COROLLA SRV-09H, SRV-12H, SROV2-18H, SROV3-27H
|
|
|
- Rebeka Szőke
- 8 évvel ezelőtt
- Látták:
Átírás
1 CONDIZIONATORE SPLIT INVERTER-MULTIINVERTER WALL MOUNTED INVERTER-MULTIINVERTER TYPE OF AIR CONDITIONER INVERTER-MULTIINVERTER SPLIT LÉGKONDICIONÁLÓ BERENDEZÉS COROLLA SRV-09H, SRV-12H, SROV2-18H, SROV3-27H

2 INDICE: Nome delle parti e le loro funzioni 3 Condizioni di operazione 3 Regolazione della direzione di flusso 4 Precauzioni 5 Fenomeni non derivanti da malfunzionamento 6 Anomalie e controlli 7 Pulizia / Manutenzione / Installazione 9 Dati tecnici 10 Telecomando 11 Identificazione delle parti 11 Pannello controllo 12 Funzioni 14 Regolazione timer 14 CONTENTS: Parts names and their functions 16 Air conditioner operation and performance 16 Adjusting air flow direction 17 Precaution 18 Phenomenia not concerning malfunctions 19 Care and maintenance 21 Cleaning / Maintenance / Installation 22 Technical parameters 23 Remote Controller 24 Unit parts identification 24 Control panel 25 Operations 27 Timer setting 29 TARTALOMJEGYZÉK: Részegységek és szerepük 30 A légkondicionáló mûködése és teljesítménye 30 A légáram beállítása 31 Óvintézkedések 32 Nem meghibásodásból eredõ jelenségek 33 Hibák és megoldások 35 Tisztítás / Karbantartás / Telepítés 36 Mûszaki adatok 37 Távirányító 38 A távirányító kezelõgombjai 38 A távirányító kijelzõje 39 Üzemmódok 41 Idõzített üzemmód 43-2-

3 NOME DELLE PARTI E LE LORO FUNZIONI UNITÁ INTERNA 1 Panello frontale 2 Ingresso d aria 3 Filtro d aria 4 Uscita d aria 5 Griglia orizzontale UNITÁ INTERNA 6 Lamelle verticali 7 Pannello display 8 Ricevitore di segnale 9 Telecomando 10 Interruttore UNITÁ ESTERNA 11 Tubo collegamento, tubo di drenaggio 12 Ingresso d aria 13 Uscita d aria L'indicatore di operazione lampeggia frequentemente (5 volte/sec) se le funzioni di protezioni sono state attivate. NOTE: Tutte le immagini del manuale hanno la sola funzione di dimostrazione. L'apparechio da Lei comprato puó essere minimamente diversa dall'immagine. Indicatori di funzioni sul panello display dell'unitá interna Il panello display della vs. unitá interna sará come una delle immagini qui sotto: Ricevitore di segnale Ricevitore di segnale 1 - Indicatore AUTO: L'indicatore si illumina quando la modalitá del funzionamento é AUTO. 2 - Indicatore DEFROST (solo modelli in pompa di calore): L'indicatore si illumina quando il condizionatore inizia a scongelare automaticamente oppure la funzione controllo aria calda é stata attivata in riscaldamento. 3 - Indicatore TEMPERATURE: Visualizza la temperatura regolata 4 - Indicatore OPERATION: L'indicatore lampeggia dopo l'accensione e rimane illuminato finché il condizionatore lavora. 5 - Indicatore TIMER: L'indicatore si illumina quando la funzione TIMER é stata attivata. Temperatura Temperatura ambiente Temperatura esterna CONDIZIONI DI OPERAZIONE Funzione Raffreddamento Riscaldamento Deumidificazione o o 17 C ~ 32 C o o 0 C ~50 C o o 17 C ~ 27 C o o -15 C ~ 34 C o o 10 C ~ 32 C o o 0 C ~50 C ATTENZIONE: 1. Se il condizionatore funziona fuori i parametri sovracitati puó attivarsi la funzione di autoprotezione che causa fenomeni anormali. 2. L umiditá relativa della stanza deve essere meno di 80%. Se il condizionatore lavora fuori tali parametri, sulla superficie dell apparecchio puó formarsi condensa. É consigliato regolare le lamelle verticali alla loro massima angolazione e selezionare la funzione di ventilazione piú potenziata. -3-

4 FUNZIONAMENTO TEMPORANEO Questa funzione serve per far fuzionare il condizionatore se il telecomando é stato smarrito o non funziona per mancanza di pile. 1. Aprire il frontale dell apparecchio, alzarlo fino al punto di bloccarlo. Non alzare il frontale piú sopra del punto in cui fermandosi si sente un leggero click. 2. Riposizionare il pulsante delle funzioni a quella automatica. 3. Chiudere fermamente il pannello frontale nell sua posizione originale. ATTENZIONE: 1. Premere una volta il pulsante Funzionamento temporaneo, il condizionatore tornerá alle seguenti funzioni: Automatica, Stop, Raffreddamento e nuovamente Automatico. 2. Premere il pulsante Funzionamento temperaneo fino a quando il LED di Funzionamento si accende, l unitá lavora con un autotest, si prega di non sceglierla. 3. Quando il LED di funzionamento si spegne, anche il condizionatore é spento. 4. Premere il pulsante apposito sul telecomando per riattivarne l uso. Leva REGOLAZIONE DELLA DIREZIONE DI FLUSSO FLUSSO ORIZZONTALE Regolare le lamelle verticali manualmente. Mentre il condizionatore é in funzione e le lamelle orizzontali sono ferme, tenere saldamente la leva denstra e sinestra e muoverle per regolare la direzione desiderata. FLUSSO VERTICALE Usare il telecomando per regolare la direzione delle lamelle orizzontali. Non posizionare il movimento delle lamelle ad un ampiezza troppo ristretta perché potrebbe compromettere l uscita dell aria durante il raffredamento o il riscaldamento. Non muvere manualmente i deflettori orizzontali, ció provocherebbe malfunzionamenti. Se il malfunzionamento si verifica é necessario spegnere l apparecchio, scollegare dalla rete elettrica per alcuni minuti, poi ricollegare e far ripartire il condizionatore. Non far funzionare per lunghi periodi con la direzione di flusso indirizzata verso sotto. Si potrebbero verificare fenomeni di condensazione e sgocciolamenti. Riaccendendo l apparecchio puó succedere che i deflettori rimangono immobili per circa 10 secondi. Al primo avviamento é naturale sentire dei rumori durante i movimento delle lamelle. -4-

5 PRECAUZIONI Si prega di leggere attentamente questo manuale prima di mettere in funzione l apparecchio e seguire rigorosamente le instruzioni, altrimenti il condizionatore potrebbe subire gravi danni o causarli a persone e cose. DA CONTROLLARE PRIMA DELL AVVIAMENTO Controllare che la messa a terra sia fatta correttamente. Controllare che il filtro sia inserito correttamente. Pulire il filtro dopo un lungo periodo di mancanza di uso. Vedere dettagli al capitolo MANUTENZIONE. Assicurarsi che l entrata o l uscita aria non siano bloccate. CONSIGLI PER USO ECONOMICO Seguire i punti sotto elencati per un funzionamento economico: Regolare la direzione dei deflettori in modo da evitare il flusso d aria diretto sulle persone. Regolare la temperatura desiderata per assicurare il massimo comfort ed evitare l eccessivo raffredamento o riscaldamento. Durante la funzione di raffredamento chiudere le tende per evitare i raggi diretti di sole. Per mantenere la temperatura raggiunta nell ambiente non aprire porte e finestre piú volte del necessario. Regolare il timer solo per il periodo desiderato. Non ostuire mai l entrata o l uscita dell aria. Potrebbe provocare un ribasso dell efficenza o il blocco di funzionamento. Il filtro intasato riduce l efficienza sia del raffreddamento che del riscaldamento, é consigliato pulirlo una volta ogni due settimane. CONDIZIONI DI SICUREZZA Non cercare di installare il condizionatore da soli. L installazione deve essere svolta da personale qualificato in ogni caso. Per assicurare un funzionamento adeguato si prega di mantenere le impostazioni dei valori descritti in questo manuale. Se il condizionatore funziona fuori tali parametri, possono verificarsi fenomeni di malfunzionamento e sgocciolamenti. Mantenere la temperatura della stanza ad un livello comfortevole specialmente in presenza di bambini. Si possono verificare fenomeni di malfunzionamento in vicinanza di corpi illuminanti o telefoni cellulari. In questi casi bisogna scollegare l apparecchio dalla rete e poi ricollegare. É necessario controllare che i bambini non abbiano acceso ai pulsanti di regolazione. Spegnere l apparecchio se la stanza resta inusata per molto tempo. Scollegare l apparecchio dalla rete elettrica prima di iniziare qualsiasi lavoro di pulizia o manutenzione. Non usare detergenti liquidi o a spray. Effettuare la pulizia con l aiuto di un panno di cotone morbido e asciutto.per evitare scosse elettriche non usare mai getti d acqua diretti sul condizionatore per pulirlo. -5-

6 PERICOLI Non introdurre mai le mani o altri corpi estranei nelle bocche di entrata o uscita aria. Il condizionatore contiene un ventilatore che gira ad alta velocitá, toccarlo provoca seri danni. Non toccare i deflettori durante il loro movimento, ció puó causare ferite alle mani. Non togliere la cassa del ventilatore dell unitá esterna per evitare danni. Non usare mai getti d acqua diretti sul condizionatore o sul telecomando per evitare scosse elettrice. Non tenere materiale inflammabile come p.e.: lacca per capelli, spray e gasolio nelle vicinanze dell apparecchio. In caso di fenomeni anormali come eccessivo rumore, cattivo odore, fumo, rotture, é necessario spegnere il condizionatore e contattare il Centro Assistenza. Non cercare mai di riparare l apparecchio da soli! É vietato lasciar usare il condizionatore senza il controllo di adulti a bambini, anziani e persone inferme. Assicurarsi che i bambini non abbiano l occasione di giocare con il condizionatore. É necessario controllare che i bambini non abbiano acceso ai pulsanti di regolazione. FENOMENI NON DERIVANTI DA MALFUNZIONAMENTO I fenomeni sottoelencati non derivano da malfunzionamenti: 1. Il condizionatore non funziona Il condizionatore non comincia a funzionare immediamente dopo l accensione. Bisogna aspettare per cca. 3 minuti perché l apparecchio riprenda il suo lavoro.il LED di funzionamento e quello di sbrinamento si accendono contemporanemente, la funzione scelta é quella di riscaldamento. Per tornare alla temperatura preimpostata, il condizionatore svolge un lavoro di autocontrollo. 2. Dall unitá interna esce vapore Il raffredamento viene effettuato in una stanza con alto tasso di umiditá relativa (dove si conservano oli o polveri). Se nell unitá interna lo scorpo é eccessivo, la temperatura non risulterá uniforme nei vari punti del locale. É necessario pulire l unitá. Questo lavoro richiede l intervento di personale qualificato. Se il condizionatore raffredda bene dopo lo sbrinamento, l acqua deve uscire sotto forma di vapore. 3. Il rumore é eccessivo Durante il funzionamento del condizionatore si sente un leggero soffio. Questo é causato dal flusso del Freon tra le due unitá. Si sente un leggero soffio anche durante lo sbrinamento o appena dopo l arresto di questa funzione. Ció é causato dal cambiamento del volume di flusso del Freon. Si sente un leggero click all accensione o allo spegnimento dell apparecchio. Ció é causato dal movimento dei deflettori. 4. Dall unitá interna esce polvere Questo fenomeno puó verificarsi solo nel caso di un primo riavvio dopo un lungo periodo di conservazione fuori stagione. 5. Dall unitá interna esce cattivo odore. Succede se i muri e i mobili sono impregnati di cattivo odore o fumo, e il condizionatore ricircola questa aria. 6. Ad un certo punto del raffredemento il condizionatore ritorna alla funzione di ventilazione. Per evitare la formazione di brina l apparecchio torna automaticamente alla ventilazione, la funzione di raffreddamento tornerá dopo non molto. Quando la temperatura interna raggiune quella preimpostata, il compressore si ferma per dare inizio alla funzione di ventilazione, e riparte quando la temperatura nuovamente risale. -6-

7 7. Ad un certo punto del riscaldamento il condizionatore ritorna alla funzione di ventilazione. Quando la temperatura interna raggiunge quella preimpostata, il compressore si ferma per dare inizio alla funzione di ventilazione, e riparte quando la temperatura nuovamente riscende. 8. Se l umiditá relativa é piú alta del 85%, sulla superficie si possono verificare fenomeni di condensazione. 9. Funzione di sbrinamento Se l unitá esterna presenta brina, l efficienza del riscaldamento si riduce. La funzione di sbrinamento si attiva in condizione di necessitá. Nel frattempo il compressore funziona, ma il ventilatore no. Il riscaldamento ricomincia se lo sbrinamento é terminato. 10. Riscaldamento Durante la funzione di riscaldamento il condizionatore porta nel locale il calore estraibile dall aria esterna. Se la temperatura esterna si abbassa, di conseguenza anche la capacitá di riscaldamento si riduce. 11. Controllo aria calda Durante il riscaldamento (anche in funzione automatica) la velocitá del ventilatore interno é sensibilmente ridotto per prevenire un raffreddamento interno eccessivo, quindi la funzione automatica dello sbrinamento. Il LED rimane acceso fino a quando la temperatura richiesta non é stata raggiunta nelle seguenti 3 situazioni: A. La funzione di riscaldamento é appena stata avviata. B. Lo sbrinamento é appena finito. C. La temperatura esterna é estremamente bassa. 12. La protezione 3 minuti Una protezione interna cca. 3 minuti non permette l avviamento dopo lo spegnimento. ANOMALIE E CONTROLLI In caso dei malfunzionamenti sottoelencati spegnere immediamente il condizionatore e chiamare il Centro Assistenza: Problema L indicatore di funzionamento lampeggia velocemente (5 volte al secondo) Il lampeggiare del LED continua anche dopo aver spento e riacceso il condizionatore) Il fusibile si brucia frequentemente o l interruttore spesso si attiva Corpi estranei o acqua sono stati introdotti nel condizionatore. Il ricevitore segnali o il pulsante di accensione non funzionano. In qualsiasi altro caso di malfunzionamento. -7-

8 Disturbo Il condozionatore non funziona Non raffredda o riscalda sufficientemente Le pile del telecomando sono scariche La temperatura impostata é troppo alta o troppo. bassa Il filtro é sporco Causa La corrente elettrica é interatta O La spina elettrica non é collegata É stata impostata la funzione timer L entrata o uscita aria dell unitá esterna é bloccata Cambiare le pile Aspettare o cancellare la funzione preimpostata del timer Impostare una temperatura piú comfortevole Pulire il filtro Pulire il boccagli Soluzione Aspettare il ripristino, il condizionatore automaticamente riparte Collegare la spina elettrica Non raffredda o riscalda Le porte o le finestre sono aperte L entrata o uscita aria dell unitá esterna é bloccata É attiva la protezione di 3 minuti É stata impostata una temperatura non adeguata Chiuderle Pulire i boccagli e riaccendere l apparecchio Aspettare Reimpostare la temperatura Se il problema continua a presentarsi, si prega di contattare il Centro Assistenza ed informarli dettagliatamente del disturbo. ATTENZIONE: Non cambiare mai il cavo di alimentazione da soli per evitare danni a persone. -8-

9 PULIZIA Scollegare l apparecchio dalla rete elettrica prima di iniziare qualsiasi lavoro di pulizia. 1. Usare un panno asciutto per la pulizia dell unitá interna e del telecomando. 2. Se l unitá interna é troppo sporca si puó usare un panno leggermente bagnato. ATTENZIONE: Non usare panni trattati con agenti chimici. Non usare benzina, polveri o altri solventi. Potrebbero provocare danni alla cassa in PVC. PULIZIA DEL FILTRO Pulizia del filtro Rimozione del filtro Un filtro intasato riduce l efficienza di raffredamento. Pulire il filtro frequentemente. 1. Alzare il pannello frontale fino a bloccarlo.non cercare di spingere il pannello oltre al punto in cui ha fatto un leggero click. Afferrare il filtro al centro e tirarlo fuori verso sotto. 2. Usare un aspirapolvere per rimuovere efficacemente la polvere. 3. Reinserire il filtro cominciando dalla parte superiore, poi pressando leggermente tenendo ai 2 MANUTENZIONE Le parti interne dell unitá esterna richiedono una pulizia accurata, si prega di contattare il Centro Assistenza. Accorgamenti per una conservazione fuori stagione: 1. Controllare se i boccagli di entrata aria sono liberi, se no, provvedere alla pulizia. 2. Far funzionare il ventilatore per cca. mezza giornata per asciugare bene le parti interne. 3. Spegnere il condizionatore e scollegarlo dalla rete. Togliere le pile del telecomando. INSTALLAZIONE ATTENZIONE L installazione del condizionatore d aria puó essere effettuata solamente da personale qualificato. Se il rumore che si sente durante il funzionamento dell apparechio non é quello solito contattare il rivenditori presso il quale il condizionatore é stato acquistato. In caso di necessitá di cambiare posizione al condizionatore contattare il rivenditore. -9-

10 MANUALE D'USO TELECOMANDO INDICE Specificazioni del telecomando Prestazioni Identificazione dei pulsanti di funzionamento Denominazioni e funzioni delle finestre del pannello display Uso del telecomando Precauzioni ATTENZIONE Il condizionatore d'aria non puó funzionare se la trasmissione dei segnali é ostacolata da alcun oggetto o materiale. Non lasciare entrare liquidi nel telecomando. Non esporre il telecomando ai raggi solari o a temperatura alta. Non esporre l'unitá interna ai raggi diretti di sole perché il suo funzionamento puó essere compromesso. Altri apparecchi elettrici possono disturbare il Leggere attentamente il manuale d'uso prima di funzionare l'unitá e tenerlo in un posto sicuro per futura consulenza. -11-

11 Specificazioni del telecomando Modello: R71A/E Voltaggio: 3,0 V Voltaggio dell'emettitore di Segnale del Panello di Controllo: 2,0 V Portata: 8m (11m usando 3,0 V) Raggio della temperatura ambiente: -5 ~ 60 C Prestazioni 1. Modalitá di funzionamento: FREDDO, CALDO, DEUMIDIFICATORE, VENTOLA, AUTOMATICO 2. Funzione regolazione timer a 24 ore 3. Raggio della temperatura interna : C. 4. LCD panello di funzioni. Identificazione dei pulsanti di funzionamento 1 - Pulsante On/Off: Premere questo pulsante per far funzionare l'unitá, premere nuovamente per spegnere. 2 - Pulsante Modalitá (MODE): Premere il pulsante Modalitá per cambiare la modalitá del funzionamento nell'ordine: AUTO - FREDDO - DEUMIDIFICATORE - CALDO - VENTOLA - AUTO ATTENZIONE CALDO puó essere selezionato solo per le unitá in pompa di calore. 3 - Pulsante A: premere il pulsante per aumentare la temperatura impostata (mass. 30 gradi) 4 - Pulsante V: premere il pulsante per abbassare la temperatura impostata (min. 17 gradi) 5 - Pulsante FAN: Premendo questo pulsante si seleziona la velocitá della ventola nell'ordine: AUTO BASSA MEDIA ALTA, Quando l'unitá opera nella modalitá AUTO o DEUMIDIFICATORE (DRY), la velocitá della ventola é preimpostata. 6 - Pulsante SLEEP/TURBO: Premere questo pulsante per selezionare la modalitá SLEEP o TURBO nell'ordine: SLEEP SLEEP OFF TURBO TURBO OFF Non é possibile adoperare questa funzione nelle modalitá DEUMIDIFICATORE O VENTOLA. 7 - Pulsante SWING: Premere questo pulsante per attivare la funzione oscillazione. Premere nuovamente per disattivare. 8 - Pulsante AIR DIRECTION: Premere questo pulsante per regolare la direzione del flusso d'aria. L'angolazione dei deflettori cambia di 6 gradi per ogni volta premuta. Se i diflettori sono in un'angolazione che inluenzerebbe la prestazione del condizionatore, la direzione del flusso sará automaticamente cambiata. Nessuno segnale indica questa impostazione sul display. 9 - Pulsante TIMER On: Premere questo pulsante per attivare la funzione auto-accensione.. Premendo una volta il periodo impostato si aumenta di 30 minuti. Se sul display si visualizza 10Hr, si aumenta di 60 minuti premendo una volta. Per cancellare l'impostazione dell'auto-accensione, continuare a premere finché niente é visualizzato sul display Pulsante TIMER Off: Premere questo pulsante per attivare la funzone auto-spegnimento Premendo una volta il periodo impostato si aumenta di 30 minuti. Se sul display si visualizza 10Hr, si aumenta di 60 minuti premendo una volta. Per cancellare l'impostazione dell'auto-accensione, continuare a premere finché niente é visualizzato sul display. -12-
: Premere il pulsante Modalitá per cambiare la modalitá del funzionamento nell'ordine: AUTO - FREDDO - DEUMIDIFICATORE - CALDO - VENTOLA - AUTO ATTENZIONE CALDO puó essere")
12 DENOMINAZIONI E FUNZIONI DELLE FINESTRE DEL PANNELLO DISPLAY DEL TELECOMANDO 1 - Indicatore TRASMISSIONE (TRANSMISSION): Si illumina quando il telecomando trasmette segnali all'unitá interna 2- Indicatore MODALITÁ (MODE): Indica l'attuale modalitá d'operazione: AUTO FREDDO DEUMIDIFICATORE CALDO VENTOLA 3- Indicatore TEMPERATURA (TEMPERATURE): Visualizza la temperatura regolata (da 17 a 30 gradi) 4 - Indicatore VELOCITÁ VENTOLA (FAN SPEED): Visualizza la velocitá della ventola: AUTO BASSA MEDIA ALTA. Visuaizzano I segni se la modalitá AUTO o DEUMIDIFICATORE é attivata. 5 - Indicatore NOTTE/TURBO (SLEEP/TURBO): Premendo questo pulsante si attiva la funzione NOTTE, si cancella premendo ancora. Premendolo ancora si attiva la funzione TURBO, si cancella premendolo ancora. Non si visualizza niente sul display quando la modalitá d'operazione é DEUMIDIFICATORE o VENTOLA. 6 - Indicatore OSCILLAZIONE (SWING): l'indicatore si illumina quando la funzione OSCILLAZIONE é attiva. 7 - Indicatore TIMER: Visualizza l'intervallo dell'operazione (da 0,5 a 24 ore) ATTENZIONE: I segnali disegnati sopra hanno la sola funzione di dimostrazione. Durante il lavoro del condizionatore verrano visualizzati solamente i segnali correspontenti alle funzioni del momento. PREPARAZIONE DEL TELECOMANDO Cambio delle pile Il telecomando funziona con 2 pile alcaline. Non inserire batterie ricaricabili.. Rimuovere il pannellino di copertura delle pile facendolo scivolare nella direzione della freccia. Togliere le pile usate ed inserire correttamente quelle nuove. Rimettere il pannellino. ATTENZIONE: Non usare pile differenti o usate per il cambio. Possono causare il malfunzionamento del telecomando. Se il telecomando non viene usato per piú settimane é consigliato togliere le pile altrimenti si potrebbe danneggiare. La durata delle pile in generale é di 6 mesi cca. Cambiare le pile se l'unitá interna non riceve i segnali o se l'indicatore di trasmissione segnali del telecomando non é acceso. OPERAZIONE AUTOMATICA Dopo l'installazione, collegare il condizionatore con la rete elettrica e l'indicatore OPERAZIONE sul display dell'unitá interna inizia a lampeggiare. Premere il pulsante MODALITÁ per selezionare AUTO Adoperare i pulsanti A e V per impostare la temperatura desiderata. La temperatura ideale é fra i 21e 28 gradi. Premere i il pulsante ON/OFF, il condizionatore inizia a funzionare. L'indicatore OPERAZIONE sul display dell'unitá interna é acceso. La modalitá di funzionamento é AUTO, la velocitá della ventola é automaticamente impostata. Premere nuovamente il pulsante ON/OFF per spegnere. ATTENZIONE Nella modalitá AUTO, la modalitá CALDO, FREDDO, DEUMIDIFICATORE, VENTOLA é automatica selezionata dal condizionatore in base alle condizioni attuali nella stanza. Se la modalitá AUTO non é al Suo gradimento, la modalitá puó essere impostata manualmente. -13-
: Premendo questo pulsante si attiva la funzione NOTTE, si cancella premendo ancora.")
13 Modalitá FREDDO, CALDO, VENTOLA Nel caso in cui la modalitá AUTO non é conveniente, é possibile cambiare la modalitá adoperando i pulsanti, FREDDO, CALDO (solo modelli in pompa di calore), DEUMIDIFICATORE, VENTOLA. Premere il pulsante V o A per impostare la temperatura desiderata. Nella modalitá FREDDO la temperatura consigliata da impostare é 21 o piú alta. Nella modalitá CALDO la temperatura consilgliata é 28 gradi meno. Premere il pulsante VENTOLA (FAN) per selezionare l'operazione desiderata tra AUTO, BASSA, ALTA, MEDIA Premere il pulsante On/Off. Si illumina l'indicatore e il condizionatore inizia a funzionare secondo le impostazioni. Premere nuovamente il pulsante On/Off per spegnere. ATTENZIONE Durante l'operazione solo VENTOLA (FAN ONLY) la temperatura dell'ambiente non é controllabile, quindi non é necessario impostarla. Modalitá DEUMIDIFICATORE Premere il pulsante MODALITÁ (MODE) per selezionare la modalitá DEUMIDIFICATORE (DRY). Premere il pulsante V o A per regolare la temperatura fra 21 e 28 gradi. Premere il pulsante On/off. Si illumina lindicatore e il condizionatore inizia a funzionare in modalitá DEUMIDIFICATORE. Premere nuovamente il pulsante On/Off per spegnere. ATTENZIONE Grazie alla differenza della temperatura impostata e quella dell'ambiente, in questa modalitá il condizionatore opera automaticamente tante volte senza far funzionare le modalitá VENTOLA e FREDDO. OPERAZIONE TIMER Premere il pulsante TIMER on/off per regolare gli orari di accensione e spegnimento dell'unitá. Il periodo di funzionamento impostato deve essere fra 0,5 e 24 ore. 1. Regolazione dell'accensione 1.1 Premere il pulsante Timer off, sul display verranno visualizzati OFF TIMER, l'ultimo orario impostato piú il segnale Hr, Adesso si puó procedere per la modifica dell'orario dello spegnimento. 1.2 Premere nuovamente il pulsante Timer off per impostare l'orario desiderato. Dopo la regolazione del timer il segnale sará trasmesso all'unitá in 1-1,5 secondi. 2.Regolazione dell'orario dello spegnimento 2.1 Premere il pulsante Timer off, sul display verranno visualizzati OFF TIMER, l'ultimo orario impostato piú il segnale Hr, Adesso si puó procedere per la modifica dell'orario dello spegnimento. 2.2 Premere nuovamente il pulsante Timer off per impostare l'orario desiderato. 2.3 Dopo la regolazione del timer il segnale sará trasmesso all'unitá in 1-1,5 secondi. 3. Regolazione del orario dell'accensione/spegnimento 3.1 Premere il pulsante Timer On, sul display verranno visualizzati ON TIMER, 'ultimo orario impostato piú il segnale Hr.. Adesso si puó procedere per la modifica dell'orario dell'accensione Premere nuovamente il pulsante Timer on per impostare l'orario desiderato. 3.3 Premere il pulsante Timer off, sul display verranno visualizzati OFF TIMER, l'ultimo orario impostato piú il segnale Hr, Adesso si puó procedere per la modifica dell'orario dello spegnimento. 3.4 Premere nuovamente il pulsante Timer off per impostare l'orario desiderato. 3.5 Dopo la regolazione del timer il segnale sará trasmesso all'unitá in 1-1,5 secondi. ATTENZIONE Se sia per l'attivazione che la disattivazione sono stati impostati orari uguali, l'orario dello spegnimento viene automaticamente modificato di 0,5 ora (se l'orario impostato é inferiore a 10Hr) di 1,0 ora ( se l'orario impostato é superiore a 10Hr) Per modificare l'orario impostato, premere il corrispondente pulsante Timer. L'orario impostato é relativo all'ora visualizzata sul display. -14-

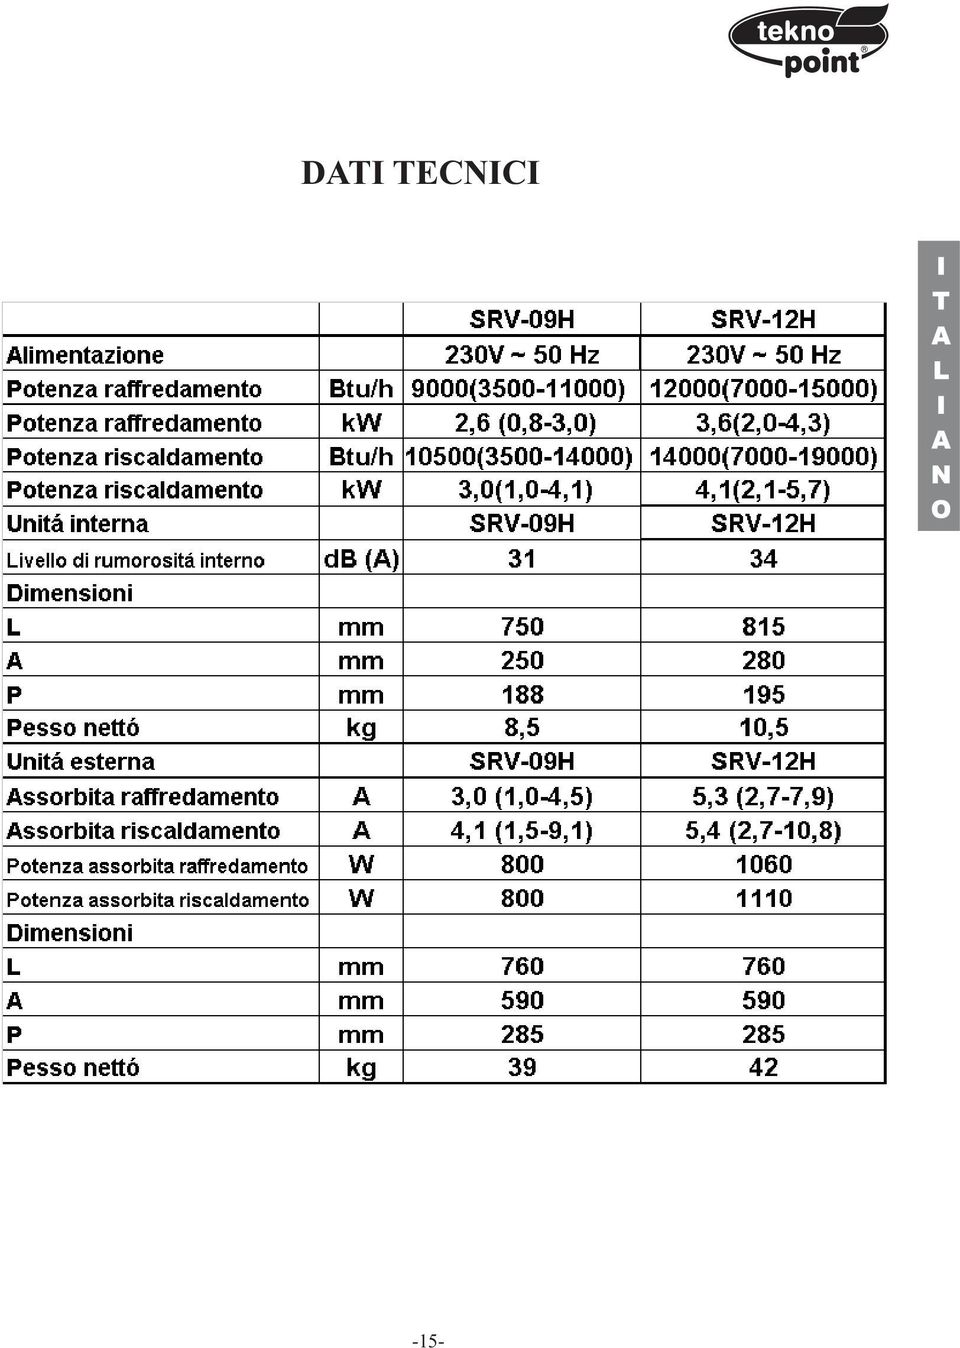
14 DATI TECNICI -15-
15 PARTS NAMES AND THEIR FUNCTIONS INDOOR UNIT 1 Front panel 2 Air inlet 3 Air filter 4 Air outlet 5 Horizontal air flow grille 6 Vertical air flow louver 7 Display panel 8 Infrared signal receiver 9 Remote controller 10 Manual controll button OUTDOOR UNIT 11 Drain hose, refrigerant connecting pipe 12 Air inlet (side and rear) 13 Air outlet The operation indicator lights flash rapidly (five times per second.) when safety protection features come into operation. NOTE: All the pictures in this manual are for explanation purpose only. They may be slightly different from the air conditioner you purchased(depend on model). The actual shape shall prevail. Function indicators on indoor unit display panel The display panel of indoor unit will look like one of the following pictures: Signal receptor Signal receptor 1 - AUTO indicator This indicator illuminates when the air conditioner is in AUTO operation. 2 - DEFROST indicator (For Cooling & Heating models only) This indicator illuminates when the air conditioner starts defrosting automatically or when the warm air control feature is activated in heating operation. 3 - TEMPERATURE indicator Displays the temperature settings when the air conditioner is operational. 4 - OPERATION indicator This indicator flashes after power is on and illuminates when the unit is in operation. 5 - TIMER indicator This indicator illuminates when TIMER is set ON/OFF. Temperature Room temperature Outdoor temperature AIR CONDITIONER OPERATION CONDITIONS Mode Cooling operation Heating operation Drying operation o o 17 C ~ 32 C o o 0 C ~50 C o o 17 C ~ 27 C o o -15 C ~ 34 C o o 10 C ~ 32 C o o 0 C ~50 C CAUTION: 1. If air conditioner is used outside of the above conditions, safety protection features may come into operation and cause the unit works abnormal. 2. Room relative humidity less than 80%. If the air conditioner operates in excess of this figure, the surface of the air conditioner may attract condensation. Please sets the vertical air flow louver to its maximum angle (vertically to the floor), and set HIGH fan mode. 3. Optimum performance will be achived within these operating temperature. -16-
. The actual shape shall prevail.")
16 TEMPORARY OPERATION This function is used to operate the unit temporarily in case you misplace the remote controller or its batteries are exhausted. 1. Open the pane land, lift the panel up to an angle where it remains fixed. Do not lift the panel any further when it stops with a clicking sound. 2. Turn the switch to AUTO position and the air conditioner will run under AUTO mode. 3. Close the panel firmly to its original position. CAUTION: Once you push the temporary button, the air conditioner will run in such order: AUTO, COOL, OFF, and back to AUTO. Push the temperary button until the OPERATION lamp is lit, the unit is on the mandatory COOL mode, this is used to test only, please don t choose it When the OPERATION lamp goes off, the air conditioner is OFF. Push the button on the remote controller will restore the remote operation. ADJUSTING AIR FLOW DIRECTION Adjusting the Horizontal Air Flow Lever Please move the louver to adjust the air-flow direction as required manually. When the unit is operating and horizontal louvers are on certain position, take hold of the left or right lever on the horizontal louvers and move them to adjust the air flow direction as required. Adjusting the Vertical Air Flow Please use the remote controller to adjust horizontal louvers so as to adjust the vertical air flow direction. The starting angle of the horizontal louver should not be too small, or the narrow air outlet will affect cooling or heating. Do not move the horizontal louver manually, or it may malfunction during operation. Lf the malfunction happens, please stop operating, unplug for several minutes then plug again and restart. Do not operate the air conditioner for long with the airflow direction set downward during the cooling or drying operation. Otherwise, condensation may occur on the surface of the vertical louver and cause dew dripping. When the air conditioner restarts the vertical louver might not move for 10 seconds or so. At the first time to operate, there may be some noise when horizontal louver is turning, it is under control. -17-

17 PRECAUTION Please read this User s Manual carefully before operation and strictly follow the operation method, or the unit may be seriously damaged and cause injury or property damage. CHECKS BEFORE OPERATION Check that the ground wiring is not broken off and is connected well. Check that the air filter is installed well. Clean the air filter at first after a long time rest. Refer to CARE AND MAINTENANCE for detail. Be sure that air inlet and air outlet of the indoor and outdoor units are not blocked. HINTS FOR ECONOMICAL OPERATION The following should be noticed to ensure an economical operation. (Refer to corresponding chapter for details) Adjusting the airflow direction properly to avoid winding toward your body. Adjusting the room temperature properly to get a comfortable situation and to avoid supercooling and superheating. In cooling, close the curtains to avoid direct sunlight. To keep cool or warm air in the room, never open doors or windows more often than necessary. Set the timer for the desired operating time. Never put obstructions near the air outlet or the air inlet. Or it will cause lower efficiency, even a sudden stop. A clogged air filter will reduce cooling or heating efficiency, please clean it once two weeks. SAFETY INFORMATION Do not attempt to install this unit yourself. This unit requires installation by qualified persons. For proper performance, operate the unit under the usable operating temperature and humidity conditions indicated in this user s manual. If the unit is operated beyond these conditions, it may cause malfunctions of the unit or dew dripping from the unit. Maintain room temperature at comfortable level, especially there is old, infirm person and children. Lightning, automobiles nearby and mobile phone operating may cause the unit to malfunction. Please disconnect the unit with the power and then connect the unit with the power again. Children should be supervised to ensure that they do not play with the main switch, which must be unavailable to them. When it is raining, please shut down the main switch to avoid accidents. It is better to shut down the unit if you plan to leave for a long time. To prevent accident, turn off the power or disconnect the power supply plug before beginning any cleaning or other routine maintenance. Do not use liquid cleaners or aerosol cleaners, use a soft and dry cloth for cleaning. -18-

18 DANGER Never put hands or objects into the air outlet of indoor and outdoor units. These units contain a fan running at high speed. Touching the moving fan will cause serious injury. Do not touch the grill while the airflow louver is running. Or your finger or machine parts may be hurt. Do not remove the fan hood from the outdoor unit, without that it is very dangerous. To avoid the risk of serious electrical shock. Never sprinkle or spill water or liquid on the indoor unit and the remote controller. To avoid the risk of fire, please keep inflammables such as hair-glue, spray lacquer and gasoline away from the air conditioner. If there is any abnormal phenomenon, such as noise, smell, fog, high temperature, leakage, please turn off the power and connect to our dealer. Never service the unit yourself. Children or infirm persons without supervision do not intend the appliance for use. Children should be supervised to ensure that they do not play with the unit. PHENOMENIA NOT CONCERNING MALFUNCTIONS The following symbols do not mean the unit is abnormal. 1. No operation The unit does not work immediately after the ON/OFF button is pushed. The lighting OPERATION lamp indicated a normal performance. The cause is that a Protection feature prevents the air conditioner from being activated for approximately 3 minutes when it is restarted immediately after operation. If OPERATION lamp and DEF./PRE-DEF. lamp lights at the same time, the HEATING mode is selected. The low temperature right after restarting will activate the Warm Air control. (Refer to the COOLING/HEATING (cooling only type without) /FAN ONLY chapter) 2. A white mist of chilled air is generated from the indoor unit Cooling in a room with a high relative humidity ( in a place with much oil mist or dusts). The room temperature will be uneven if there is much filth inside the indoor unit. In this case, cleaning is necessary. This work requires qualified person. If the air conditioner heats right after defrosting, the water will be sent out in the form of steam. 3. Noise A kind of continuous low sound of hiss could be heard while the air conditioner is on operation. This is caused by Freon flowing between the indoor and outdoor units. A kind of hiss could be heard during the time of defrosting or right after stop. This is caused by Freon changing its flow volume or not flowing any more. A kind of squeak will be heard while the air conditioner is on or off operation. This is caused by the inflation or deflation of the plastics of the unit due to the temperature fluctuation. 4. Dusts are blown out of the indoor unit. This occures only in the case of the first use after a longtime rest. 5. Bad odor is coming out from the indoor unit. This is because the indoor unit gives off the smell impregnated from the wall, furniture, or smoking. 6. Turning to FAN ONLY while COOLING To prevent the heat exchanger from frosting, turn to FAN ONLY mode automatically and the COOLING mode will be restored before long. When the room temperature reaches the set one, the compressor will stop to turn to FAN ONLY, and start again until room temperature increase to the set one. -19-

19 7. Turn to FAN ONLY while HEATING. When the room temperature reaches to the set one, the compressor will stop to turn to FAN ONLY, and start again until room temperature drop to the set one. 8. When room relative humidity is more than 85%, the surface of the air conditioner may attract condensation. 9. Defrosting operation If the outdoor unit is frosted during heating operation, the heat ability will be reduced. Then defrosting is started automatically after running for a while under the condition of frosting. Meanwhile the compressor is continuous running but the fans stop. The heating will resume after defrosting is over. 10. Heating operation In the heating operation, the air conditioner absorbs the heat outside the room and bring it into the room, if the outdoor temperature is too low, the air outlet temperature is reduced correspondingly. As the outdoor temperature decreasing, the heat ability will be reduced. 11. Warm air control Under the HEAT mode (including heat under AUTO mode), the indoor fan speed is automatically reduced or stopped to prevent a cold draft and the DEF./PRE-DEF. Lamp will be on if the set temperature has not been reached. Under the following three situations: A. Heating just starts B. Defrosting has just finished C. Outdoor temperature is extremely low. 12. Three-minute protection feature A protection feature prevents the air conditioner from being activated for approximately 3 minutes when it is restarts immediately after operation. -20-

20 CARE AND MAINTENANCE TROUBLES AND CAUSES ABOUT THE AIR CONDITIONER If any of the following conditions occur, stop the air conditioner immediately, set off the power switch, and contact the dealer: Category of Troubles The indicator lamps flash rapidly (five times per second), you disconnect the unit with the power and then connect the unit with the power again after two or three minutes but the lamps still flash. The fuse is blown frequently or the circuit breaker is tripped frequently. Foreign matter or water has fallen inside the air conditioner. Infrared signal receiver is misfunction or switch operations are erratic. Any other unusual condition is observed. Troubles Power failure Cause Disposal Wait for power restoring, the airconditioner will automatically restart. Inoperative Does not cool or heat well Does not cool or heat at all The power supply is disconnected. The batteries in the remote controller are exhausted. The timer is set. The temperature setting is too high or. too low The air filter is clogged with dust The air inlet or outlet of the outdoor unit is blocked Clear up the block Doors or windows are open The air inlet or outlet of the outdoor unit is blocked Three-minute protection feature Unapproriate temperature setting Connect the power supply plug Change the batteries Wait or cancel timer setting Set a more comfortable temperature. Clean the filter Clear up the block Close the doors or windows Clear up the block first, then begin to operate. Wait for a while Set the temperature properly If the problem is still existing, please connect our dealer and inform them the product model and troubles in detail. CAUTION: To avoid danger, do not change the power wiring neither service the unit yourself. -21-

21 CLEANING It is necessary to stop the air conditioner and disconnect the power supply plug before cleaning. 1. Use a dry cloth to wipe the indoor unit and remote controller. 2. A cloth dampened with cold water may be used on the indoor unit if it is very dirty. CAUTION: Do not use a chemical-treated duster for wiping or leave such material on the unit for long. Do not use benzine, thinner, polishing powder, or similar solvents for cleaning. These may cause theplastic surface to crack or deform. CLEANING THE AIR FILTER Air refresher Filter Handle A clogged air filter reduce cooling efficiency. Clean it frequently. 1. You can lift the panel up to an angel where it will remain fixed. Do not lift the panel any further when it stops with a clicking sound. Take hold of the middle of the filter and pull it out downward. 2. Use a vacuum cleaner to remove the dust or wash the air filter. 3. Insert the upper portion of air filter confirming to fit its right and left edges on the indoor unit until it is firmly set. MAINTENANCE The inner machine in the outdoor unit requires termly inspection and cleaning, please connect with our dealer. If you do not plan to use the unit for a long time: Checking if the air inlet and outlet on the indoor unit and outdoor unit are blocked, and clear them. Operate the fan for about half a day to dry the inside of the unit. Stop the air conditioner and disconnect power. Remove the batteries from the remote controller. INSTALLATION NOTICE The air conditioner installation must be done by authorised person!!!! If the air conditioner sounds abnormal during operation, contact the dealer where you purchased the air conditioner. If you move out or if it is desired to relocate the air conditioner, consult your dealer. -22-
22 OWNERS M ANUAL REMOTE CONTROLLER CONTENTS - Remote Controller Specifications - Performance Features - Introduction of Function Buttons on the Remote Controller - Names and Functions of indicators on Remote Controller - Operating the Remote Controller Warning 1. Be sure there are no barriers between the remote controller and the receiver of indoor unit otherwise the air conditioner will not work. 2. Keep the Remote Controller away from all liquids. 3. Protect the Remote Controller from high temperatures and exposure to radiation. 4. Keep the indoor receiver out of direct sunlight or the Air Conditioner may malfunction. 5. Keep controller away from EMI (Electro-Magnetic Interference) supplied by other household appliances. Please read carefully and thoroughly this manual before operating this unit and save it in a safe place for future reference. -24-
23 Remote Controller Specifications Model: R71A/E Rated Voltage: 3.0V Lowest Voltage of CPU Emitting Signal: 2.0V Reaching Distance: 8m (when using 3.0 voltage, it Gets 11m) Environment Temperature Range: -5 C ~ 60 C Performance Features 1. Operating Mode: COOL HEAT DRY FAN only and AUTO. 2. Timer Setting Function in 24 hours. 3. Indoor Setting Temperature Range : 17 C~30 C. 4. LCD (Liquid Crystal Display) of functions. Introduction of Function Buttons on the Remote Controller 1 - On/off Button: Push this button to start the unit operation. Push the button again to stop the unit operation. 2 - Mode Button: Each time you press the button, a mode is selected in a sequence that goes from AUTO COOL DRY HEAT and FAN only as the following figure indicates: AUTO - COOL - DRY - HEAT - FAN - AUTO NOTE: HEAT only for Heat Pump 3 - Button : Push the button to increase the indoor temperature setting to Button : Push the button to decrease the indoor temperature setting to Fan Button: This button is used for selecting Fan Speed. Each time you press the button, a fan speed is selected in a sequence that goes from AUTO LOW MED to HIGH, then back to Auto. When you select the AUTO or DRY mode, the fan speed will be automatically controlled and you can not set the fan speed. 6 - Sleep/Turbo Button: Press this button to select SLEEP or TURBO mode. Each time you press the button, the operation mode is shifted in the direction of the arrow. When the operation mode is either DRY or FAN only, this function can not be used. SLEEP - SLEEP - OFF - TURBO - TURBO - OFF - SLEEP 7 - Swing Button: Press the SWING button to activate the swing feature. Push the button again to stop. 8 - Air direction Button: Press this button to change the swing o angle of the louver. The swing angle of the louver is 6 C for each press. When the louver swing at a certain angle which would affect the cooling and heating effect of the air conditioner, it would automatically change the swing direction. No symbol will appear in the display area when press this button. 9 - Timer on Button: Press this button to initiate the auto-on time sequence. Each press will increase the auto-timed setting in 30 minutes increments. When the setting time displays 10Hr, each press will increase the auto-timed setting 60 minutes increments. To cancel the auto-timed program, continue pressing the button until nothing displays Timer off Button: Press this button to initiate the auto-off time sequence. Each press will increase the auto-timed setting in 30 minutes increments. When the setting time displays 10Hr, each press will increase the auto-timed setting 60 minutes increments. To cancel the auto-timed program, continue pressing the button until nothing displays. -25-
24 Names and Functions of indicators on Remote Controller Display Panel 1 - TRANSMISSION Indicator: This indicator lights when remote controller transmits signals to indoor unit. 2 - MODE indicator: Displays the current operation modes. Including AUTO, COOL, DRY, HEAT or FAN. HEAT only available for heat pump model. 3 - TEMPERATURE indicator: Displays the temperature settings (17 C to 30 C). 4 - FAN SPEED indicator: Displays the selected fan speed, AUTO and three fan speed levels LOW, MED, HIGH. Displays (flashing) when the operating mode is either AUTO or DRY. 5 - SLEEP/TURBO indicator: Each time the Sleep/Turbo button is pushed, the signal displays in the following sequence: SLEEP - Nothing - TURBO - Nothing - SLEEP Nothing appears when the operating mode is either DRY or FAN only. 6 - SWING indicator: This indicator lights up when the SWING button is pressed. 7 - TIMER indicator: The time set for timer operation is indicated. (0.5 ~ 24 hours) NOTE: All items are shown in the Fig.2 for the purpose of clear presentation But during the actual operation only the relative functional items are shown on the display panel. -26-
25 Operating the Remote Controller Install / Replace Batteries Use two alkaline dry batteries (R03/LR03X2). Do not use rechargeable batteries. (1) Remove the battery cover by pulling it according to the arrow direction. (2) Insert new batteries making sure that the (+) and (-) of battery are installed correctly. (3) Reattach the cover by sliding it back into position. NOTE When the Air Conditioner is ready for use, switch on the power and the OPERATION indicator lamp on the display panel of the indoor unit starts flashing. 1. Use the Mode select button to select AUTO. 2. Push the or button to set the desired room temperature. The most comfortable temperature settings are between 21 C to 28 C. 3. Push the On/off button to start the air conditioner. The OPERATION lamp on the display panel of the indoor unit lights. The operating mode is AUTO. The FAN SPEED is automatically controlled. 4. Push the On/off button again to stop the unit operation. AUTOMATIC OPERATION 1. When replacing batteries, do not use old batteries or a different type battery. This may cause the remote controller to malfunction. 2. If you do not use the remote controller for several weeks remove the batteries. Otherwise battery leakage may damage the remote controller. 3. The average battery life under normal use is about 6 months. 4. Replace the batteries when there is no answering beep from the indoor unit or if the Transmission Indicator light fails to appear. NOTE 1. In the AUTO mode, the air conditioner can logically choose the mode of COOL, FAN, HEAT and DRY by sensing the difference between the actual ambient room temperature and the set temperature on the remote controller. 2. If the AUTO mode is not comfortable for you, the desired mode can be selected manually. COOL, HEAT, and FAN ONLY Operation 1. If the AUTO mode is not comfortable, you may manually override the settings by using COOL, DRY, HEAT( HEAT PUMP units only), or FAN ONLY modes. 2. Push the or button to set the desired room temperature. When in COOLING mode, the most comfortable settings are 21 C or above. When in HEATING mode, the most comfortable settings are 28 C or b elow. 3. Push the Fan button to select the FAN mode of AUTO, HIGH, MED or LOW. 4. Push the On/off button. The operation lamp lights and the air conditioner starts to operate per your settings. Push the On/off button again to stop this unit operation. NOTE: The FAN ONLY mode cannot be used to control the temperature. While in this mode, only steps 1 3 and 4 may be performed. -27-
26 DRY OPERATION 1. Push the Mode button to select DRY. 2. Push the or button to set the desired temperature from 21 C to 2 8 C. 3. Push the On/off button. The operation lamp lights and the air conditioner starts to operate in the DRY mode. Push the On/off button again to stop this unit operation. NOTE: Due to the difference of the set temperature of the unit and the actual indoor temperature, the Air Conditioner when in DRY mode will automatically operate many times without running the COOL and FAN mode. TIMER OPERATION Push Timer on/off button to set the on and off times of the unit. The effective operation time set by the remote controller for the timer function is limited to a period of between 0.5 and less than 24 hours. 1. To set the STARTING time. 1.1 Push the Timer on button, then the remote controller shows ON TIMER, the last set time for the starting operation and the signal "Hr" will be shown on the Timer display area. You are now ready to reset the time to START the operation. 1.2 Push the Timer on button again to set desired unit start time. 1.3 After setting the Timer on,there will be a one-half second delay before the remote controller transmits the signal to the air conditioner. 2. To set the STOPPING time. 2.1 Push the Timer off button and the remote controller will show OFF TIMER, the last set time for the stopping operation and the signal "Hr" will be shown on the Timer display area. You are now ready to reset the time of the STOP operation. 2.2 Push the Timer off button again to set the time you want to stop the operation. 2.3 After setting the Timer off,there will be a one-half second delay before the remote controller transmits the signal to the air conditioner. 3. Set the starting & stopping time 3.1 Push the Timer on button, the remote controller will show ON TIMER, the last set time for START operation and the signal "Hr" will be shown on the Timer display area. You are now ready to readjust the Timer on to start the operation. 3.2 Push the Timer on button again to set the time you want to start the operation. 3.3 Push the Timer off button, the remote controller will show OFF TIMER, the last set time for STOP operation and the signal "Hr" will be shown on the Timer display area. You are now ready to reset the time to STOP operation. 3.4 Push the Timer off button again to set the time you want to stop the operation. 3.5 After setting the TIMER, there will be a one-half second delay before the remote controller transmits the signal to the Air Conditioner. NOTE If the same time is set for both START and STOPPING settings, the stopping time will automatically increase 0.5hr(the set time displays less than 10Hr) or one hour (the set time displays 10Hr or more). To change the Timer on/off time, just press the corresponding TIMER button and reset the time. The setting time is relative time. That is the time set is based on the delay of the current time. -28-
KN-CP50. MANUAL (p. 2) Digital compass. ANLEITUNG (s. 4) Digitaler Kompass. GEBRUIKSAANWIJZING (p. 10) Digitaal kompas
 Digital compass. ANLEITUNG (s. 4) Digitaler Kompass. GEBRUIKSAANWIJZING (p. 10) Digitaal kompas") KN-CP50 MANUAL (p. ) Digital compass ANLEITUNG (s. 4) Digitaler Kompass MODE D EMPLOI (p. 7) Boussole numérique GEBRUIKSAANWIJZING (p. 0) Digitaal kompas MANUALE (p. ) Bussola digitale MANUAL DE USO (p.
KN-CP50 MANUAL (p. ) Digital compass ANLEITUNG (s. 4) Digitaler Kompass MODE D EMPLOI (p. 7) Boussole numérique GEBRUIKSAANWIJZING (p. 0) Digitaal kompas MANUALE (p. ) Bussola digitale MANUAL DE USO (p.
MINO V2 ÁLLVÁNY CSERÉJE V4-RE
 MINO V2 remote controlled MINO V2 ÁLLVÁNY CSERÉJE V4-RE Mino V3 circuit board replacement Mino V2-V4 csere készlet ezüst Art# 59348S, Mino V2-V4 csere készlet fehér Art# 59348W V4 áramköri lap Art# 75914
Utasítások. Üzembe helyezés
 HASZNÁLATI ÚTMUTATÓ Üzembe helyezés Utasítások Windows XP / Vista / Windows 7 / Windows 8 rendszerben történő telepítéshez 1 Töltse le az AORUS makróalkalmazás telepítőjét az AORUS hivatalos webhelyéről.
MAKING MODERN LIVING POSSIBLE. Danfoss Heating Solutions
 MAKING MODERN LIVING POSSIBLE Danfoss Danfoss Link Link HC Hidronikus HC Hydronic szabályozó Controller Szerelési Installation útmutató Guide Danfoss Heating Solutions Szerelési útmutató Tartalomjegyzék
Using the CW-Net in a user defined IP network
 Using the CW-Net in a user defined IP network Data transmission and device control through IP platform CW-Net Basically, CableWorld's CW-Net operates in the 10.123.13.xxx IP address range. User Defined
INSTALLATION MANUAL For authorized service personnel only.
 Connection Method CHASSIS TYPE A AIR CONDITIONER OPTIONAL PARTS Communication box kit PART NO. 9317807005 INSTALLATION MANUAL For authorized service personnel only. 1. SAFETY PRES Contents 1. SAFETY PRES...
Cég név: Készítette: Telefon:
 Pozíció Darab Leírás 1 SCALA2 3-45 A Dátum: 218. 2. 9. Cikkszám: 98562862 Grundfos SCALA2 is a fully integrated, self-priming, compact waterworks for pressure boosting in domestic applications. SCALA2
Széchenyi István Egyetem www.sze.hu/~herno
 Oldal: 1/6 A feladat során megismerkedünk a C# és a LabVIEW összekapcsolásának egy lehetőségével, pontosabban nagyon egyszerű C#- ban írt kódból fordítunk DLL-t, amit meghívunk LabVIEW-ból. Az eljárás
bladeless AR5T90RE ToWER FAn instruction MAnuAl AR5T90RE 220-240V / 50Hz / 45W 220-240v~50Hz 45W
 bladeless AR5T90RE ToWER FAn lapátkerék nélküli instruction MAnuAl torony ventilátor AR5T90RE 220-240V / 50Hz / 45W 220-240v~50Hz 45W PAge 1/7 A jelölt készülék összeszerelését, beüzemelését, használatát
Proxer 7 Manager szoftver felhasználói leírás
 Proxer 7 Manager szoftver felhasználói leírás A program az induláskor elkezdi keresni az eszközöket. Ha van olyan eszköz, amely virtuális billentyűzetként van beállítva, akkor azokat is kijelzi. Azokkal
INSTRUCTION OF USE HASZNÁLATI UTASÍTÁS MANUALE D'USO
 INSTRUCTION OF USE HASZNÁLATI UTASÍTÁS MANUALE D'USO 105095101 105095104 105095101 105095104 Tisztelt Vásárló! Köszönjük, hogy az indukciós főzőlapunkat választotta. Annak érdekében, hogy a lehető legjobban
MetaTrader 5 con Mac OS
 MetaTrader 5 con Mac OS Suggerimenti forniti da MetaQuotes per l utilizzo di MetaTrader 5 con Mac OS Nonostante esistano già in rete diversi metodi di vendita, MetaQuotes lo sviluppatore di MetaTrader
Használati utasítás az OVC-WF1218 típusú vízszűréses porzsák nélküli háztartási porszívóhoz
 Használati utasítás az OVC-WF1218 típusú vízszűréses porzsák nélküli háztartási porszívóhoz Kérjük, figyelmesen olvassa el a használati utasítást. Biztonsági utasítások: A gépet csak 230V ~ 50Hz váltóáramra
1.oldal Budapest, Alsóerdősor u. 32 Tel.: / Mobil: / web:
 D and T Hungary Kft - Midea Hibakódok Hibakód (x = sötét, o = világít. * = villog) Defr. Timer Auto Oper. 1074 Budapest, Alsóerdősor u. 32 Tel.: +36-79/950-844 Mobil: +36-70/421-6940 web: www.dthungary.hu
EN United in diversity EN A8-0206/419. Amendment
 22.3.2019 A8-0206/419 419 Article 2 paragraph 4 point a point i (i) the identity of the road transport operator; (i) the identity of the road transport operator by means of its intra-community tax identification
Csatlakozás a BME eduroam hálózatához Setting up the BUTE eduroam network
 Csatlakozás a BME eduroam hálózatához Setting up the BUTE eduroam network Table of Contents Windows 7... 2 Windows 8... 6 Windows Phone... 11 Android... 12 iphone... 14 Linux (Debian)... 20 Sebők Márton
ANGOL NYELV KÖZÉPSZINT SZÓBELI VIZSGA I. VIZSGÁZTATÓI PÉLDÁNY
 ANGOL NYELV KÖZÉPSZINT SZÓBELI VIZSGA I. VIZSGÁZTATÓI PÉLDÁNY A feladatsor három részbol áll 1. A vizsgáztató társalgást kezdeményez a vizsgázóval. 2. A vizsgázó egy szituációs feladatban vesz részt a
EL-ES03HQ. English Deutsch Français Nederlands Italiano Español Magyar Suomi Svenska Česky Română Ελληνικά. MANUAL (p. 2) TV SMART POWER SAVER
 TV SMART POWER SAVER") MANUAL (p. 2) TV SMART POWER SAVER MODE D EMPLOI (p. 8) Economiseur d énergie intelligent pour TV MANUALE (p. 14) RISPARMIATORE DI ENERGIA PER TV HASZNÁLATI ÚTMUTATÓ (o. 20.) INTELLIGENS TV ENERGIAMEGTAKARÍTÓ
MANUAL (p. 2) TV SMART POWER SAVER MODE D EMPLOI (p. 8) Economiseur d énergie intelligent pour TV MANUALE (p. 14) RISPARMIATORE DI ENERGIA PER TV HASZNÁLATI ÚTMUTATÓ (o. 20.) INTELLIGENS TV ENERGIAMEGTAKARÍTÓ
THS710A, THS720A, THS730A & THS720P TekScope Reference
 THS710A, THS720A, THS730A & THS720P TekScope Reference 070-9741-01 Getting Started 1 Connect probes or leads. 2 Choose SCOPE 3 or METER mode. Press AUTORANGE. Copyright Tektronix, Inc. Printed in U.S.A.
4-42 ELECTRONICS WX210 - WX240
 4-42 ELECTRONICS WX210 - WX240 PCS 40000499-en Fig. 8 WX210 - WX240 ELECTRONICS 4-43 PCS COMPONENTS 40000471-en Load-limit regulator Legend Fig. 1 Fig. 2 1 Power supply 2 PWM1 output, proportional valve
1.1. EGYETLEN KÉSZÜLÉK ÜZEMBE HELYEZÉSE... 124 1.2. KÉT KÉSZÜLÉK ÜZEMBE HELYEZÉSE... 124 2.1. BEKAPCSOLT/KÉSZENLÉTI ÁLLAPOT... 125
 TÁRGYMUTATÓ Fejezet 1: ÜZEMBE HELYEZÉS...124 1.1. EGYETLEN KÉSZÜLÉK ÜZEMBE HELYEZÉSE... 124 1.2. KÉT KÉSZÜLÉK ÜZEMBE HELYEZÉSE... 124 Fejezet 2: FUNKCIÓK...125 2.1. BEKAPCSOLT/KÉSZENLÉTI ÁLLAPOT... 125
Sia il nostro Partner. Relazioni Curate da un Assistenza Clienti di Qualità
 Sia il nostro Partner Relazioni Curate da un Assistenza Clienti di Qualità Tutti hanno un approccio diverso 2 Dove si trova il Cliente? 3 Cosa vuole il Cliente? 4 Cosa vuole l Imprenditore? 5 Come mi trova?
Zephyr használati utasítás
 Zephyr használati utasítás fontos óvintézkedések Ez a termék háztartási használatra készült. Elektromos termékek használatánál, különösen gyermekek jelenlétében, mindig be kell tartani a következő alapvető
(Asking for permission) (-hatok/-hetek?; Szabad ni? Lehet ni?) Az engedélykérés kifejezésére a következő segédigéket használhatjuk: vagy vagy vagy
 (-hatok/-hetek?; Szabad ni? Lehet ni?) Az engedélykérés kifejezésére a következő segédigéket használhatjuk: vagy vagy vagy") (Asking for permission) (-hatok/-hetek?; Szabad ni? Lehet ni?) SEGÉDIGÉKKEL Az engedélykérés kifejezésére a következő segédigéket használhatjuk: vagy vagy vagy A fenti felsorolásban a magabiztosság/félénkség
(Asking for permission) (-hatok/-hetek?; Szabad ni? Lehet ni?) SEGÉDIGÉKKEL Az engedélykérés kifejezésére a következő segédigéket használhatjuk: vagy vagy vagy A fenti felsorolásban a magabiztosság/félénkség
Ültetési és öntözési javaslatok. Planting and watering instructions
 Ültetési és öntözési javaslatok Planting and watering instructions 1 Önöntöző-rendszer Sub-irrigation 2 Kedves növénykedvelő A LECHUZA önöntöző rendszerrel növényeink természetüknél fogva gyönyörű virágokat
MP3-FMTRANS50. MANUAL (p. 2) CAR MP3 FM+BLUETOOTH TRANSMITTER INCL. REMOTE CONTROL. ANLEITUNG (s. 4) AUTO MP3 FM+BT TRANSMITTER INKL.
 CAR MP3 FM+BLUETOOTH TRANSMITTER INCL. REMOTE CONTROL. ANLEITUNG (s. 4) AUTO MP3 FM+BT TRANSMITTER INKL.") MP3-FMTRANS50 MANUAL (p. 2) CAR MP3 FM+BLUETOOTH TRANSMITTER INCL. REMOTE CONTROL ANLEITUNG (s. 4) AUTO MP3 FM+BT TRANSMITTER INKL. FB MODE D EMPLOI (p. 6) Transmetteur MP3, FM + Bluetooth avec télécommande
MP3-FMTRANS50 MANUAL (p. 2) CAR MP3 FM+BLUETOOTH TRANSMITTER INCL. REMOTE CONTROL ANLEITUNG (s. 4) AUTO MP3 FM+BT TRANSMITTER INKL. FB MODE D EMPLOI (p. 6) Transmetteur MP3, FM + Bluetooth avec télécommande
NASODRILL ORRSPRAY: TARTÁLY- ÉS DOBOZFELIRAT, VALAMINT A BETEGTÁJÉKOZTATÓ SZÖVEGE. CSECSEMŐ GYERMEK FELNŐTT 100 ml-es üveg
 NASODRILL ORRSPRAY: TARTÁLY- ÉS DOBOZFELIRAT, VALAMINT A BETEGTÁJÉKOZTATÓ SZÖVEGE TARTÁLY - BOTTLE NASAL LAVAGE For chronic or recurring infection NASODRILL Formulated with thermal Luchon water naturally
Contact us Toll free (800) fax (800)
 fax (800)") Table of Contents Thank you for purchasing our product, your business is greatly appreciated. If you have any questions, comments, or concerns with the product you received please contact the factory.
Table of Contents Thank you for purchasing our product, your business is greatly appreciated. If you have any questions, comments, or concerns with the product you received please contact the factory.
FÖLDRAJZ OLASZ NYELVEN
 Földrajz olasz nyelven középszint 1121 É RETTSÉGI VIZSGA 2011. október 18. FÖLDRAJZ OLASZ NYELVEN KÖZÉPSZINTŰ ÍRÁSBELI ÉRETTSÉGI VIZSGA JAVÍTÁSI-ÉRTÉKELÉSI ÚTMUTATÓ NEMZETI ERŐFORRÁS MINISZTÉRIUM Parte
1. Gyakorlat: Telepítés: Windows Server 2008 R2 Enterprise, Core, Windows 7
 1. Gyakorlat: Telepítés: Windows Server 2008 R2 Enterprise, Core, Windows 7 1.1. Új virtuális gép és Windows Server 2008 R2 Enterprise alap lemez létrehozása 1.2. A differenciális lemezek és a két új virtuális
Felhasználói Útmutató
 USER MANUAL Felhasználói Útmutató Please read this manual carefully before installation and keep it for application Figyelmesen olvassa el az alábbi leírást és őrizze meg további alkalmazásra PREFACE 1.
Construction of a cube given with its centre and a sideline
 Transformation of a plane of projection Construction of a cube given with its centre and a sideline Exercise. Given the center O and a sideline e of a cube, where e is a vertical line. Construct the projections
későbbi használat esetére Őrizzük meg az útmutatót.
 4H01 típus későbbi használat esetére Őrizzük meg az útmutatót. A készüléket 8 év alatti gyermekek, valamint testi, mentális, érzékszervi fogyatékkal élő személyek, továbbá a kellő tapasztalattal, tudással
ANGOL NYELV KÖZÉPSZINT SZÓBELI VIZSGA I. VIZSGÁZTATÓI PÉLDÁNY
 ANGOL NYELV KÖZÉPSZINT SZÓBELI VIZSGA I. VIZSGÁZTATÓI PÉLDÁNY A feladatsor három részből áll 1. A vizsgáztató társalgást kezdeményez a vizsgázóval. 2. A vizsgázó egy szituációs feladatban vesz részt a
16F628A megszakítás kezelése
 16F628A megszakítás kezelése A 'megszakítás' azt jelenti, hogy a program normális, szekvenciális futása valamilyen külső hatás miatt átmenetileg felfüggesztődik, és a vezérlést egy külön rutin, a megszakításkezelő
EN 1317 Ütközés hevessége és Az utasok biztonsága
 Budapest, 8 February 007 EN 37 Ütközés hevessége és Az utasok biztonsága Massimo Cucchietti Technical Director TUBOSIDER SPA Torma Sandor Product Manager TUBOSIDER HUNGARIA kft A cél az utasok biztonságának
2012 Légkondicionálók
 2012 Légkondicionálók Típus azonosítók, távirányító 2 Midea Légkondicionálók 2012 Midea Légkondicionálók 2012 3 1 7 W E R Lakossági M S 9V I 12 H R D N1 Q C2 F 1 2 3 4 5 6 7 8 9 10 11 12 Midea 2 Kivitel
T Á J É K O Z T A T Ó. A 1108INT számú nyomtatvány a http://www.nav.gov.hu webcímen a Letöltések Nyomtatványkitöltő programok fülön érhető el.
 T Á J É K O Z T A T Ó A 1108INT számú nyomtatvány a http://www.nav.gov.hu webcímen a Letöltések Nyomtatványkitöltő programok fülön érhető el. A Nyomtatványkitöltő programok fület választva a megjelenő
A vitorlázás versenyszabályai a 2013-2016. évekre angol-magyar nyelvű kiadásának változási és hibajegyzéke
 A vitorlázás versenyszabályai a 2013-2016. évekre angol-magyar nyelvű kiadásának változási és hibajegyzéke A dokumentum A vitorlázás versenyszabályai a 2013-2016. évekre angol-magyar nyelvű kiadásában
English PATROL 24VDC SOROMPÓ HASZNÁLATI UTASÍTÁS
 English PATROL 24VDC SOROMPÓ HASZNÁLATI UTASÍTÁS English 3.3 Hand configuration changing As standard the system is supplied in right-hand configuration. To fit the barrier in the left-hand position, follow
Formula Sound árlista
 MIXERS FF-6000; FF6000P Formula Sound 160 6 channel dual format DJ mixer with removable fader panel. (Supplied with linear faders) Formula Sound 160P As above but with PRO X crossfade fitted. Formula Sound
Angol Középfokú Nyelvvizsgázók Bibliája: Nyelvtani összefoglalás, 30 kidolgozott szóbeli tétel, esszé és minta levelek + rendhagyó igék jelentéssel
 Angol Középfokú Nyelvvizsgázók Bibliája: Nyelvtani összefoglalás, 30 kidolgozott szóbeli tétel, esszé és minta levelek + rendhagyó igék jelentéssel Timea Farkas Click here if your download doesn"t start
Kezdőlap > Termékek > Szabályozó rendszerek > EASYLAB és TCU-LON-II szabályozó rendszer LABCONTROL > Érzékelő rendszerek > Típus DS-TRD-01
 Típus DS-TRD FOR EASYLAB FUME CUPBOARD CONTROLLERS Sash distance sensor for the variable, demand-based control of extract air flows in fume cupboards Sash distance measurement For fume cupboards with vertical
Viaggi Alloggio. Alloggio - Cercare. Alloggio - Prenotare. Chiedere indicazioni sull'alloggio
 - Cercare Dove posso trovare? Chiedere indicazioni sull'alloggio Hol találom a?... una camera in affitto?... kiadó szoba?... un ostello?...hostel?... un albergo?... egy hotel?... un bed and breakfast?...bed
Lexington Public Schools 146 Maple Street Lexington, Massachusetts 02420
 146 Maple Street Lexington, Massachusetts 02420 Surplus Printing Equipment For Sale Key Dates/Times: Item Date Time Location Release of Bid 10/23/2014 11:00 a.m. http://lps.lexingtonma.org (under Quick
ÜZEMELTETÉSI KÉZIKÖNYV
 ÜZEMELTETÉSI KÉZIKÖNYV WRC-HPC Infra távirányító OM-GS02-0112(0)-Daikin-HU WRC-HPC WRC-HPC Infra távirányító jelölései Fali tartó felszerelése Elemek behelyezése (AAA.R03) Távirányító lopás megelőzés (opció):
Comfort típusú kezelő egység
 Comfort típusú kezelő egység Felhasználói kézikönyv Kezelő egység Tartalom Oldal Rövidítések / Jelentések Rövidítések / jelentések... 2 Nyomógombok azonosítása... 3 Képernyő jelzések... 4 Gyors indítás...
Használati útmutató HANDELSINFORMATIONEN FÜR DEN KUNDEN COMMERCIËLE INFORMATIES VOOR DE KLANT SLT955 SLT955. ökocímke
 INFORMAZIONI COMMERCIALI PER I CONSUMATORI COMMERCIAL INFORMATION FOR THE CONSUMER INFORMATIONS COMMERCIALES POUR LE CLIENT INFORMACIONES COMERCIALES PARA EL CLIENTE Használati útmutató HANDELSINFORMATIONEN
FÖLDRAJZ OLASZ NYELVEN
 Földrajz olasz nyelven középszint 1112 ÉRETTSÉGI VIZSGA 2014. május 15. FÖLDRAJZ OLASZ NYELVEN KÖZÉPSZINTŰ ÍRÁSBELI ÉRETTSÉGI VIZSGA JAVÍTÁSI-ÉRTÉKELÉSI ÚTMUTATÓ EMBERI ERŐFORRÁSOK MINISZTÉRIUMA 1. ESERCIZIO
HAMBURG Használati útmutató Vezérlőmodul UKSM 24VDC Cikkszám: 260.033
 HABURG Használati útmutató Vezérlőmodul UKS 24VDC Cikkszám: 260.033 Brandschutz-Technik und Rauchabzug GmbH Schnackenburgallee 41d D-22525 Hamburg Germany +49 40 89 71 20-0 Fax: +49 40 89 71 20-20 Internet:
Viola GWH09RB-K3DNXXC GWH12RB-K3DNXXC
 Kezelési útmutató Viola GWH09RB-K3DNXXC GWH12RB-K3DNXXC FRIOTECH KFT. H-2040 Budaörs, Vasút u. 9. Tel./Fax: +36 23 430 674, +36 23 428 243 H-5400 Mezőtúr, Földvári út 2. Tel.: +36 56 351 412 Web: www.friotech.hu
USER MANUAL Guest user
 USER MANUAL Guest user 1 Welcome in Kutatótér (Researchroom) Top menu 1. Click on it and the left side menu will pop up 2. With the slider you can make left side menu visible 3. Font side: enlarging font
Flight Tool V2. Basic setting. The interface is as follow when running the software: A szoftver felülete:
 Flight Tool V2 Basic setting The interface is as follow when running the software: A szoftver felülete: Close button, you can close the software by clicking this button Az alkalmazás bezárásoz kattints
SPLIT - TYPE TÍPUSÚ VERTU SOROZAT. A légkondicionáló beszerelése elõtt egyeztessen a helyi áramszolgáltatóval
 Kérjük, Before using olvassa your el azt air conditioner, az útmutatót please a készülék readhasználatbavétele elõtt, majd this manual õrizze meg carefully Késõbb and szüksége keep it for lehet future
REMOTE RADAR DETECTOR (connectable to GPS DETECTOR device.) BEÉPÍTHETŐ RADARDETEKTOR (GPS DETECTOR készülékhez) USER MANUAL / HASZNÁLATI ÚTMUTATÓ
 BEÉPÍTHETŐ RADARDETEKTOR (GPS DETECTOR készülékhez) USER MANUAL / HASZNÁLATI ÚTMUTATÓ") REMOTE RADAR DETECTOR (connectable to GPS DETECTOR device.) BEÉPÍTHETŐ RADARDETEKTOR (GPS DETECTOR készülékhez) USER MANUAL / HASZNÁLATI ÚTMUTATÓ 1 REMOTE RADAR DETECTOR (connectable to GPS DETECTOR device.)
REMOTE RADAR DETECTOR (connectable to GPS DETECTOR device.) BEÉPÍTHETŐ RADARDETEKTOR (GPS DETECTOR készülékhez) USER MANUAL / HASZNÁLATI ÚTMUTATÓ 1 REMOTE RADAR DETECTOR (connectable to GPS DETECTOR device.)
Presenter SNP6000. Register your product and get support at HU Felhasználói kézikönyv
 Register your product and get support at www.philips.com/welcome Presenter SNP6000 HU Felhasználói kézikönyv 1 a b c d e 2 3 4 Federal Communication Commission Interference Statement This equipment has
Abigail Norfleet James, Ph.D.
 Abigail Norfleet James, Ph.D. Left side of brain develops first in girls, right in boys o Probably source of girls verbal skills o And source of boys spatial skills Pre-frontal lobes Control impulses and
Cashback 2015 Deposit Promotion teljes szabályzat
 Cashback 2015 Deposit Promotion teljes szabályzat 1. Definitions 1. Definíciók: a) Account Client s trading account or any other accounts and/or registers maintained for Számla Az ügyfél kereskedési számlája
Hogyan használja az OROS online pótalkatrész jegyzéket?
 Hogyan használja az OROS online pótalkatrész jegyzéket? Program indítása/program starts up Válassza ki a weblap nyelvét/choose the language of the webpage Látogasson el az oros.hu weboldalra, majd klikkeljen
AR5R12 léghűtő-párologtató. Vigyázat!
 AR5R12 léghűtő-párologtató A készüléket 8 év feletti gyermekek, valamint testi, mentális, érzékszervi fogyatékkal élő személyek, továbbá a kellő tapasztalattal, tudással nem bíró személyek is használhatják
BALÁZS HORVÁTH. Escalator
 BALÁZS HORVÁTH Escalator per tromba in Do e pianorte / for trumpet in C and piano Original version for trumpet and orchestra was composed for the final round of the International Trumpet Competition, Debrecen,
LIBRETTO ISTRUZIONI. Használati útmutató
 Italiano English Deutsch Français Español Português LIBRETTO ISTRUZIONI на русском языке Cod. 110030252 (CAPPE AD ISOLA) Használati útmutató INSTRUCTIONS BOOKLET BEDIENUNGSSANLEITUNG Sziget páraelszívókhoz
FAMILY STRUCTURES THROUGH THE LIFE CYCLE
 FAMILY STRUCTURES THROUGH THE LIFE CYCLE István Harcsa Judit Monostori A magyar társadalom 2012-ben: trendek és perspektívák EU összehasonlításban Budapest, 2012 november 22-23 Introduction Factors which
Lopocsi Istvánné MINTA DOLGOZATOK FELTÉTELES MONDATOK. (1 st, 2 nd, 3 rd CONDITIONAL) + ANSWER KEY PRESENT PERFECT + ANSWER KEY
 + ANSWER KEY PRESENT PERFECT + ANSWER KEY") Lopocsi Istvánné MINTA DOLGOZATOK FELTÉTELES MONDATOK (1 st, 2 nd, 3 rd CONDITIONAL) + ANSWER KEY PRESENT PERFECT + ANSWER KEY FELTÉTELES MONDATOK 1 st, 2 nd, 3 rd CONDITIONAL I. A) Egészítsd ki a mondatokat!
Lopocsi Istvánné MINTA DOLGOZATOK FELTÉTELES MONDATOK (1 st, 2 nd, 3 rd CONDITIONAL) + ANSWER KEY PRESENT PERFECT + ANSWER KEY FELTÉTELES MONDATOK 1 st, 2 nd, 3 rd CONDITIONAL I. A) Egészítsd ki a mondatokat!
HU) FIGYELMEZTETÉS! EN) WARNING!
 FIGYELMEZTETÉS! EN) WARNING!") OJ u C nice HU) FIGYELMEZTETÉS! Gondosan olvassa el és pontosan kövesse ezeket az utasításokat, és tartsa meg, hogy a jövőben is használhassa. A telepítést "szakember" módjára, szigorúan a telepítési utasításokat
OJ u C nice HU) FIGYELMEZTETÉS! Gondosan olvassa el és pontosan kövesse ezeket az utasításokat, és tartsa meg, hogy a jövőben is használhassa. A telepítést "szakember" módjára, szigorúan a telepítési utasításokat
Minta ANGOL NYELV KÖZÉPSZINT SZÓBELI VIZSGA II. Minta VIZSGÁZTATÓI PÉLDÁNY
 ANGOL NYELV KÖZÉPSZINT SZÓBELI VIZSGA II. A feladatsor három részből áll VIZSGÁZTATÓI PÉLDÁNY 1. A vizsgáztató társalgást kezdeményez a vizsgázóval. 2. A vizsgázó egy szituációs feladatban vesz részt a
XV1100K(C)/XV1100SK(C)
/XV1100SK(C)") Lg C18ahr XV1100K(C)/XV1100SK(C) All rights reserverd. Any reprinting or unauthorized use wihout the written permission of Lg C18ahr Corporation, is expressly prohibited. P/N LIT-11646-12-51 1.1. INTRODUCTION
Lg C18ahr XV1100K(C)/XV1100SK(C) All rights reserverd. Any reprinting or unauthorized use wihout the written permission of Lg C18ahr Corporation, is expressly prohibited. P/N LIT-11646-12-51 1.1. INTRODUCTION
ITALIANO MAGYAR. bar MIN MAX MAX MIN MIN. bar. service
 ITALIANO MAGYAR bar 1 2 3 service 0 bar 4 ISTRUZIONI HASZNÁLATI D USO ÚTMUTATÓ PER L UTENTE A FELHASZNÁLÓNAK 2 AVVERTENZE BIZTONSÁGI FIGYELMEZTETÉSEK PER LA SICUREZZA Attenzione! Figyelem! A készüléket
KERÜLETI DIÁKHETEK VERSENYKIÍRÁS 2017.
 1183. Budapest, Thököly u. 11. Tel.: 290-0642 Fax: 290-8222. KERÜLETI DIÁKHETEK VERSENYKIÍRÁS 2017. Kapcsolattartó: Dobner Tímea Erzsébet dobner.timea@gmail.com Játékos irodalmi és nyelvi vetélkedő 1183
General information for the participants of the GTG Budapest, 2017 meeting
 General information for the participants of the GTG Budapest, 2017 meeting Currency is Hungarian Forint (HUF). 1 EUR 310 HUF, 1000 HUF 3.20 EUR. Climate is continental, which means cold and dry in February
3. MINTAFELADATSOR KÖZÉPSZINT. Az írásbeli vizsga időtartama: 30 perc. III. Hallott szöveg értése
 Oktatáskutató és Fejlesztő Intézet TÁMOP-3.1.1-11/1-2012-0001 XXI. századi közoktatás (fejlesztés, koordináció) II. szakasz ANGOL NYELV 3. MINTAFELADATSOR KÖZÉPSZINT Az írásbeli vizsga időtartama: 30 perc
ANGOL NYELVI SZINTFELMÉRŐ 2013 A CSOPORT. on of for from in by with up to at
 ANGOL NYELVI SZINTFELMÉRŐ 2013 A CSOPORT A feladatok megoldására 45 perc áll rendelkezésedre, melyből körülbelül 10-15 percet érdemes a levélírási feladatra szánnod. Sok sikert! 1. Válaszd ki a helyes
FÖLDRAJZ OLASZ NYELVEN GEOGRAFIA
 Földrajz olasz nyelven középszint 0521 ÉRETTSÉGI VIZSGA 2006. május 16. FÖLDRAJZ OLASZ NYELVEN GEOGRAFIA KÖZÉPSZINTŰ ÍRÁSBELI ÉRETTSÉGI VIZSGA ESAME DI MATURITÁ SCRITTO DI LIVELLO MEDIO JAVÍTÁSI-ÉRTÉKELÉSI
Marion Baker Gloucester Virginia Wâv{xáá Éy ZÄÉâvxáàxÜ YÄÉãxÜá
 Marion Baker Gloucester Virginia www.duchessflowers.com marion@duchessflowers.com Wâv{xáá Éy ZÄÉâvxáàxÜ YÄÉãxÜá Williamsburg Farmers Market Marion Baker Specialty Cut Flower Grower Sell Bouquets, cut flowers
Vezérlő Panel. Electrónico. Elektromos kapcsoló doboz
 Az ENERGIE SY225 Elektronik a termodinamikai szolár rendszer vezérlő és kontrol egysége. Ez teszi lehetővé a működési paraméterek beállítását és a rendszer működésének ellenőrzését. Elektromos kapcsoló
Due fori, zero unitá esterne Csak két cső, zeró kültéri egység
 ..2.0 Due fori, zero unitá esterne Csak két cső, zeró kültéri egység ..2.0 Due fori, zero unitá esterne Quasi invisibile, fuori e dentro Con soli 17 centimetri di profonditá, 2.0 é in assoluto il più sottile
Szundikáló macska Sleeping kitty
 Model: Peter Budai 999. Diagrams: Peter Budai 999.. Oda-visszahajtás átlósan. Fold and unfold diagonally. 2. Behajtunk középre. Fold to the center. 3. Oda-visszahajtások derékszögben. Fold and unfold at
PTC HŐSUGÁRZÓ HASZNÁLATI KÉZIKÖNYV Modell: NTFD-18-WG. Tartalomjegyzék:
 PTC HŐSUGÁRZÓ HASZNÁLATI KÉZIKÖNYV Modell: NTFD-18-WG Tartalomjegyzék: Biztonsági tanácsok...1 Termékjellemzők...6 Műszaki paraméterek...6 Külső felépítés és alkatrészek nevei...6 Elektromos kapcsolási
A katalógusban szereplő adatok változásának jogát fenntartjuk. 2015. 02-es kiadás
 RUGÓKATALÓGUS A Biotek Kft. több mint 20 év tudásával és tapasztalatával valamint kiváló minőségű rögzítéstechnikai és gépépítő elemek nagy választékával kínál megoldásokat termékek tervezéséhez és gyártásához.
Előszó.2. Starter exercises. 3. Exercises for kids.. 9. Our comic...17
 2011. december Tartalom Előszó.2 Starter exercises. 3 Exercises for kids.. 9 Our comic....17 1 Előszó Kedves angolul tanulók! A 2010/2011- es tanévben elkezdett újságunkat szeretnénk továbbra is szerkeszteni
Correlation & Linear Regression in SPSS
 Petra Petrovics Correlation & Linear Regression in SPSS 4 th seminar Types of dependence association between two nominal data mixed between a nominal and a ratio data correlation among ratio data Correlation
AR5R11 léghűtő-párologtató. Vigyázat!
 AR5R11 léghűtő-párologtató A készüléket 8 év feletti gyermekek, valamint testi, mentális, érzékszervi fogyatékkal élő személyek, továbbá a kellő tapasztalattal, tudással nem bíró személyek is használhatják
Tudományos Ismeretterjesztő Társulat
 Sample letter number 5. International Culture Festival PO Box 34467 Harrogate HG 45 67F Sonnenbergstraße 11a CH-6005 Luzern Re: Festival May 19, 2009 Dear Ms Atkinson, We are two students from Switzerland
Rezgésdiagnosztika. Diagnosztika 02 --- 1
 Rezgésdiagnosztika Diagnosztika 02 --- 1 Diagnosztika 02 --- 2 A rezgéskép elemzésével kimutatható gépészeti problémák Minden gép, mely tartalmaz forgó részt (pl. motor, generátor, szivattyú, ventilátor,
English Magyar Slovenščina Česky V 3.42
 English... 2 Magyar... 83 Slovenščina... 164 Česky... 245 V 3.42 Content Introduction... 5 Intended use... 6 Supplied items... 7 Overview... 8 LED indicators... 9 Technical data... 10 Safety instructions...
BKI13ATEX0030/1 EK-Típus Vizsgálati Tanúsítvány/ EC-Type Examination Certificate 1. kiegészítés / Amendment 1 MSZ EN 60079-31:2014
 (1) EK-TípusVizsgálati Tanúsítvány (2) A potenciálisan robbanásveszélyes környezetben történő alkalmazásra szánt berendezések, védelmi rendszerek 94/9/EK Direktíva / Equipment or Protective Systems Intended
124 Dust-proof for block. Kocsi porvédelme
 Kocsi porvédelme A TBI MOTION termékek porvédelme kapcsán több féle kombináció lehetséges, úgy mint: acél zárótömítés, acél végzáró elem, borítólemez. Ezen kiegészítőkkel kapcsolatban, kérjük vegye fel
ANGOL NYELVI SZINTFELMÉRŐ 2008 A CSOPORT
 ANGOL NYELVI SZINTFELMÉRŐ 2008 A CSOPORT A feladatok megoldására 60 perc áll rendelkezésedre, melyből körülbelül 15 percet érdemes a levélírási feladatra szánnod. Sok sikert! 1. Válaszd ki a helyes megoldást.
LIBRETTO ISTRUZIONI. Használati útmutató INSTRUCTIONS BOOKLET BEDIENUNGSSANLEITUNG LIVRET D INSTRUCTIONS INSTRUKCJE OBSŁUGI
 Cod. 110030291 (CIELO / AURA) LIBRETTO ISTRUZIONI Használati útmutató INSTRUCTIONS BOOKLET BEDIENUNGSSANLEITUNG LIVRET D INSTRUCTIONS INSTRUKCJE OBSŁUGI Ed. 2014 Italiano English Deutsch Français Español
sorveglianza, Vigyázat! oppure se hanno ric istruzioni circa l uso in sicur dell apparecchio e hanno compre
 Használati útmutató ISTRUZIONI PER L U INSTRUCTIONS FOR VENTILATORE AR5B30 BOX PADLÓ ventilátor BOX FAN AR5B23 A készüléket 8 év feletti gyermekek, valamint testi, mentális, érzékszervi fogyatékkal élő
Smaller Pleasures. Apróbb örömök. Keleti lakk tárgyak Répás János Sándor mûhelyébõl Lacquerware from the workshop of Répás János Sándor
 Smaller Pleasures Apróbb örömök Keleti lakk tárgyak Répás János Sándor mûhelyébõl Lacquerware from the workshop of Répás János Sándor Smaller Pleasures Oriental lacquer, or urushi by its frequently used
Tavaszi Sporttábor / Spring Sports Camp. 2016. május 27 29. (péntek vasárnap) 27 29 May 2016 (Friday Sunday)
 27 29 May 2016 (Friday Sunday)") Tavaszi Sporttábor / Spring Sports Camp 2016. május 27 29. (péntek vasárnap) 27 29 May 2016 (Friday Sunday) SZÁLLÁS / ACCOMODDATION on a Hotel Gellért*** szálloda 2 ágyas szobáiban, vagy 2x2 ágyas hostel
Tavaszi Sporttábor / Spring Sports Camp 2016. május 27 29. (péntek vasárnap) 27 29 May 2016 (Friday Sunday) SZÁLLÁS / ACCOMODDATION on a Hotel Gellért*** szálloda 2 ágyas szobáiban, vagy 2x2 ágyas hostel
AZ E sorozatú RMG-csörlők programozása
 AZ E sorozatú RMG-csörlők programozása 10. Setup Setup is completely different to all previous versions of the SmartWinch. The Txno longer needs to be turned on and off or the servo lead plugged in and
*MFL *
 *MFL70422302* www.lg.com (1805-REV01) 43UK62* UK62* UK63* 1 12 14 16 2 3 4 5 4 5 20 a 14 16 20 12 a X2 (M4 X L16) 43UK63* 43UK62* X4 (M4 X L16) 49/50/55UK63* 49/55UK62* b X6 (M4 X L20) 65UK63* 60UK62*
*MFL * (1804-REV01)
") *MFL70359822* (1804-REV01) www.lg.com OLED55B8* OLED65B8* 1 2 4 5 7 8 3 X4 (M4 X L12) AA Read Safety and Reference. For the power supply and power consumption, refer to the label attached to the product.
*MFL70359822* (1804-REV01) www.lg.com OLED55B8* OLED65B8* 1 2 4 5 7 8 3 X4 (M4 X L12) AA Read Safety and Reference. For the power supply and power consumption, refer to the label attached to the product.
Személyes adatváltoztatási formanyomtatvány- Magyarország / Personal Data Change Form - Hungary
 Személyes adatváltoztatási formanyomtatvány- Magyarország / Personal Data Change Form - Hungary KITÖLTÉSI ÚTMUTATÓ: A formanyomtatványon a munkavállaló a személyes adatainak módosítását kezdeményezheti.
A teszt a következő diával indul! The test begins with the next slide!
 A teszt a következő diával indul! The test begins with the next slide! A KÖVETKEZŐKBEN SZÁMOZOTT KÉRDÉSEKET VAGY KÉPEKET LÁT SZÁMOZOTT KÉPLETEKKEL. ÍRJA A SZÁMOZOTT KÉRDÉSRE ADOTT VÁLASZT, VAGY A SZÁMOZOTT
A jövedelem alakulásának vizsgálata az észak-alföldi régióban az 1997-99. évi adatok alapján
 A jövedelem alakulásának vizsgálata az észak-alföldi régióban az 1997-99. évi adatok alapján Rózsa Attila Debreceni Egyetem Agrártudományi Centrum, Agrárgazdasági és Vidékfejlesztési Intézet, Számviteli
PIACI HIRDETMÉNY / MARKET NOTICE
 PIACI HIRDETMÉNY / MARKET NOTICE HUPX DAM Másnapi Aukció / HUPX DAM Day-Ahead Auction Iktatási szám / Notice #: Dátum / Of: 18/11/2014 HUPX-MN-DAM-2014-0023 Tárgy / Subject: Változások a HUPX másnapi piac
openbve járműkészítés Leírás a sound.cfg fájlhoz használható parancsokról
 Leírás az openbve-vel kompatibilis sound.cfg fájl készítéséhez használható parancsokról 1. oldal openbve járműkészítés Leírás a sound.cfg fájlhoz használható parancsokról A leírás az openbve-hez készíthető