UPPLEVA 32-46" Design and Quality IKEA of Sweden
|
|
|
- Anna Kelemenné
- 10 évvel ezelőtt
- Látták:
Átírás
1 UPPLEVA 32-46" Design and Quality IKEA of Sweden

2 AV 1 adapter
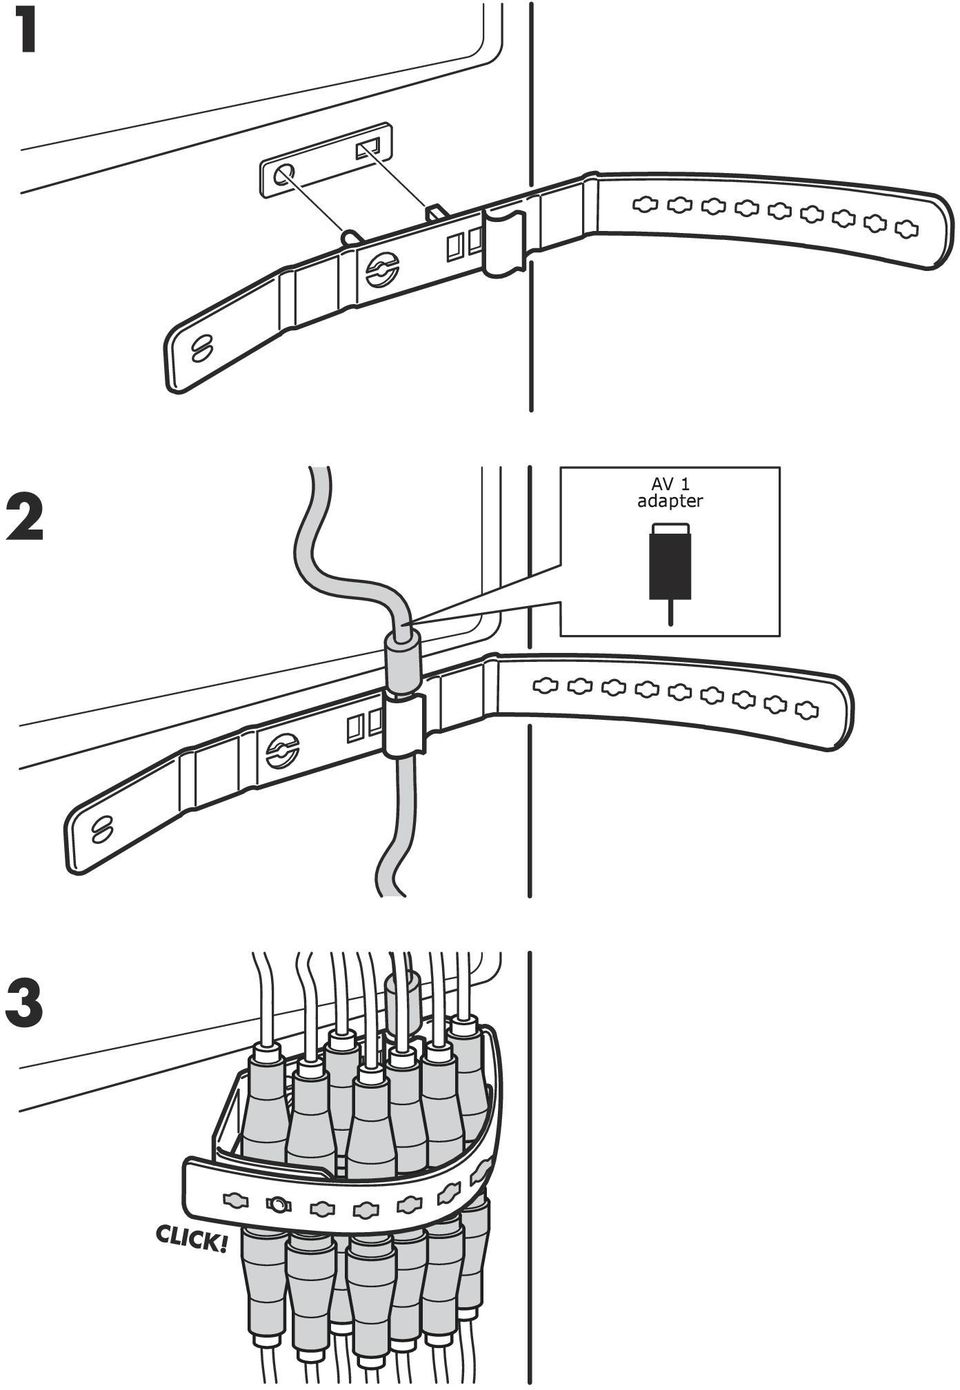
3 BACK EXIT INITIAL SETUP BACK EXIT BACK EXIT WELCOME CHANNEL INSTALL Automatic Search... Welcome to use the Wizard for Initial Setup!! Please press [OK] to start the wizard. SETUP Automatic Update... Analogue Manual Scan... Antenna Manual Installation... Clean Channel List... Enter Select Back Exit Figure 1 Figure 2 SUBTITLE Subtitle On Digital Subtitle Language English PICTURE SOUND PAP OPTIONS OPTIONS Digital Subtitle Language 2nd English Subtitle Type Normal MEDIA SMART TV LOCK SETUP Select Back Exit Figure 3 Figure 4 Location Home Software Update... OPTIONS HBBTV mode On DivX Registration... DivX Deregistration... Enter Timer... Select Back Exit Figure 5

4
5 ENGLISH 4 MAGYAR 24

6 ENGLISH 4 Important information Safety Ensure that your domestic mains supply voltage matches the voltage indicated on the identification sticker located at the back of your set. Where the mains plug or an appliance coupler is used as disconnect device, the disconnect device shall remain readily operable. On certain models, the light indicator is located at the side of the TV set. The absence of a light indication at the front does not mean that the TV set is fully disconnected from the mains. To disconnect the TV set completely, the mains plug must be pulled out. The TV set s components are sensitive to heat. The maximum ambient temperature should not exceed 35º Celsius. Do not cover the vents at the back or sides of the TV set. Leave sufficient space around it to allow adequate ventilation. Install the appliance away from any source of heat (fireplace,...) or appliances creating strong magnetic or electric fields. Moisture in rooms where the set is installed should not exceed 85% humidity. Apparatus shall not be exposed to dripping or splashing and no objects filled with liquids, such as vases, shall be placed on the apparatus. Moving the set from a cold place to a warm one can cause condensation on the screen (and on some components inside the TV set). Let the condensation evaporate before switching the TV set on again. WARNING To prevent the spread of fire, keep candles or other open flames away from this product at all times. time, switch it off completely by removing the plug from the mains power socket. During thunderstorms, we recommend that you disconnect the TV set from the mains and aerial so that it is not affected by electrical or electromagnetic surges that could damage it. For this reason, keep the mains and aerial sockets accessible so they can be disconnected, if necessary. Unplug the TV set immediately if you notice it giving off a smell of burning or smoke. You must never, under any circumstances, open the TV set yourself, as you run the risk of an electric shock in doing so. TV screen The TV screen used in this product is made of glass. Therefore, it can break when the product is dropped or impacted upon by other objects. The TV screen is a very high technology product, giving you finely detailed pictures. Occasionally, a few nonactive pixels may appear on the screen as a fixed point of blue, green or red. This does not affect the performance of your product. Care Use a glass-cleaning product to clean the screen and a soft cloth and mild detergent to clean the rest of the set. Important: Using strong detergents, alcohol-based and abrasive products may damage the screen. Dust the vents at the back and sides regularly. Using solvents, abrasive or alcohol-based products could damage the TV set. If an object or liquid enters inside the appliance, unplug it immediately and have it checked by an authorized engineer. Never open the appliance yourself since this may put you at risk or damage the appliance. The or POWER/ button on the TV set or the button on the remote control can be used to switch it on and put it into standby mode. If you are not going to be watching the TV for a lengthy period of

7 5 Hanging the TV set on the wall WARNING: This operation requires two people. To ensure a safe installation, observe the following safety notes: Check that the wall can support the weight of the TV set and wall mount assembly. Follow the mounting instructions provided with the wall mount. For certain models, make sure to screw the hexagonal VESA wall mounting screw bosses (and screws) provided with the set into the nuts for the wall mount at the back of your set before your wall mounting. The TV set must be installed on a vertical wall. Make sure to use only screws suitable for the material of the wall. Make sure that the TV set cables are placed so that there is not danger of tripping over them. This product is designed and manufactured with high quality materials and components which can be recycled and reused. This symbol means that electrical and electronic equipment, at their end-of-life, should be disposed of separately from your household waste to prevent potential negative consequences for the environment and human health. Please, dispose of this equipment at your local community waste collection/recycling centre. In the European Union there are separate collection systems for used electrical and electronic product. Please, help us to conserve the environment we live in! All other safety instructions about our TV sets are also applicable here. Handling the TV set on the table Before setting up your television set, make sure that the surface you want to put the set on can support its weight. Don t place the set on an unstable surface (e.g. moving shelf, very edge of a unit) and make sure that the front of the television set does not overhang the surface it is sitting on.
 provided with the set into the nuts for the wall mount at the back of your set before your wall")
8 6 Remote control functions Most of your TV's functions are available via the menus that appear on the screen. The remote control supplied with your TV can be used to navigate through the menus and to configure all the general settings. 1. Standby / quit standby To switch the remote for TV use. 3. BACK To return to the previous menu. To return to the previous channel. 4. To navigate through the menus. To set functions and change values. can also be used to open the corresponding submenu. 5. EXIT/ To exit the menu structure or Teletext; to stop some functions To fast forward or reverse (press and hold in Media function);and to move to the previous or next photo, song or video CH+/- To change channels. 8. Colour buttons To select tasks or Teletext pages. The red button can also be used for MHEG function. 9. MUTE To switch the sound off and back on again. 10. REC To record programme. 11. IPTV No function.

9 7 12. SUBT To select a subtitle language available for selected digital TV programme. 13. GUIDE To toggle the Electronic Programme Guide on or off (only available for digital channels) To enter channel numbers. To enter a letter, a digit or a symbol in some functions. 15. DISK MENU No function. 16. SOUND To select a preset sound mode. 17. To switch the remote for sound system use. 18. MENU To access the main menu. To access or exit the virtual keyboard in smart TV function. 19. OK To confirm an entry or selection. To freeze/unfreeze the picture in digital TV mode. 25. OPTION To display the function menu.to perform certain operations. To display the Teletext page in different modes. 26. SOURCE To select connected devices. 27. ECO To select desired power saving mode. 28. INFO To display programme information, if available. 29. CH.LIST To display the channel list. 30. TEXT/MEDIA CENTER To toggle Teletext on or off. 31. REPEAT No function. 32. To select the picture format. Note: We recommended you use the full screen mode. Do not use the display mode with black bars on both sides of the picture (such as 4:3) for a prolonged period of time; this may result in permanent damage to the TV screen may be damaged permanently. 20. To navigate through the menus. To select menu options. 21. SMART TV To display the smart TV homepage. 22. To play/pause. 23. VOL+/- To control the volume. 24. LANG To select a sound type available for selected Analogue TV programme. To select an audio language available for selected digital TV programme.

10 8 Connect the power and antenna To switch on the TV after connecting the power cord, press or POWER/. Note: The location of the power socket varies depending on the TV model. On some models, you have to turn on the power switch first. Antenna/Cable input Cable Game console, PC Note: Before connecting a PC, set the PC monitor refresh rate to 60Hz. AV 2 adapter VGA audio in Game console LAN AV 1 adapter VGA Or use an HDMI connection. Network connection

11 9 DVD player, home theatre system DVD player/ Home theatre system CMP adapter AUDIO in adapter OUT Pr Pb Y R L Blu-ray Disc player, headphones, HD game console & HD camcorder Notes: USB connectors are for data input from USB storage devices. Only USB 1 port can be connected to your USB memory stick. Exposure to excessive sound levels from earphones and headphones can result in hearing loss. Number of HDMI may vary. ARC (Audio Return Channel) function is only supported on HDMI 4 (ARC) port. It is recommended to connect your home theatre to the HDMI ARC connector to send sound from the TV to the sound system via an HDMI cable. COMMON INTERFACE HDMI 1 HD Camcorder HDMI 2 HDMI 3 Blu-ray Disc player USB HD game console
 function is only supported on HDMI 4 (ARC) port.")
12 10 DVD player, cable receiver Note: Remove the power cord before connecting devices. CMP adapter AUDIO in adapter Antenna/Cable input OUT Pr Pb Y R L Set-top box Cable DVD recorder IN OUT Pr Pb Y R L Pr Pb Y R L Notes: These illustrations are for reference only. Your model may differ in appearance or may not include all connections shown. The location of the power socket on the TV may vary depending on the model. The location and names of the function buttons and connectors on the TV may vary depending on the model.

13 11 Important: If the remote control is not used for a long period, remove the batteries and store them properly. Handle damaged or leaking batteries carefully. If your remote control has two batteries, do not mix new and old batteries. Batteries shall not be exposed to excessive heat such as sunshine, fire or the like. Danger of explosion if battery is incorrectly replaced. Replace only with the same or equivalent type recommended by the manufacturer. Discard used batteries according to manufacturer s instructions. Refer to your local recycling or waste disposal rules and contact a local waste disposal vendor to dispose of used batteries. If the batteries in your remote control are run down you can use the buttons on your TV. In TV mode, they have the same functions as the corresponding buttons on the remote control. In the menus they have the following functions: CH CH VOL VOL MENU/ OK/ MENU OK Switch the TV on and off 1. When powered on, the TV will be turned on directly or be in standby mode. If the TV is in standby mode, press the or POWER/ button on the TV or the button on the remote control to turn it on. 2. To put the TV into standby mode, press the or POWER/ button on the TV or the button on the remote control. The TV remains powered up, but with low energy consumption. 3. To switch the TV off, unplug the mains plug from the mains outlet. (*On certain models, you have to turn on the power switch first.) Initial setup Initial setup involves selecting all the settings required to be able to search for and store all the Analogue and digital channels you can receive. Make sure the TV is switched on and follow all the steps below in the order given. Note: If the channel search retrieved only the analogue channels it could be caused by weak broadcasting signals and therefore is not covered by the manufacturer warranty. Manufacturers cannot be held responsible for the lack of or weak broadcasting signals that can be found in some areas. The first time you switch the TV on, the Initial Setup wizard opens, which guides you through the initial setup process. (Refer to Figure 1.) Press OK to start your initial setup. 1. Press / to select your language, then press OK/ to enter the next step. 2. Press / to select your country, then press OK/ to enter the next step. Note: If you select France, you will have to enter the Password Setting menu here in order to set a password. Use the digit buttons to enter a four-digit number for your password. (0000 is too simple to be set as your password.) Re-enter the same code to confirm the password. After that, you will enter the next step automatically. (In this step, you can only press BACK to return to the previous step.) 3. Press / to select your tuner mode Antenna or Cable or Satellite. (Note: For some models, this option may not be available.) Select Antenna. Press OK/ to enter. Select Digital & Analogue, Digital or Analogue, then press OK/. Press / to select Scan, then press OK/ to start the automatic search for all DVB-T digital and/or analogue channels. Select Cable. Press OK/ to enter. Select Digital & Analogue, Digital or Analogue, then press OK/. Press / to select Scan, then press OK/ to directly start your initial setup or enter below step. Select Full if available to search for and store all DVB-C digital and analogue channels. You may select another advanced scan mode if available (for example, Advanced), then configure proper cable information as described below. Use the digit buttons to adjust the values for frequency, symbol rate and network ID;

14 12 use / to select a modulation mode. Press OK to start initial setup relating to all DVB-C digital and analogue channels. Note: For some models, this option may not be available. Select Satellite. Press OK/ to enter. Press / to select Scan, then press OK/ to enter the next step to configure proper information relating to satellite and antenna. Press OK to start initial setup relating to all satellite channels. Note: To prevent the channel setup process from being interrupted, wait for the message indicating that the setup is complete. 4. Before starting the scanning, you can also select Skip Scan to skip the initial setup process. 5. During the setup, you can follow the instructions at the bottom of the screen and return to the previous step by pressing BACK. Or press EXIT to exit or interrupt the search halfway. 6. Once the automatic search ends, the TV enters the next step automatically. Press / to select your location Shop or Home. Press OK/ to confirm your selection and enter the last step. 7. In this step, you can press OK to exit the initial setup. The channels are arranged in a preset order. If you wish to skip channels, modify the preset order or rename channels, select SETUP > Organiser and press OK/ to enter. In this step, you can also press BACK to return to the previous step. Automatically install channels This section describes how to search and store channels automatically. Instructions are for both analogue and digital channels. 1. Press MENU on the remote control and select SETUP > Language > Menu Language. Press / to select your desired menu language. 2. Press BACK to return to SETUP, press / to select Country, then press / to select your country. The TV installs and arranges channels according to your country. 3. Press / to select Tuner Mode, then press / to select Antenna, Cable or Satellite. (For some models, this option may not be avialable.) Select Antenna. Press / to select Channel Install, and press OK/ to enter. Select Automatic Search (Refer to Figure 2.), then press OK/ to display Automatic Search. Press OK to skip the country selection and enter the next step. Or use / to reselect your country, then press OK to enter. Select Digital & Analogue, Digital or Analogue, then press OK/ to start the automatic search, which relates to all DVB-T digital and/or analogue channels. Select Cable. Press / to select Channel Install, and press OK/ to enter. Select Automatic Search, then press OK/ to display Automatic Search. Press OK to skip the country selection and enter the next step. Or use / to reselect your country, then press OK to enter. Select Digital & Analogue, then press OK/ to enter. Select your scan mode if available and configure proper cable information in the same way as in Initial setup. Select Scan and press OK/ to start your automatic search relating to all DVB-C digital and analogue channels. Select Digital, then follow the same process as above to start your automatic search relating to all DVB-C digital channels. Select Analogue, then press OK/ to start your automatic search relating to all analogue channels. Select Satellite. Note: For some models, this option may not be available. Press / to select Satellite Setup, and press OK/ to enter. Press / to select a proper satellite or add new satellites if needed, then press OK to enter and configure proper information relating to satellite and antenna. Select SETUP > Channel Install > Automatic Search, then press OK/ to enter. Select Country, and use / to reselect your desired country, if necessary. Select Satellite Tuning, press

15 13 OK/ to display the SATELLITE TUNING menu. Configure the proper information. Select Scan, and press OK/ to start initial setup relating to all satellite channels. Note: For some models, this option may not be available. 4. The search may take a few minutes. During the process, you can press EXIT to abort halfway. 5. Once the automatic search ends, press BACK to return to the previous step or press OK to restart your channel search. 6. After the automatic search, channels are arranged in a preset order. You can skip channels, modify the preset order or rename channels. Use your TV Access channels Using the digit buttons: press the corresponding digit buttons to access the channels. Using the CH+/- or CH / buttons: scroll through the channels. Watch connected devices Repeatedly press SOURCE on the remote control or OK on the TV to toggle between TV and other input sources. To resume TV viewing, press any digit button to enter the channel, while CH+/- will cycle through all TV channels and other input sources. Note: Not all models have an OK button on the TV. Volume Volume control: use the VOL / buttons on the TV or VOL+/- buttons on the remote control to increase or decrease the volume. Sound mute: press the MUTE button to temporarily mute the sound. Press this button again or the VOL+ button to restore it. Use TV menus 1. Press MENU to display the main menu. (Refer to Figure 3.) 2. Press / / / to select the desired item, then press OK to open the corresponding submenu. 3. In submenus, use / to select menu options, use / to set functions or change values. Use OK to activate a setting. Use OK/ to open the corresponding submenu. 4. Press BACK to return to the previous menu. 5. Press EXIT to close the menu. Note: Some options may not be available for certain signal sources. Select menu language You can choose your preferred menu language following the instructions below. 1. Press MENU to display the main menu. 2. Press / / / to select SETUP, then press OK to enter. 3. Select Language and press OK/ to enter. 4. Select Menu Language and press / to select your desired language to display the menus. 5. Press EXIT to close the menu. Use more of your TV Setup your favourite channels You can create a list of your favourite TV channels. 1. Press CH.LIST. 2. Press the yellow button to enter CHANNEL LIST SELECTION. Press / to select the favourite list and press OK to enter. 3. Press the blue button to start editing your favourite list. Press / to scroll through the channel list and press OK to select or deselect it. 4. Repeat this procedure to setup other favourite channels. 5. Press CH.LIST/EXIT to exit. Energy Saving 1. Press MENU on the remote control and select PICTURE > ECO Settings > Energy Saving. 2. Press / to select desired power saving mode to achieve the desired power saving effect. 3. Press EXIT to close the menu. Shortcut operation: Press ECO on the remote control to select desired power saving mode directly. PAP function To display the pictures from different source inputs side by side. Note that one window is for both analogue and digital TV inputs, the other is for VGA, HDMI and CMP inputs. (Note: Not available for AV-Scart on both windows.)

16 14 1. Press MENU to display the main menu. 2. Select PAP and press OK to enter. 3. Select the PAP option, and press / to turn on/off PAP function. 4. Select TV Position, press / to reposition the TV window. 5. Press / to toggle the focus window. 6. When the focus is on the TV window, the digit buttons and CH+/- work in TV. When the focus is on the other window, CH+/- switches available external sources. Use subtitles You can enable subtitles for each TV channel. Subtitles are broadcast via Teletext or DVB-T/DVB-C digital broadcasts. With digital broadcasts, you have the additional option of selecting a preferred subtitle language. Turn on/off subtitles 1. Press MENU on the remote control and select OPTIONS > Subtitle. 2. Press OK/ to enter. (Refer to Figure 4.) 3. Select the Subtitle option, and press / to select On/Off to turn on/off subtitles. Enable subtitle languages on digital TV channels 1. Press MENU on the remote control and select OPTIONS > Subtitle > Digital Subtitle Language. 2. Press / to select a subtitle language as your preferred language. 3. Press / to select Digital Subtitle Language 2nd. 4. Press / to select a secondary subtitle language. 5. Press EXIT to close the menu. Shortcut operation: Press SUBT on the remote control to directly select a subtitle language available for the selected digital TV programme. Select a subtitle type on digital TV channels 1. Press MENU on the remote control and select OPTIONS > Subtitle > Subtitle Type. 2. Press / to select a subtitle type. You can select Hearing Impaired to display the hearing impaired subtitles with your selected language. Select decoding page language in Teletext Press MENU on the remote control and select OPTIONS > Teletext > Decoding Page Language. Select a proper type of language in which Teletext will display. Digital Teletext language For digital TV channels, your TV could zap to a service with multiple initial Teletext pages in different languages. This function allows you to select an available language as primary language, which relates to different initial Teletext pages. Press MENU on the remote control and select OPTIONS > Teletext > Digital Teletext Language. Press / to select. SPDIF type Connect to an audio device through the SPDIF output. Press MENU on the remote control and select OPTIONS > SPDIF Type. Select a proper sound type from the list for digital programmes. If the current programme outputs sound in Dolby D format, then either PCM or Dolby D can be selected. If the current programme does not output sound in Dolby D format, only PCM can be selected. Otherwise no sound will be output. Select Off to turn off the audio output from the audio device connected to the SPDIF output. Note: The options you may choose depend on the programme you are watching. If you select PCM and the sound is ahead of the picture, you can select SPDIF Delay from the OPTIONS menu and press / to adjust the delay time to synchronize the sound with the picture. T-Link To search for CEC devices connected to the HDMI sockets in your TV and enable onetouch play and one-touch standby between CEC devices. Enable or disable T-Link 1. Press MENU on the remote control, then select OPTIONS > T-Link. 2. Press / to select On or Off.

17 15 Use one-touch play One-touch play enables you to press the play button on, for example, your DVD remote control. This starts playback on your DVD device and automatically switches your TV to the correct source, displaying DVD content. Use system standby System standby enables you to press the button on, for example, your TV remote control. This switches your TV and all connected HDMI devices to standby mode. Network update Press MENU on the remote control, then select OPTIONS > Network Update. Select On/Off to enable or disable the Network update function. When this function is on, the TV will automatically update channels if your DTV service provider updates his DTV network. When this function is off, you need to run the channel search again to get new channels or remove unavailable channels if your DTV service provider adds or removes channels from their DTV network. Common interface Encrypted digital TV channels can be decoded with a common interface module and a card provided by a digital TV service operator. The common interface module may enable several digital services, depending on the operator and services you choose (for example, pay TV). Contact your digital TV service operator for more information about services and terms. Use the common interface module WARNING: Switch off your TV before inserting a common interface module. Be sure to follow the instruction described below. Wrong insertion of a common interface module may damage both the module and your TV. 1. Following the directions printed on the common interface module, gently insert the module into the common interface slot on the TV. 2. Push the module in as far as it will go. 3. Turn on the TV and wait for the common interface function to be activated. This may take several minutes. Note: Do not remove the common interface module from the slot. Removing the module will deactivate the digital services. Access common interface services After inserting and activating the common interface module, press MENU on the remote control and select OPTIONS > Common Interface. This menu option is only available if the common interface module is correctly inserted and activated. On-screen applications and content are provided by your digital TV service operator. Software update Press MENU on the remote control and select OPTIONS > Software Update. Press OK/ to enter. Current Version: Checks the current version of the software. Product Name: Displays the product name of your TV. Serial Number(if available): Displays the serial number of your TV. By Network: Enables you to download and install the latest software version from the Internet. Make sure to set up a wired or wireless network connection first, then select By Network and press OK/ to enter. Follow the on-screen instructions to continue. Note: Connect a USB device to your TV before you start software update. By Channel: Enables you to install the latest version of the software if available. Select By Channel and press OK/ to enter. Use / to select Yes under Auto Download to automatically download the latest software if available. After the software has been downloaded successfully, you will be prompted to decide if you want to install it right now. If yes, follow the on-screen instructions to complete your installation. You can also select to ignore the installation here. Select No under Auto Download to decline the automatic download. Select Manual Download and press OK/ to start manual scanning the latest software. Follow the on-screen

18 16 instructions to complete. During the scan, press OK/EXIT to cancel or exit the process. Change to Shop or Home mode 1. Press MENU on the remote control and select OPTIONS > Location. 2. Press / to select your location Shop or Home. 3. Press EXIT to exit. Note: According to the regulation of European Commission 2009/125/EC, in Home mode the TV will be put into standby mode automatically if there is no operation in 4 hours. This feature can be deactivated in OPTIONS menu. MHEG function Some digital TV broadcasters offer dedicated digital text or interactive services (for example, BBC1). These services work like normal Teletext with the addition of number, colour and navigation buttons. 1. Press MENU on the remote control and select OPTIONS > Subtitle > Subtitle. 2. Press / to set Subtitle to Off. Note: MHEG and subtitles are mutually exclusive and cannot coexist on the same screen. If Subtitle is set to On, MHEG will not appear. 3. Press the red button or TEXT on the remote control. 4. Press / / / to select or highlight items. 5. Press OK to confirm or activate. 6. Press one of the colour buttons to select an option. 7. Press TEXT or EXIT to exit. View photos, play music and watch videos from a USB memory stick Your TV is fitted with a USB connector that enables you to view photos, listen to music or watch videos stored on a USB storage device. Supported file formats: Photo JPEG Music Video MP3 AVI, MP4, MPG, MPEG, TS, DIVX, MKV Notes: Some USB keys and USB products like digital cameras or mobile phones are not fully compatible with USB 2.0 standard so they may not work with the TV multimedia player. Not all USB keys or devices are compatible with the USB function. Not all above formats are supported. The encoding formats of your files will determine whether or not they can be used. When a USB device is detected, it enters the MEDIA menu directly. (Alternative: Select MEDIA in the main menu and press OK to enter.) Photo To display photos, if available. 1. Select MEDIA > PHOTO, then press OK to enter the main file content browser. 2. In the main file content browser, use / / / to select a photo or an inner file folder. 3. Select an inner file folder, press OK to enter a sub file content browser. 4. Use / / to select a photo in either main or sub file content browser, press MENU to display the photo menu in folder mode. Sort: Sort folders and photos by modification Date or Name. Edit: Copy, paste or delete a selected photo. Parser: You can select Recursive to display photos from all sub file folders. 5. Select a photo, press OK to watch, and a slide show begins from the selected photo. Press to pause the photo if you want to rotate the paused photo. Press MENU to display the photo menu in the browser mode. You can play, pause or rotate the photo, select different play modes and displaying effects, etc. 6. Press the related buttons on the remote control to perform the available functions shown on the function bar at the bottom of the TV screen. Music To playback music, if available. 1. Select MEDIA > MUSIC, then press OK to enter the main file content browser. 2. Use / / / to select a song in either main or sub file content browser in the same way as in photo display function, press MENU to display the music menu in folder mode. Sort: Sort folders and songs by Name, Genre, Artist or Album. Edit: Copy, paste or delete a selected song. Parser: You can select Recursive to
.")
19 17 display songs from all sub file folders. 3. Select a song, press OK to play, and automatic playback begins from the selected song. Press MENU to display the music menu in the browser mode. You can play or pause the song, select different play modes, etc. Show Lyrics: This option is available for the songs with lyrics. Select it and use / to turn on/off lyrics synchronized display. Audio Only: Select and press OK to listen to the music with the screen turned off. Any key press will turn the screen on. 4. Press the related buttons on the remote control to perform the available functions shown on the function bar at the bottom of the TV screen. Video To watch videos, if available. 1. Select MEDIA > VIDEO, then press OK to enter the main file content browser. 2. Use / / / to select a video in either main or sub file content browser in the same way as in photo display function, press MENU to display the video menu in folder mode. Sort: Sort folders and videos by Type, modification Date or Name. Edit: Copy, paste or delete a selected video. Parser: You can select Recursive to display videos from all sub file folders. 3. Select a video, press OK to watch, and automatic playback begins from the selected video. Press MENU to display the video menu in the browser mode. You can play or pause the video, select different play modes, screen modes and preset picture settings, etc. 4. Press the related buttons on the remote control to perform the available functions shown on the function bar at the bottom of the TV screen. DivX video (* not available for some models) ABOUT DIVX VIDEO: DivX is a digital video format created by DivX, LLC, a subsidiary of Rovi Corporation. This is an official DivX Certified device that plays DivX video. Visit divx.com for more information and software tools to convert your files into DivX videos. ABOUT DIVX VIDEO-ON-DEMAND: This DivX Certified device must be registered in order to play purchased DivX Video-on- Demand (VOD) movies. Obtain your registration code: Press MENU on the remote control. Select OPTIONS > DivX(R) Registration. Press OK/ and your registration code will be displayed. Go to vod.divx.com for more information on how to complete your registration. Deregister your TV: If you wish to deregister your TV, Press MENU on the remote control. Select OPTIONS > DivX(R) Deregistration. Press OK/ and a message will guide you. DivX, DivX Certified and associated logos are trademarks of Rovi Corporation or its subsidiaries and are used under license. Time detection You can detect the time from digital channels through following operations. 1. Press MENU on the remote control and select OPTIONS >Timer > Clock > Auto Synchronization. 2. Press / to select On. Assign a channel decoder Decoders that decode analogue channels can be connected to the AV connector. Assign the TV channel as a channel to be decoded. Then assign the connection where the decoder is connected. 1. Press MENU on the remote control and select SETUP > Decode. 2. Press OK/ to enter the list. 3. Press / to select the channel to decode. 4. Press OK to select or unselect the channel. 5. Press BACK to return to the previous menu.

20 18 Diagnostics on digital TV channels 1. Press MENU on the remote control and select SETUP > Diagnostics. 2. Press OK/ to display some signal information on the current digital channel, such as signal strength, frequency, etc. Time Shift Allows you to pause, rewind and forward in a programme. The first time you use this function, make sure to connect a USB memory stick. Note: Due to specific country requirements, the Time Shift function is not available for Finland. 1. Press MENU on the remote control and select SETUP > Time Shift. 2. Press / to select On to switch on the Time Shift function, then press EXIT to close the menu. 3. Press OPTION on the remote control and select Time Shift, then press OK to confirm. 4. Follow the directions on the screen to do the setup. 5. After the disk setup is done, press OPTION and select Time Shift. 6. Press OK to display the Time Shift menu. Press the button to pause the picture and begin the Time Shift. Press the button to play the recorded part. When the Time Shift menu disappears and only the timing of the Time Shift remains on the screen, you can press the button or OK to access the Time Shift menu. Press the button to fast backward or the button to fast forward. Press the button to quit the Time Shift function. Notes: Before you connect the USB memory stick to the TV, make sure you have backed up the data in the device to avoid the risk of losing important data due to unforeseen malfunction. We recommend you use a USB device with free capacity above 1GB and disk speed faster than 5.0MB/sec. The bigger the file size for Time Shift, the longer the recording time. If you change the channel in Time Shift mode, a message prompts you to select Yes or No. You can select Yes to exit the Time Shift function and execute the channel change. Reset shop Allows you to reset the TV to factory default settings. 1. Press MENU on the remote control and select SETUP, then press OK to confirm. 2. Select Reset Shop and press OK/ to enter. 3. Use the digit buttons to enter the password. 4. Press / to select OK and press OK to confirm. 5. The Initial Setup menu appears. Follow the related instructions. Customising the input settings Allows you to configure your TV for external input devices, such as a set-top box, Blu- Ray player, computer or game console. 1. Press MENU on the remote control and select SETUP > Input Settings. 2. Press OK/ to enter Input Settings. 3. Press / to select the port the input device is connected to. 4. Press / to select the type of device. Press / to assign a name to the device. 5. Press BACK to return to the SETUP menu. After configuring, the selected source label will be displayed after the name of the related connector in the source list when pressing SOURCE on the remote control or OK on the TV. Use Electronic programme guide EPG is an on-screen guide that displays scheduled TV programmes. You can navigate, select, view and record programmes. 1. Press GUIDE on the remote control, the Now and Next EPG menu will appear, which allows you to get information about the current or next programme playing on each channel. Navigate through the different programmes using the navigation buttons on the remote control. 2. Use the colour buttons to view the 8 Days EPG.

1. Gyakorlat: Telepítés: Windows Server 2008 R2 Enterprise, Core, Windows 7
 1. Gyakorlat: Telepítés: Windows Server 2008 R2 Enterprise, Core, Windows 7 1.1. Új virtuális gép és Windows Server 2008 R2 Enterprise alap lemez létrehozása 1.2. A differenciális lemezek és a két új virtuális
Using the CW-Net in a user defined IP network
 Using the CW-Net in a user defined IP network Data transmission and device control through IP platform CW-Net Basically, CableWorld's CW-Net operates in the 10.123.13.xxx IP address range. User Defined
Széchenyi István Egyetem www.sze.hu/~herno
 Oldal: 1/6 A feladat során megismerkedünk a C# és a LabVIEW összekapcsolásának egy lehetőségével, pontosabban nagyon egyszerű C#- ban írt kódból fordítunk DLL-t, amit meghívunk LabVIEW-ból. Az eljárás
Proxer 7 Manager szoftver felhasználói leírás
 Proxer 7 Manager szoftver felhasználói leírás A program az induláskor elkezdi keresni az eszközöket. Ha van olyan eszköz, amely virtuális billentyűzetként van beállítva, akkor azokat is kijelzi. Azokkal
KN-CP50. MANUAL (p. 2) Digital compass. ANLEITUNG (s. 4) Digitaler Kompass. GEBRUIKSAANWIJZING (p. 10) Digitaal kompas
 Digital compass. ANLEITUNG (s. 4) Digitaler Kompass. GEBRUIKSAANWIJZING (p. 10) Digitaal kompas") KN-CP50 MANUAL (p. ) Digital compass ANLEITUNG (s. 4) Digitaler Kompass MODE D EMPLOI (p. 7) Boussole numérique GEBRUIKSAANWIJZING (p. 0) Digitaal kompas MANUALE (p. ) Bussola digitale MANUAL DE USO (p.
KN-CP50 MANUAL (p. ) Digital compass ANLEITUNG (s. 4) Digitaler Kompass MODE D EMPLOI (p. 7) Boussole numérique GEBRUIKSAANWIJZING (p. 0) Digitaal kompas MANUALE (p. ) Bussola digitale MANUAL DE USO (p.
Csatlakozás a BME eduroam hálózatához Setting up the BUTE eduroam network
 Csatlakozás a BME eduroam hálózatához Setting up the BUTE eduroam network Table of Contents Windows 7... 2 Windows 8... 6 Windows Phone... 11 Android... 12 iphone... 14 Linux (Debian)... 20 Sebők Márton
Utasítások. Üzembe helyezés
 HASZNÁLATI ÚTMUTATÓ Üzembe helyezés Utasítások Windows XP / Vista / Windows 7 / Windows 8 rendszerben történő telepítéshez 1 Töltse le az AORUS makróalkalmazás telepítőjét az AORUS hivatalos webhelyéről.
USER MANUAL Guest user
 USER MANUAL Guest user 1 Welcome in Kutatótér (Researchroom) Top menu 1. Click on it and the left side menu will pop up 2. With the slider you can make left side menu visible 3. Font side: enlarging font
MAKING MODERN LIVING POSSIBLE. Danfoss Heating Solutions
 MAKING MODERN LIVING POSSIBLE Danfoss Danfoss Link Link HC Hidronikus HC Hydronic szabályozó Controller Szerelési Installation útmutató Guide Danfoss Heating Solutions Szerelési útmutató Tartalomjegyzék
T Á J É K O Z T A T Ó. A 1108INT számú nyomtatvány a http://www.nav.gov.hu webcímen a Letöltések Nyomtatványkitöltő programok fülön érhető el.
 T Á J É K O Z T A T Ó A 1108INT számú nyomtatvány a http://www.nav.gov.hu webcímen a Letöltések Nyomtatványkitöltő programok fülön érhető el. A Nyomtatványkitöltő programok fület választva a megjelenő
Regisztrálja termékét és vegye igénybe a rendelkezésre álló HMP7001
 Regisztrálja termékét és vegye igénybe a rendelkezésre álló www.philips.com/welcome HMP7001 Trademark notice Interface are trademarks or registered trademarks of HDMI licensing LLC in ABOUT DIVX VIDEO:
MP3-FMTRANS50. MANUAL (p. 2) CAR MP3 FM+BLUETOOTH TRANSMITTER INCL. REMOTE CONTROL. ANLEITUNG (s. 4) AUTO MP3 FM+BT TRANSMITTER INKL.
 CAR MP3 FM+BLUETOOTH TRANSMITTER INCL. REMOTE CONTROL. ANLEITUNG (s. 4) AUTO MP3 FM+BT TRANSMITTER INKL.") MP3-FMTRANS50 MANUAL (p. 2) CAR MP3 FM+BLUETOOTH TRANSMITTER INCL. REMOTE CONTROL ANLEITUNG (s. 4) AUTO MP3 FM+BT TRANSMITTER INKL. FB MODE D EMPLOI (p. 6) Transmetteur MP3, FM + Bluetooth avec télécommande
MP3-FMTRANS50 MANUAL (p. 2) CAR MP3 FM+BLUETOOTH TRANSMITTER INCL. REMOTE CONTROL ANLEITUNG (s. 4) AUTO MP3 FM+BT TRANSMITTER INKL. FB MODE D EMPLOI (p. 6) Transmetteur MP3, FM + Bluetooth avec télécommande
Formula Sound árlista
 MIXERS FF-6000; FF6000P Formula Sound 160 6 channel dual format DJ mixer with removable fader panel. (Supplied with linear faders) Formula Sound 160P As above but with PRO X crossfade fitted. Formula Sound
Hogyan használja az OROS online pótalkatrész jegyzéket?
 Hogyan használja az OROS online pótalkatrész jegyzéket? Program indítása/program starts up Válassza ki a weblap nyelvét/choose the language of the webpage Látogasson el az oros.hu weboldalra, majd klikkeljen
Személyes adatváltoztatási formanyomtatvány- Magyarország / Personal Data Change Form - Hungary
 Személyes adatváltoztatási formanyomtatvány- Magyarország / Personal Data Change Form - Hungary KITÖLTÉSI ÚTMUTATÓ: A formanyomtatványon a munkavállaló a személyes adatainak módosítását kezdeményezheti.
SLE 2057M4. LED Television LED televizor LED televízor LED televízió Telewizor LED
 LED Television LED televizor LED televízor LED televízió Telewizor LED SLE 2057M4 USER'S MANUAL NÁVOD K OBSLUZE NÁVOD NA OBSLUHU HASZNÁLATI ÚTMUTATÓ INSTRUKCJA OBSŁUGI EN CZ SK HU PL Contents EN Warnings.......1
THS710A, THS720A, THS730A & THS720P TekScope Reference
 THS710A, THS720A, THS730A & THS720P TekScope Reference 070-9741-01 Getting Started 1 Connect probes or leads. 2 Choose SCOPE 3 or METER mode. Press AUTORANGE. Copyright Tektronix, Inc. Printed in U.S.A.
Alkalmazás-shop (Internet-kapcsolat szükséges)
") Alkalmazás-shop (Internet-kapcsolat szükséges) 1) Lépj ide: Webszolgáltatások -> 1. kép: Alkalmazások indítása 2) Megjelenik az elérhető alkalmazások listája. 3) A távirányító navigációs gombjaival lépj
Alkalmazás-shop (Internet-kapcsolat szükséges) 1) Lépj ide: Webszolgáltatások -> 1. kép: Alkalmazások indítása 2) Megjelenik az elérhető alkalmazások listája. 3) A távirányító navigációs gombjaival lépj
MINO V2 ÁLLVÁNY CSERÉJE V4-RE
 MINO V2 remote controlled MINO V2 ÁLLVÁNY CSERÉJE V4-RE Mino V3 circuit board replacement Mino V2-V4 csere készlet ezüst Art# 59348S, Mino V2-V4 csere készlet fehér Art# 59348W V4 áramköri lap Art# 75914
Contact us Toll free (800) fax (800)
 fax (800)") Table of Contents Thank you for purchasing our product, your business is greatly appreciated. If you have any questions, comments, or concerns with the product you received please contact the factory.
Table of Contents Thank you for purchasing our product, your business is greatly appreciated. If you have any questions, comments, or concerns with the product you received please contact the factory.
1. Ismerkedés a Hyper-V-vel, virtuális gépek telepítése és konfigurálása
 1. Ismerkedés a Hyper-V-vel, virtuális gépek telepítése és konfigurálása 1.1. Új virtuális gép és a Windows Server 2012 R2 Datacenter alap lemez létrehozása 1.2. A differenciális lemezek és a két új virtuális
Digital High Definition Terrestrial Receiver SRT 8101/8105. Picture similar
 Digital High Definition Terrestrial Receiver SRT 8101/8105 Picture similar User manual Manuel d Utilisateur Manuale Utente Manual del usuario Manual do Usuário Felhasználói kézikönyv Instrukcja obsługi
Features. Preparation
 Contents Features... 2 Introduction... 2 Preparation... 2 Safety Precautions... 3 Connection to a Television Distribution System (Cable TV etc.) from Tuner... 4 Package Contents... 4 Environmental Information...
EN United in diversity EN A8-0206/419. Amendment
 22.3.2019 A8-0206/419 419 Article 2 paragraph 4 point a point i (i) the identity of the road transport operator; (i) the identity of the road transport operator by means of its intra-community tax identification
ANGOL NYELV KÖZÉPSZINT SZÓBELI VIZSGA I. VIZSGÁZTATÓI PÉLDÁNY
 ANGOL NYELV KÖZÉPSZINT SZÓBELI VIZSGA I. VIZSGÁZTATÓI PÉLDÁNY A feladatsor három részbol áll 1. A vizsgáztató társalgást kezdeményez a vizsgázóval. 2. A vizsgázó egy szituációs feladatban vesz részt a
4. Gyakorlat: Csoportházirend beállítások
 4. Gyakorlat: Csoportházirend beállítások 4.1. A Default Domain Policy jelszóra vonatkozó beállításai 4.2. Parancsikon, mappa és hálózati meghajtó megjelenítése csoport házirend segítségével 4.3. Alkalmazások
TVU43S298STWEB INSTRUCTION MANUAL HASZNÁLATI UTASÍTÁS
 TVU43S298STWEB INSTRUCTION MANUAL HASZNÁLATI UTASÍTÁS GB COLOUR TELEVISION WITH REMOTE CONTROL SZÍNES TELEVÍZIÓ TÁVSZABÁLYOZÓVAL HU HU Contents Safety Information...2 Markings on the Product...2 Environmental
English PATROL 24VDC SOROMPÓ HASZNÁLATI UTASÍTÁS
 English PATROL 24VDC SOROMPÓ HASZNÁLATI UTASÍTÁS English 3.3 Hand configuration changing As standard the system is supplied in right-hand configuration. To fit the barrier in the left-hand position, follow
English Magyar Slovenščina Česky V 3.42
 English... 2 Magyar... 83 Slovenščina... 164 Česky... 245 V 3.42 Content Introduction... 5 Intended use... 6 Supplied items... 7 Overview... 8 LED indicators... 9 Technical data... 10 Safety instructions...
TVU40S298STWEB INSTRUCTION MANUAL HASZNÁLATI UTASÍTÁS
 TVU40S298STWEB INSTRUCTION MANUAL HASZNÁLATI UTASÍTÁS GB COLOUR TELEVISION WITH REMOTE CONTROL SZÍNES TELEVÍZIÓ TÁVSZABÁLYOZÓVAL HU HU Contents Safety Information...2 Markings on the Product...2 Environmental
Lexington Public Schools 146 Maple Street Lexington, Massachusetts 02420
 146 Maple Street Lexington, Massachusetts 02420 Surplus Printing Equipment For Sale Key Dates/Times: Item Date Time Location Release of Bid 10/23/2014 11:00 a.m. http://lps.lexingtonma.org (under Quick
12.2.2 Laborgyakorlat: A Windows XP haladó telepítése
 12.2.2 Laborgyakorlat: A Windows XP haladó telepítése Bevezetés Nyomtasd ki a laborgyakorlatot és végezd el lépéseit! Ebben a laborgyakorlatban automatizálva fogjuk telepíteni a Windows XP Professional
CAUTION. IMPORTANT - Please read these instructions fully before installing or operating
 Contents Safety Information...2 Markings on the Product...2 Environmental Information...3 Features...4 Accessories Included...4 Standby Notifications...4 TV Control Switch & Operation...4 Inserting the
9. Gyakorlat: Network Load Balancing (NLB)
") 9. Gyakorlat: Network Load Balancing (NLB) 9.1. Az NLB01 és az NLB02 szerverek létrehozása 9.2. Az NLB01 szerver konfigurálása 9.3. Az NLB02 szerver konfigurálása 9.4. Teszt weboldal létrehozása 9.5. Az
9. Gyakorlat: Network Load Balancing (NLB) 9.1. Az NLB01 és az NLB02 szerverek létrehozása 9.2. Az NLB01 szerver konfigurálása 9.3. Az NLB02 szerver konfigurálása 9.4. Teszt weboldal létrehozása 9.5. Az
10. Gyakorlat: Alkalmazások publikálása Remote Desktop Szervízen keresztül
 10. Gyakorlat: Alkalmazások publikálása Remote Desktop Szervízen keresztül 10.1. Jogosultságok és csoportok létrehozása 10.2. Az RDS szerver szerepkör telepítése a DC01-es szerverre 10.3. Az RDS01-es szerver
Személyes adatváltoztatási formanyomtatvány - Magyarország / Personal Data Change Form - Hungary
 Személyes adatváltoztatási formanyomtatvány - Magyarország / Personal Data Change Form - Hungary Kitöltési útmutató: A formanyomtatványon a munkavállaló a személyes adatainak módosítását kezdeményezheti.
IMPORTANT - Please read these instructions fully before installing or operating
 Contents Safety Information...2 Markings on the Product...2 Environmental Information...3 Features...4 Accessories Included...4 Standby Notifications...4 TV Control Switch & Operation...5 Inserting the
INSTALLATION MANUAL For authorized service personnel only.
 Connection Method CHASSIS TYPE A AIR CONDITIONER OPTIONAL PARTS Communication box kit PART NO. 9317807005 INSTALLATION MANUAL For authorized service personnel only. 1. SAFETY PRES Contents 1. SAFETY PRES...
TRENDnetVIEW Pro szoftvert. ŸGyors telepítési útmutató (1)
") TRENDnetVIEW Pro szoftvert ŸGyors telepítési útmutató (1) TRENDnetVIEW Pro/05.29.2014 Tartalomjegyzék TRENDnetVIEW Pro Management Software követelmények... 13 TRENDnetVIEW Pro Telepítése... 14 Videokamerák
TRENDnetVIEW Pro szoftvert ŸGyors telepítési útmutató (1) TRENDnetVIEW Pro/05.29.2014 Tartalomjegyzék TRENDnetVIEW Pro Management Software követelmények... 13 TRENDnetVIEW Pro Telepítése... 14 Videokamerák
User manual Bedienungsanleitung Manuel d Utilisateur Manual del usuario Manual do Utilizador Uživatelská příručka
 Digital Terrestrial HD Receiver SRT 8108 Picture similar User manual Bedienungsanleitung Manuel d Utilisateur Manual del usuario Manual do Utilizador Uživatelská příručka Návod k obsluze Instrukcja obsługi
(NGB_TA024_1) MÉRÉSI JEGYZŐKÖNYV
 MÉRÉSI JEGYZŐKÖNYV") Kommunikációs rendszerek programozása (NGB_TA024_1) MÉRÉSI JEGYZŐKÖNYV (5. mérés) SIP telefonközpont készítése Trixbox-szal 1 Mérés helye: Széchenyi István Egyetem, L-1/7 laboratórium, 9026 Győr, Egyetem
Kommunikációs rendszerek programozása (NGB_TA024_1) MÉRÉSI JEGYZŐKÖNYV (5. mérés) SIP telefonközpont készítése Trixbox-szal 1 Mérés helye: Széchenyi István Egyetem, L-1/7 laboratórium, 9026 Győr, Egyetem
DWL-G520 AirPlus Xtreme G 2,4GHz Vezeték nélküli PCI Adapter
 Ez a termék a következő operációs rendszereket támogatja: Windows XP, Windows 2000, Windows Me, Windows 98SE DWL-G520 AirPlus Xtreme G 2,4GHz Vezeték nélküli PCI Adapter Előfeltételek Legalább az alábbiakkal
BKI13ATEX0030/1 EK-Típus Vizsgálati Tanúsítvány/ EC-Type Examination Certificate 1. kiegészítés / Amendment 1 MSZ EN 60079-31:2014
 (1) EK-TípusVizsgálati Tanúsítvány (2) A potenciálisan robbanásveszélyes környezetben történő alkalmazásra szánt berendezések, védelmi rendszerek 94/9/EK Direktíva / Equipment or Protective Systems Intended
Minta ANGOL NYELV KÖZÉPSZINT SZÓBELI VIZSGA II. Minta VIZSGÁZTATÓI PÉLDÁNY
 ANGOL NYELV KÖZÉPSZINT SZÓBELI VIZSGA II. A feladatsor három részből áll VIZSGÁZTATÓI PÉLDÁNY 1. A vizsgáztató társalgást kezdeményez a vizsgázóval. 2. A vizsgázó egy szituációs feladatban vesz részt a
(Asking for permission) (-hatok/-hetek?; Szabad ni? Lehet ni?) Az engedélykérés kifejezésére a következő segédigéket használhatjuk: vagy vagy vagy
 (-hatok/-hetek?; Szabad ni? Lehet ni?) Az engedélykérés kifejezésére a következő segédigéket használhatjuk: vagy vagy vagy") (Asking for permission) (-hatok/-hetek?; Szabad ni? Lehet ni?) SEGÉDIGÉKKEL Az engedélykérés kifejezésére a következő segédigéket használhatjuk: vagy vagy vagy A fenti felsorolásban a magabiztosság/félénkség
(Asking for permission) (-hatok/-hetek?; Szabad ni? Lehet ni?) SEGÉDIGÉKKEL Az engedélykérés kifejezésére a következő segédigéket használhatjuk: vagy vagy vagy A fenti felsorolásban a magabiztosság/félénkség
ANGOL NYELV KÖZÉPSZINT SZÓBELI VIZSGA I. VIZSGÁZTATÓI PÉLDÁNY
 ANGOL NYELV KÖZÉPSZINT SZÓBELI VIZSGA I. VIZSGÁZTATÓI PÉLDÁNY A feladatsor három részből áll 1. A vizsgáztató társalgást kezdeményez a vizsgázóval. 2. A vizsgázó egy szituációs feladatban vesz részt a
REMOTE RADAR DETECTOR (connectable to GPS DETECTOR device.) BEÉPÍTHETŐ RADARDETEKTOR (GPS DETECTOR készülékhez) USER MANUAL / HASZNÁLATI ÚTMUTATÓ
 BEÉPÍTHETŐ RADARDETEKTOR (GPS DETECTOR készülékhez) USER MANUAL / HASZNÁLATI ÚTMUTATÓ") REMOTE RADAR DETECTOR (connectable to GPS DETECTOR device.) BEÉPÍTHETŐ RADARDETEKTOR (GPS DETECTOR készülékhez) USER MANUAL / HASZNÁLATI ÚTMUTATÓ 1 REMOTE RADAR DETECTOR (connectable to GPS DETECTOR device.)
REMOTE RADAR DETECTOR (connectable to GPS DETECTOR device.) BEÉPÍTHETŐ RADARDETEKTOR (GPS DETECTOR készülékhez) USER MANUAL / HASZNÁLATI ÚTMUTATÓ 1 REMOTE RADAR DETECTOR (connectable to GPS DETECTOR device.)
EL-ES03HQ. English Deutsch Français Nederlands Italiano Español Magyar Suomi Svenska Česky Română Ελληνικά. MANUAL (p. 2) TV SMART POWER SAVER
 TV SMART POWER SAVER") MANUAL (p. 2) TV SMART POWER SAVER MODE D EMPLOI (p. 8) Economiseur d énergie intelligent pour TV MANUALE (p. 14) RISPARMIATORE DI ENERGIA PER TV HASZNÁLATI ÚTMUTATÓ (o. 20.) INTELLIGENS TV ENERGIAMEGTAKARÍTÓ
MANUAL (p. 2) TV SMART POWER SAVER MODE D EMPLOI (p. 8) Economiseur d énergie intelligent pour TV MANUALE (p. 14) RISPARMIATORE DI ENERGIA PER TV HASZNÁLATI ÚTMUTATÓ (o. 20.) INTELLIGENS TV ENERGIAMEGTAKARÍTÓ
quick installation guide
 quick installation guide The image is for reference only. ArIeS e1 2 in 1 GAMING COMBO English Thank you for purchasing the KWG ARIES E1 COMBO. The KWG ARIES E1 gaming keyboard has a comfortable design
SOPHOS simple + secure. A dobozba rejtett biztonság UTM 9. Kókai Gábor - Sophos Advanced Engineer Balogh Viktor - Sophos Architect SOPHOS
 SOPHOS simple + secure A dobozba rejtett biztonság UTM 9 Kókai Gábor - Sophos Advanced Engineer Balogh Viktor - Sophos Architect SOPHOS SOPHOS simple + secure Megint egy UTM? Egy újabb tűzfal extrákkal?
ENROLLMENT FORM / BEIRATKOZÁSI ADATLAP
 ENROLLMENT FORM / BEIRATKOZÁSI ADATLAP CHILD S DATA / GYERMEK ADATAI PLEASE FILL IN THIS INFORMATION WITH DATA BASED ON OFFICIAL DOCUMENTS / KÉRJÜK, TÖLTSE KI A HIVATALOS DOKUMENTUMOKBAN SZEREPLŐ ADATOK
SIGNAL HD 527 DVB T vevő, rögzítő, és médialejátszó készülék
 SIGNAL HD 527 DVB T vevő, rögzítő, és médialejátszó készülék A magyarországi földfelszíni digitális adások vételére alkalmas. Szemközti nézet IR érzékelő, LED kijelző, USB 2.0 port Nézet hátulról antennabemenet,
Alcor HD-600S Nagy felbontású digitális Földfelszíni vevőkészülék Kezelési Útmutató
 Alcor HD-600S Nagy felbontású digitális Földfelszíni vevőkészülék Kezelési Útmutató 2 Tartalomjegyzék 1 TÁVIRÁNYÍTÓ... 5 2 A készülék ismertetése... 6 3 ÜZEMBE HELYEZÉS... 6 Üzembe helyezési útmutató...
TVF22N266T INSTRUCTION MANUAL HASZNÁLATI UTASÍTÁS
 TVF22N266T INSTRUCTION MANUAL HASZNÁLATI UTASÍTÁS GB COLOUR TELEVISION WITH REMOTE CONTROL SZÍNES TELEVÍZIÓ TÁVSZABÁLYOZÓVAL HU HU Contents Safety Information...2 Markings on the Product...2 Environmental
Digitális nagy felbontású műholdvevő SRT 7100
 Digitális nagy felbontású műholdvevő SRT 7100 Picture similar Használati útmutató 1 3 Fig. 1 2 1 6 3 9 10 Fig. 2 2 4 5 7 8 Fig. 3 SCART Fig. 4 A B C HDMI Fig. 5 A B C A A Fig. 6 B C TARTALOMJEGYZÉK 1.0
Budapest By Vince Kiado, Klösz György
 Budapest 1900 2000 By Vince Kiado, Klösz György Download Ebook : budapest 1900 2000 in PDF Format. also available for mobile reader If you are looking for a book Budapest 1900-2000 by Vince Kiado;Klosz
Mele PMC200 Használati Utasítás
 Mele PMC200 Használati Utasítás A doboz tartalma: - PMC 200-as lejátszó - AV (audió/videó) kábel - Y/U/V kábel - USB kábel - USB OTG adapter, fényképezők és egyéb USB eszközök csatlakoztatásához - AC hálózati
Új funkciók az RBP-ben 2015. október 1-től New functions in RBP from 1 October 2015. Tatár Balázs
 Új funkciók az RBP-ben 2015. október 1-től New functions in RBP from 1 October 2015 Tatár Balázs Üzletfejlesztés vezető / Business Development Manager Rendszerhasználói Tájékoztató Nap, 2015. szeptember
1.1. EGYETLEN KÉSZÜLÉK ÜZEMBE HELYEZÉSE... 124 1.2. KÉT KÉSZÜLÉK ÜZEMBE HELYEZÉSE... 124 2.1. BEKAPCSOLT/KÉSZENLÉTI ÁLLAPOT... 125
 TÁRGYMUTATÓ Fejezet 1: ÜZEMBE HELYEZÉS...124 1.1. EGYETLEN KÉSZÜLÉK ÜZEMBE HELYEZÉSE... 124 1.2. KÉT KÉSZÜLÉK ÜZEMBE HELYEZÉSE... 124 Fejezet 2: FUNKCIÓK...125 2.1. BEKAPCSOLT/KÉSZENLÉTI ÁLLAPOT... 125
HAMBURG Használati útmutató Vezérlőmodul UKSM 24VDC Cikkszám: 260.033
 HABURG Használati útmutató Vezérlőmodul UKS 24VDC Cikkszám: 260.033 Brandschutz-Technik und Rauchabzug GmbH Schnackenburgallee 41d D-22525 Hamburg Germany +49 40 89 71 20-0 Fax: +49 40 89 71 20-20 Internet:
LED Television SLE 55F60TC USER'S MANUAL
 LED Television SLE 55F60TC USER'S MANUAL EN Content EN CAREFULLY READ THIS USER S MANUAL BEFORE PUTTING THE TELEVISION INTO OPERATION. KEEP IT FOR FUTURE USE. RECORD THE MODEL NUMBER AND THE SERIAL NUMBER
3. MINTAFELADATSOR KÖZÉPSZINT. Az írásbeli vizsga időtartama: 30 perc. III. Hallott szöveg értése
 Oktatáskutató és Fejlesztő Intézet TÁMOP-3.1.1-11/1-2012-0001 XXI. századi közoktatás (fejlesztés, koordináció) II. szakasz ANGOL NYELV 3. MINTAFELADATSOR KÖZÉPSZINT Az írásbeli vizsga időtartama: 30 perc
quick installation guide The image is for reference only.
 quick installation guide The image is for reference only. ArIeS M1 English Thank you for purchasing the KWG ARIES M1 COMBO. The KWG ARIES M1 gaming keyboard has a comfortable design and spill resistant
Intézményi IKI Gazdasági Nyelvi Vizsga
 Intézményi IKI Gazdasági Nyelvi Vizsga Név:... Születési hely:... Születési dátum (év/hó/nap):... Nyelv: Angol Fok: Alapfok 1. Feladat: Olvasáskészséget mérő feladat 20 pont Olvassa el a szöveget és válaszoljon
Tudományos Ismeretterjesztő Társulat
 Sample letter number 3. Russell Ltd. 57b Great Hawthorne Industrial Estate Hull East Yorkshire HU 19 5BV 14 Bebek u. Budapest H-1105 10 December, 2009 Ref.: complaint Dear Sir/Madam, After seeing your
Construction of a cube given with its centre and a sideline
 Transformation of a plane of projection Construction of a cube given with its centre and a sideline Exercise. Given the center O and a sideline e of a cube, where e is a vertical line. Construct the projections
Az Ön kézikönyve PHILIPS 42HF9385D http://hu.yourpdfguides.com/dref/2756497
 Elolvashatja az ajánlásokat a felhasználói kézikönyv, a műszaki vezető, illetve a telepítési útmutató. Megtalálja a választ minden kérdésre az a felhasználói kézikönyv (információk, leírások, biztonsági
Zephyr használati utasítás
 Zephyr használati utasítás fontos óvintézkedések Ez a termék háztartási használatra készült. Elektromos termékek használatánál, különösen gyermekek jelenlétében, mindig be kell tartani a következő alapvető
ASUS Transformer Pad útmutató
 útmutató TF300TG 3G kapcsolatkezelő A SIM-kártya behelyezése 1. Egy kiegyenesített gemkapocs segítségével nyomja meg a SIMkártyatartó kilökő gombját. HUG7210 2. Vegye ki a tartót. Helyezze el a kártyát
Presenter SNP6000. Register your product and get support at HU Felhasználói kézikönyv
 Register your product and get support at www.philips.com/welcome Presenter SNP6000 HU Felhasználói kézikönyv 1 a b c d e 2 3 4 Federal Communication Commission Interference Statement This equipment has
1. MINTAFELADATSOR KÖZÉPSZINT. Az írásbeli vizsga időtartama: 30 perc. III. Hallott szöveg értése
 Oktatáskutató és Fejlesztő Intézet TÁMOP-3.1.1-11/1-2012-0001 XXI. századi közoktatás (fejlesztés, koordináció) II. szakasz ANGOL NYELV 1. MINTAFELADATSOR KÖZÉPSZINT Az írásbeli vizsga időtartama: 30 perc
Cashback 2015 Deposit Promotion teljes szabályzat
 Cashback 2015 Deposit Promotion teljes szabályzat 1. Definitions 1. Definíciók: a) Account Client s trading account or any other accounts and/or registers maintained for Számla Az ügyfél kereskedési számlája
magyar NYELVŰ FELHASZNÁLÓI KÉZIKÖNYV
 MAGYAR 404 magyar NYELVŰ FELHASZNÁLÓI KÉZIKÖNYV 3 verzió Kérjük, látogasson el a www.archos.com/manuals weboldalra és töltse le a kézikönyv legfrissebb verzióját. Kedves Vásárló! Köszönjük, hogy ezt az
BESZERELÉSI ÉS HASZNÁLATI ÚTMUTATÓ. Fejtámlamonitor
 BESZERELÉSI ÉS HASZNÁLATI ÚTMUTATÓ Fejtámlamonitor FIGYELEM! KÉRJÜK, FIGYELMESEN OLVASSA EL A BESZERELÉSI ÉS HASZNÁLATI ÚTMUTATÓT, MIELŐTT ÜZEMBE HELYEZI A KÉSZÜLÉKET! BIZTONSÁGI ELŐÍRÁSOK Saját és utasai
DANS és Narcis. Burmeister Erzsébet. HUNOR találkozó, Budapest 2013. március 13.
 DANS és Narcis Burmeister Erzsébet HUNOR találkozó, Budapest 2013. március 13. DANS DANS (Data Archiving and Network Services) http://www.dans.knaw.nl Kutatási adatok archiválása a saját fejlesztésű EASY
DF 710 / DF 1040. Digitális képkeret. Használati utasítás
 DF 710 / DF 1040 Digitális képkeret Használati utasítás Bevezetés Köszönjük, hogy cégünk termékét választotta! Kérjük, használatba vétel előtt olvassa el figyelmesen ezt a használati utasítást, hogy a
Travel Getting Around
 - Location I am lost. Not knowing where you are Can you show me where it is on the map? Asking for a specific location on a map Where can I find? Asking for a specific Eltévedtem. Meg tudná nekem mutatni
DECLARATION OF PERFORMANCE No. GST REV 1.03 According to Construction Products Regulation EU No. 305/2011
 DECLARATION OF PERFORMANCE No. According to Construction Products Regulation EU No. 305/2011 This declaration is available in the following languages: English Declaration of Performance Page 2-3 Hungarian
Kiegészítők telepítése Installing Addons
 Kiegészítők telepítése Installing Addons Válassz nyelvet: Please select a language: MAGYAR ENGLISH 1/8 Kiegészítők telepítése A BVE Klub oldaláról négyféle csomagot tölthetsz le:.7z fájlt OpenBVE-hez.ZIP
16F628A megszakítás kezelése
 16F628A megszakítás kezelése A 'megszakítás' azt jelenti, hogy a program normális, szekvenciális futása valamilyen külső hatás miatt átmenetileg felfüggesztődik, és a vezérlést egy külön rutin, a megszakításkezelő
MOTOROLA HMC3021 DIGITÁLIS VEVŐKÉSZÜLÉK HASZNÁLATI ÚTMUTATÓ. TARR Kft.
 MOTOROLA HMC3021 DIGITÁLIS VEVŐKÉSZÜLÉK HASZNÁLATI ÚTMUTATÓ TARR Kft. Tartalomjegyzék 1. Elő-, és hátlap... 4 1.1. Előlap és az előlap gombjainak funkciói... 4 1.2. Hátlap és hátoldali csatlakozók... 5
12.2.4 Laborgyakorlat: Virtuális memória beállítások testreszabása
 12.2.4 Laborgyakorlat: Virtuális memória beállítások testreszabása Bevezetés Nyomtasd ki a laborgyakorlatot és végezd el a lépéseit! A laborgyakorlat során megtanuljuk, hogyan lehet testreszabni a virtuális
HD-90. Használati utasítás User s manual
 HD-90 Használati utasítás User s manual Bevezetés Köszönjük, hogy WayteQ terméket választott! Az ön által vásárolt digitális földfelszíni vevőkészülék (DTR) a digitális új, izgalmas világába kalauzolja
DVD Player HOME TECH KH 6525 KH 6524. DVD Player Operating instructions. DVD-lejátszó Használati utasítás
 4 HOME TECH DVD Player KH 6525 KH 6524 DVD Player Operating instructions DVD-lejátszó Használati utasítás KOMPERNASS GMBH BURGSTRASSE 21 D-44867 BOCHUM www.kompernass.com ID-Nr.: KH6524/6525-04/10-V4 KH
4csatornás DVS, 7 LCD
 4csatornás DVS, 7 LCD Tömör kezelési utasítás 4-CS M OZGÁS Távirányító LAN OPCIÓ Mielőtt bekapcsolja a készüléket Kérjük megfelelően csatlakoztassa a SATA táp- és adatkábelt, amikor a SATA HDD-t a DVR-be
Négy Csatornás Digitális Képrögzítő
 Négy Csatornás Digitális Képrögzítő Típus: K-DVR-4DU Telepítési és használati útmutató 1.2-es verzió Mielőtt a készüléket megpróbálná összekötni más eszközökkel vagy megpróbálná működtetni, kérjük figyelmesen
ConCorde MIRROR Használati útmutató
 ConCorde MIRROR Használati útmutató 1 Köszönjük, hogy a ConCorde Mirror MP4 lejátszót választotta. A készülék első használata előtt, kérjük olvassa el ezt a használati útmutatót. Figyelem! A készülék bármely
SDFTA11 MŰHOLDVEVŐ KÓDOLATLAN (FTA) ADÁSOK VÉTELÉRE
 ADÁSOK VÉTELÉRE") SDFTA11 MŰHOLDVEVŐ KÓDOLATLAN (FTA) ADÁSOK VÉTELÉRE MANUAL ANLEITUNG MODE D EMPLOI GEBRUIKSAANWIJZING MANUALE MANUAL DE USO HASZNÁLATI ÚTMUTATÓ KÄYTTÖOHJE BRUKSANVISNING NÁVOD K POUŽITÍ Alapvető jellemzők:
SDFTA11 MŰHOLDVEVŐ KÓDOLATLAN (FTA) ADÁSOK VÉTELÉRE MANUAL ANLEITUNG MODE D EMPLOI GEBRUIKSAANWIJZING MANUALE MANUAL DE USO HASZNÁLATI ÚTMUTATÓ KÄYTTÖOHJE BRUKSANVISNING NÁVOD K POUŽITÍ Alapvető jellemzők:
HD-2650 KEZELÉSI ÚTMUTATÓ. Magyar
 HD-2650 KEZELÉSI ÚTMUTATÓ Magyar AZ ÁRAMÜTÉS VESZÉLYÉNEK ELKERÜLÉSE ÉRDEKÉBEN NE TÁVOLÍTSA EL A KÉSZÜLÉK BURKOLATÁT. AZ ESZKÖZ NEM RENDELKEZIK FELHASZNÁLÓ ÁLTAL JAVÍTHATÓ ALKATRÉSZEKKEL. A JAVÍTÁST MINDIG
English... 2. Magyar... 77. Deutsch... 153 V 1.33
 English... 2 Magyar... 77 Deutsch... 153 V 1.33 Contents Trademarks... 6 Introduction... 6 Intended use... 6 Package contents... 7 Technical specifications... 10 Safety instructions... 12 Copyright...
!!!"#$%&%#'"()*+!,&()*,
*+!,&()*,") -,.%'/,012)301#0)43(/15641.,/1'3##)0/15/!!!"#$%&%#'"()*+!,&()*, 78881',0%,'19*50/1:;?8@A:7887?B@A:7887 CC@A:7887 !"#$% 1 1.1 1.2 1.3 1.4 1.5 1.6 1.7 1.8 1.9 1.10 2 2.1."@)+..$ *%+/#$..& 6 2.2 2.3 2.4
-,.%'/,012)301#0)43(/15641.,/1'3##)0/15/!!!"#$%&%#'"()*+!,&()*, 78881',0%,'19*50/1:;?8@A:7887?B@A:7887 CC@A:7887 !"#$% 1 1.1 1.2 1.3 1.4 1.5 1.6 1.7 1.8 1.9 1.10 2 2.1."@)+..$ *%+/#$..& 6 2.2 2.3 2.4
ANGOL NYELVI SZINTFELMÉRŐ 2013 A CSOPORT. on of for from in by with up to at
 ANGOL NYELVI SZINTFELMÉRŐ 2013 A CSOPORT A feladatok megoldására 45 perc áll rendelkezésedre, melyből körülbelül 10-15 percet érdemes a levélírási feladatra szánnod. Sok sikert! 1. Válaszd ki a helyes
Az Ön kézikönyve BEEZ DP-N-3600-B http://hu.yourpdfguides.com/dref/4255181
 Elolvashatja az ajánlásokat a felhasználói kézikönyv, a műszaki vezető, illetve a telepítési útmutató. Megtalálja a választ minden kérdésre az a felhasználói kézikönyv (információk, leírások, biztonsági
Out-Look. Display. Analog Bar. Testing Mode. Main Parameter. Battery Indicator. Second Parameter. Testing Frequency
 Out-Look Display Analog Bar Testing Mode Battery Indicator 1. LCD Display 2. Power Key 3. Mode Key 4. HOLD Key 5. Function Keys 6. Component socket (5Wire) 7. 2Wire Input Terminals Testing Frequency Main
Ültetési és öntözési javaslatok. Planting and watering instructions
 Ültetési és öntözési javaslatok Planting and watering instructions 1 Önöntöző-rendszer Sub-irrigation 2 Kedves növénykedvelő A LECHUZA önöntöző rendszerrel növényeink természetüknél fogva gyönyörű virágokat
MAKING MODERN LIVING POSSIBLE
 MAKING MODERN LIVING POSSIBLE Link CC Central - Központi Controller vezérlő Installation Szerelési útmutató Guide DANFOSS HEATING SOLUTIONS Link CC - Bevezetés Tartalomjegyzék Bevezetés...3 Szerelés...4
Kezdje itt Gyors üzembe helyezési útmutató
 Blu-ray Disc /DVD házimozi-rendszer BDV-NF720 BDV-NF620 HU Kezdje itt Gyors üzembe helyezési útmutató BDV-NF620 BDV-NF720 1 A csomagolás tartalma/a hangsugárzók beállítása BDV-NF720 2 A tv-készülék csatlakoztatása
SFP 6070 USER S MANUAL NÁVOD K POUŽITÍ NÁVOD NA POUŽITIE HASZNÁLATI ÚTMUTATÓ INSTRUKCJA OBSŁUGI EN CZ SK HU SPORT CLIP MP4 PLAYER
 SFP 6070 USER S MANUAL NÁVOD K POUŽITÍ NÁVOD NA POUŽITIE SPORT CLIP MP4 PLAYER MP4 PŘEHRÁVAČ SPORT CLIP MP4 PREHRÁVAČ SPORT CLIP HASZNÁLATI ÚTMUTATÓ SPORT CLIP MP4 LEJÁTSZÓ INSTRUKCJA OBSŁUGI ODTWARZACZ
HASZNÁLATI TANÁCSOK H.3
 R-Link Használati tanácsok..................................................................... H.3 általános információk..................................................................... H.4 Általános
bladeless AR5T90RE ToWER FAn instruction MAnuAl AR5T90RE 220-240V / 50Hz / 45W 220-240v~50Hz 45W
 bladeless AR5T90RE ToWER FAn lapátkerék nélküli instruction MAnuAl torony ventilátor AR5T90RE 220-240V / 50Hz / 45W 220-240v~50Hz 45W PAge 1/7 A jelölt készülék összeszerelését, beüzemelését, használatát