English Magyar Deutsch V 1.33
|
|
|
- Kornélia Faragó
- 10 évvel ezelőtt
- Látták:
Átírás
1
2
3 English... 2 Magyar Deutsch V 1.33

4 Contents Trademarks... 6 Introduction... 6 Intended use... 6 Package contents... 7 Technical specifications Safety instructions Copyright Overview Before you start Inserting/removing a memory card Inserting the battery pack Buttons LEDs Charging the Battery Setting the date and time Getting started Powering the camcorder on/off The display Selecting the operating mode Recording Recording videos English

5 Taking pictures Burst mode Time-lapse mode Self-timer WiFi mode / Controlling the action camcorder from the App The menu Menu icons Setting the video resolution Selecting the camera s field of view Setting the time-lapse options Rotating the recording by Toggling the loop recording mode on/off Toggling the diving mode on/off Deleting recordings/formatting the memory card Rotating the display image by Toggling the status LEDs on/off Customising the display brightness Customising the beeper volume Customising the auto power-off delay Setting the date and time Connecting a remote control (not included in the package) Resetting to factory defaults Connecting a microphone English - 3

6 Viewing recordings on a television Transferring recordings to a computer Connecting the camcorder to a computer Using a card reader Write-protecting the SD card adapter Software System Requirements Installing the software Uninstalling the software The main screen Setting the storage location / Selecting the language Editing recordings Viewing recordings Selecting navigation view Preview window Toolbar Importing recordings Merge videos Creating an AVCHD Disk Cutting video clips Upload to YouTube Upload to Facebook Photo album English

7 Album page Using the accessories Water-resistant case Cleaning after using under water Replacing the back cover Removing / fixing the adapter Velcro Swivel holder Replacing the adhesive pad Bike holder Adapter for other mounting systems Troubleshooting Maintenance / cleaning Servicing Cleaning Environmental regulations and disposal information Conformity notes Warranty and Service Information English - 5

8 Trademarks Apple is a registered trademark, App Store is a service mark of Apple Inc., registered in the USA and other countries. Google is a registered trademark of Google Inc. HDMI, the HDMI logo and High-Definition Multimedia Interface are trademarks or registered trademarks of HDMI Licensing, LLC in the USA and other countries. Microsoft Windows is a registered trademark of Microsoft Corporation, USA. SD and SDHC are registered trademarks. USB is a registered trademark. Other names and products can be the trademarks or registered trademarks of their respective owners. Introduction Thank you for purchasing this SilverCrest SCW 5 A1 action camcorder. The action camcorder is the ideal companion for your sports activities. Its extensive accessories allow you to use the action camcorder for the most different scenarios. It allows you to capture wonderful memories at any time. Intended use Your camcorder is a Consumer Electronics device and is designed exclusively for recording movies and pictures. Any use other than that mentioned above does not correspond to the intended use. The device may only be used for private purposes, not for industrial or commercial ones. This device fulfils all relevant standards and directives relating to CE Conformity. If any changes are made to the equipment other than those endorsed by the manufacturer, compliance with these standards and directives can no longer be guaranteed. Only use accessories recommended by the manufacturer. Observe the regulations and laws in the country of use. 6 - English

9 Package contents SilverCrest SCW 5 A1 action camcorder FJ-SLB-10A battery 4 GB microsd card (incl. SD card adapter) USB cable HDMI cable Water-resistant case (incl. adapter) English - 7
 USB cable HDMI cable")
10 Lens cover Water-resistant back cover (incl. adapter) (mounted on the water-resistant case) (orange seal) Open back cover (yellow seal) Bike holder Swivel holder Adapter for other mounting systems 8 - English

11 Flat adhesive socket Curved adhesive socket Velcro with latch Velcro without latch 3 x adhesive pads for replacement 6 x anti-mist pads CD-ROM with software (lineart illustration) User manual (lineart illustration) There is a separate "GNU General Public License" flyer included with the product. You can also download this flyer at English - 9

12 Technical specifications Capture sensor Lens Display Internal memory External memory Operating modes 10 - English 5-megapixel CMOS sensor Wide-angle, F2.8, f=2.5mm OLED status indicator 128MB (approx. 89,9MB free / partially used by firmware) microsd/sdhc (up to 64GB) Video recording, picture recording Video Format: H.264 (MP4) Resolution: Photo Format: JPEG Resolution: 1080p 1920 x 1080 (30 fps) 960p 1280 x 960 (30 fps) 720p 1280 x 720 (60 fps) 5 megapixel Power supply 5V, 0.5A for power supply via PC USB port 5V, 1.0A for power supply via external power adapter Battery charging time Runtime with fully charged battery Battery Connectors and sockets USB 2.0 Microphone approx. 3.0 hours for power supply via PC USB port approx. 2.5 hours (for power supply via external power adapter) approx. 1.5 to 2.0 hours Li-Ion battery FJ-SLB-10A / 3.7V, 1130mAh Manufacturer: FUJI ELECTRONICS(SHENZHEN) CO.,LTD HDMI MIC IN (2.5mm jack) built-in

13 Built-in wireless receiver Modulation: GFSK WiFi standards Frequency: 2403MHz to 2477MHz SilverCrest SCW 5 A1 Data transfer speed: 250kbps / 1Mbps / 2Mbps Number of channels: b, g, n Operating temperature * 0 C to +35 C Storage temperature * Relative humidity Dimensions (W x H x D) Weight (incl. rechargeable battery) 0 C to +45 C max. 85 % rel. humidity approx. 60 x 43 x 43 mm approx. 80 g * Temperatures below 0 C may reduce the battery capacity and/or lifetime. Please have this in mind when practicing winter sport activities, as the maximum runtime may be significantly reduced. If you want to use your camcorder at temperatures below 0 C you should install it in the water-resistant case with the water-resistant back cover. This guarantees that the heat released from the camcorder operation also heats up the battery. When not using the camcorder you should store the battery in your pocket, for example. The technical specifications and design can be changed without prior notice. English - 11

14 Safety instructions Before you use this device for the first time, please read the following notes and heed all warnings, even if you are familiar with handling electronic devices. Keep these operating instructions in a safe place for future reference. If you sell the device or pass it on, it is essential that you also hand over this manual, as it is part of the product. CAUTION! This icon alters you about a potential dangerous situation. Ignoring it can lead to severe injury or even death. WARNING! This symbol denotes important information for the safe operation of the product and user safety. This symbol denotes further information on the topic. To power the camcorder use the supplied battery pack only (manufacturer: FUJI ELECTRONICS(SHENZHEN) CO.,LTD / model: FJ- SLB-10A) English Always make sure that the device is not exposed to direct heat sources (e.g. radiators); no direct sunlight or bright artificial light reaches the device; the camcorder may be used within the allowed operating temperature range from 0 C to 35 C only; contact with spray, dripping water and corrosive liquids is avoided and the device is never operated near water; in particular the device may never be immersed in liquids (do not place any objects containing liquids, such as vases or drinks, on or near the device);

15 Dripping and sprayed water and immersing the device is allowed only after the camcorder has been fitted into the protective water-resistant case; the device is never placed near magnetic fields (e.g. speakers); no naked flames (e.g. burning candles) are placed on or near the device; no foreign bodies can penetrate into the device; the device is not exposed to any extreme temperature fluctuations as this can cause moisture through condensation and cause short-circuits; if the device has been exposed to strong temperature variations, wait for it to reach the ambient temperature before switching it on (about 2 hours); the device should not be subject to excessive shocks and vibrations; the device and its accessories are not damaged in order to avoid any further risks. Therefore you must inspect the device and its accessories regularly for any damage. If you find any component damaged, it must not be used. Never open the camcorder housing and have all repairs performed by qualified technical staff only. Failure to heed the warnings above may result in damage to the device or injury. Recordings (photo/video) of persons and the right on the own image Please note that when recording any persons, whether portraits or groups of persons, every person has the right on her/his own image/recording. Recording underaged people is subject to the consent of the parents. In order to avoid any legal measures, make sure to respect the legislation of the country of use. Using on the road Please note that using the camera on the road, whether driving a car, riding a bicycle or as a pedestrian may distract you from the traffic resulting in severe accidents. This may harm your health and/or result in legal actions. Therefore the camera may only be operated while the vehicle is not running. In some countries it can even be forbidden to use it in a car and result in legal actions. Please make sure to respect the legislation of the country of use. English - 13

16 Children and persons with disabilities Electrical devices are not suitable for children. Also persons with reduced physical, sensory or mental capabilities should only use electrical devices in appropriate circumstances. Do not allow children or persons with disabilities to use electrical devices unsupervised, unless they are instructed accordingly and supervised by a competent person responsible for their safety. Children should always be supervised to ensure that they do not play with the product. Small parts can represent choking hazards. Keep the packaging away from children and persons with disabilities. There is a risk of suffocation! Battery Always insert the battery pack with the correct polarity. The correct polarity is labelled on the battery and inside the battery compartment. Never throw a battery into fire. Remove the battery pack if you do not plan to use the camcorder for a while. Improper use could cause explosions or leaks. Batteries must never be opened or deformed. Otherwise any leaking battery fluids may cause injuries. If the battery fluid becomes in contact with the skin or eyes, rinse immediately with plenty of water and seek medical aid. Only operate this device with the battery pack supplied in order to avoid overheating, deformation of the casing, fire, electric shocks, explosion and other hazards. Batteries must be disposed of at specific collection points English

17 Warning: risk of explosion! Improper use of the battery pack may cause explosions or leaks. Never replace the battery in an explosion-sensitive environment. While inserting or removing the battery a spark may be produced that could cause an explosion. Please head the usage restrictions of prohibitions regarding battery-powered devices at dangerous places like fuel storage areas. Explosion-sensitive areas are normally (but not always) labelled. These include fuel storage areas such as below deck on a boat, fuel line or tank areas, environments where the air contains inflammable substances (e.g. cereals dust or metal powder) and any areas where you should normally switch off your car engine. Respect the environment. Old batteries must not be disposed of with domestic waste. They must be handed in at a collection point for waste batteries. Cables Always hold cables by the plug and never pull on the cable itself. Never place heavy objects or furniture on the cables and take care that the cord does not become trapped, especially at the plug and sockets. Never tie knots in a cable and do not tie them to other cables. All cables must be laid so that nobody can trip over them or be obstructed by them. English - 15
 and any areas where you should normally switch off your car engine.")
18 Water-resistance The camcorder itself is not water-resistant. It can only be used under water in combination with its water-resistant case. The water-resistant case is water-resistant up to a depth of 60 m. To guarantee its water resistance, do not use the camcorder with the water-resistant case for longer than 60 minutes under water at a time. The water resistance of this camcorder applies to salt and fresh water only. It does not apply to any cleaners, chemicals, solvents or water in public swimming pools. Liquids of this kind must be wiped off the water-resistant case immediately. Only use the water-resistant case in water of temperatures between 0 C and 35 C. Avoid excessive vibration or shaking under water. Otherwise there is a risk that the water-resistant case opens. This can damage the camcorder and any recordings. Copyright All the contents of this user manual are protected by copyright and provided to the reader for information only. Copying data and information without the prior explicit written consent of the author is strictly forbidden. This also applies to any commercial use of the contents and information. All texts and diagrams are up-to-date as of the date of printing English

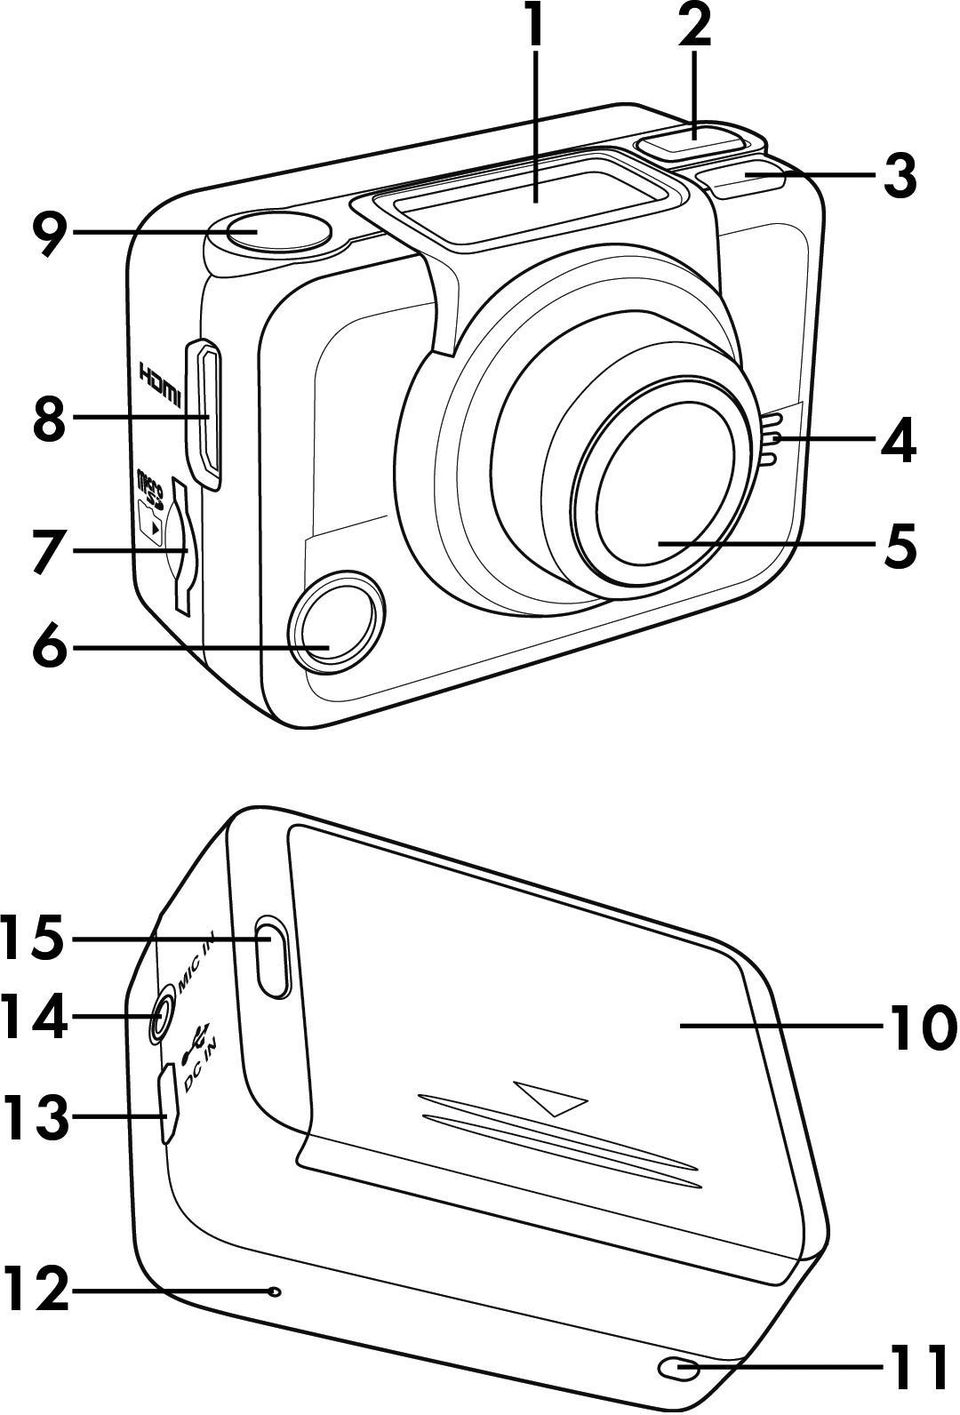
19 Overview SilverCrest SCW 5 A1 An additional illustration of the items and controls and their corresponding numbers can be found on the inner page of the fold-out cover of this user manual. You can keep this page folded out whilst reading the different chapters of this user manual. This allows you to refer to the relevant controls at any time. 1 Display 2 On/Off/Mode button 3 Status LED 4 Speaker 5 Lens 6 Status LED 7 microsd card slot 8 HDMI output 9 Record button 10 Battery compartment 11 Status LED 12 Microphone 13 USB/charging connector 14 Microphone connector 15 Status LED English - 17

20 Before you start Inserting/removing a memory card You should insert a microsd memory card to record your videos and pictures. If there is no microsd memory card inserted, all recordings will be stored on the internal camcorder memory. As the internal memory is very small, only a few recordings may be stored. Insert the supplied microsd in order to be able to store more recordings. Proceed as follows: Power the camcorder off before you insert or remove a memory card. Insert the memory card with the contacts facing towards the front of the device (towards the lens [5]) into the microsd card slot [7] until it clicks in place. To remove the memory card, gently press on the inserted card. The memory card will protrude a little so that you can get a hold of it and remove it. Only use Speed Class 4 or faster memory cards. Otherwise image and/or sound distortion may occur during video recording. If the memory card or the internal memory is full, the message FULL appears on the display (1) English
 into the microsd card slot [7] until it clicks in place.")
21 Inserting the battery pack Insert the battery pack as follows into the camcorder: SilverCrest SCW 5 A1 Open the battery compartment [10]. To do so, press on the ribbed area of the battery compartment cover and slide it into the direction of the arrow until the closed arrow on the cover and the opened arrow on the camera housing are aligned. Next lift the battery compartment cover to remove it. Align the contacts of the battery pack with the contacts in the battery compartment [10]. Make sure that the [+] and [-] contact markings on the battery and in the compartment [10] match. Next fully insert the battery pack into the battery compartment [10]. Make sure to place the end of the strip over the battery pack. English - 19
22 Close the battery compartment [10]. To do so, press on the ribbed area of the battery compartment cover and slide it into the direction of the arrow until the closed arrow on the cover and the closed arrow on the camera housing are aligned. To remove the battery pack, open the battery compartment [10] as described above. Pull the strip to remove the battery English
23 Buttons Button On/Off/Mode button [2] Record button [9] Function SilverCrest SCW 5 A1 Press and hold this button for at least 3 seconds to switch the camcorder on or off. Press this button several times while the camcorder is switched on to toggle between the different operating modes (Video, Photo, WiFi, Burst, Time-lapse, Selftimer and Menu). Press this button while the menu is shown to navigate through the menu items. Press this button in Video mode to start or stop recording. Press this button in Photo mode to take a picture. Press this button while the menu is shown to select a menu item. LEDs The status LEDs can be found on the top, bottom, front and back panels of the camcorder. They allow you to monitor the camcorder status under the most different mounting scenarios. LED Colour Description Status LED [3] Status LED [3, 11 and 15] Status LED [6] Green Slowly flashing green Fast flashing green Flashing red Flashing green/orange or red Flashing orange Off Operation: Powering on or photo capture. Operation: WiFi is enabled USB Mode: Camcorder powered on Operation: Video recording in progress Operation: Self-timer enabled Operation: Recording video or self-timer enabled USB Mode: Charging battery USB Mode: Battery is fully charged English - 21
24 Charging the Battery It is possible to recharge the camcorder battery pack via the USB power of a computer. To do this, you will need the USB cable supplied. Insert the battery pack as described above into the camcorder. Use the USB cable to connect the camcorder to an available USB port on a computer. Insert the small plug of the supplied USB cable into the USB/charge port of your camcorder [13] and the large plug into a USB port on your computer. You can keep the camcorder powered off while charging. Press and hold the On/Off/Mode button [2] for three seconds to switch the camcorder off. The status LED [6] flashes orange during charging. When the charging process is complete, the status LED [6] goes out. Some computers do not supply USB power while they are turned off. If the camcorder does not charge, make sure your computer is switched on English
25 In addition to the options above, you can also connect the camcorder to an external USB power adapter (not supplied) in order to charge the battery pack. To do this, you will need the USB cable supplied. You can purchase a suitable 5V USB power adapter with at least 1A from any electronics retail outlet. When using an external power adapter, it must be connected to an easily accessible wall outlet in order to be able to disconnect it quickly in case of an emergency. Setting the date and time To set the date and time: Press and hold the On/Off/Mode button [2] for at least 3 seconds to switch the camcorder on. The camcorder initialises in Video mode automatically. To open the menu, press the On/Off/Mode button [2] six times. If the display is in dimmed power-saving mode, press the On/Off/Mode button [2] once to toggle to active mode. Press the record button [9] to open the menu. The following menu is shown: English - 23
26 The SETUP menu will be highlighted. Press the On/Off/Mode button [2] multiple times to select the MORE menu and then press the record button [9] to confirm. Press the On/Off/Mode button [2] multiple times until the TIME menu is highlighted. Press the record button [9] to open the TIME menu. Next you can set the year, month, day, hours and minutes in sequence. Select the variable that you want to set by pressing the On/Off/Mode button [2]. Press the record button [9] to increase the value stepwise. After all settings have been entered, press the On/Off/Mode button [2] to select OK. Press the record button [9] to confirm. To exit the MORE menu, press the On/Off/Mode button [2] multiple times until the EXIT item is highlighted and then press the record button [9] to confirm. Next you can use the On/Off/Mode button [2] to select an operating mode English
27 Getting started Powering the camcorder on/off Press and hold the On/Off/Mode button [2] for at least 3 seconds to switch the camcorder on or off. While powering on the status LED [3] goes green. The display The display [1] shows the following information: No. Icon* Description 21 Number of recordings saved 22 Battery capacity Alternates between the following: Displays the field of view of the camera: WIDE or ULTRA Shows the remaining storage space in percentage. Displays the option that is executed when pressing the record button [9]. When this icon is shown, pressing the record button [9] starts a video recording. When this icon is shown, pressing the record button [9] captures a picture. English - 25
28 No. Icon* Description Shows the operating mode currently selected. Video mode: Use this mode for video recording. This icon also resumes the current video recording settings. Photo mode: Use this mode for taking pictures. 25 WiFi Mode: In this operating mode you can enable or disable the WiFi function. While WiFi is enabled, you can control the camcorder from the SilverCrest Action Camcorder App. Burst mode: Use this mode to take a series of 10 pictures. Time-lapse mode: Use this mode for time-lapse picture or video recording. This icon also resumes the current settings. Self-timer: Use this mode for self-timer shots. Setup: Use this mode to customise the camcorder settings. * The icons may vary depending on the selected setting English
29 Selecting the operating mode SilverCrest SCW 5 A1 Press the On/Off/Mode button [2] several times to toggle between the different operating modes. The currently selected mode is indicated on the top-left corner of the display [1]. The modes are cycled as follows: Video mode Photo mode WiFi Mode Burst mode Setup Self-timer Time-lapse mode If the display is in dimmed power-saving mode, press the On/Off/Mode button [2] once to toggle to active mode. Recording Recording videos Press and hold the On/Off/Mode button [2] for at least 3 seconds to switch the camcorder on. The camcorder initialises in Video mode automatically. English - 27
30 Press the record button [9] to start recording. During recording the status LEDs [3, 11 and 15] will flash red and the status LED [6] orange. Press the record button [9] again to stop recording. The status LEDs [3, 11 and15] go off. Taking pictures Press and hold the On/Off/Mode button [2] for at least 3 seconds to switch the camcorder on. The camcorder initialises in Video mode automatically. To switch to Photo mode (PHOTO), press the On/Off/Mode button [2] once. Press the record button [9] to take a picture. While saving the status LED [3] goes green. Burst mode Press and hold the On/Off/Mode button [2] for at least 3 seconds to switch the camcorder on. The camcorder initialises in Video mode automatically. To switch to Burst mode (BURST), press the On/Off/Mode button [2] three times. Press the record button [9] to take a series of 10 pictures. While saving the status LED [3] goes green. Time-lapse mode Press and hold the On/Off/Mode button [2] for at least 3 seconds to switch the camcorder on. The camcorder initialises in Video mode automatically. To switch to Time-lapse mode (LAPSE), press the On/Off/Mode button [2] four times. Press the record button [9] to start recording. During recording the status LEDs [3, 11 and 15] will flash red and the status LED [6] orange. Press the record button [9] again to stop recording. The status LED [3] goes off English
31 Self-timer Press and hold the On/Off/Mode button [2] for at least 3 seconds to switch the camcorder on. The camcorder initialises in Video mode automatically. To switch to Self-timer mode (TIMER), press the On/Off/Mode button [2] five times. Press the record button [9] to enable the self-timer. After the self-timer has been enabled, the status LED [3] flashes slowly green/orange and the status LEDs [11, 15 and 6] flash slowly red or orange. The last seconds of the self-timer countdown the status LEDs [3, 6, 11 and 15] flash faster. The photo is taken 10 seconds after the self-timer is enabled. WiFi mode / Controlling the action camcorder from the App The "SilverCrest Action Camcorder" app lets you control your action camcorder from your smartphone or tablet PC. Proceed as follows: First install the "SilverCrest Action Camcorder app on your smartphone or tablet PC. You can download the app from the Apple App Store and from the Google Play Store. Enable the action camcorder WiFi mode: o Press and hold the On/Off/Mode button [2] for at least 3 seconds to switch the camcorder on. The camcorder initialises in Video mode automatically. o To switch to WiFi mode, press the On/Off/Mode button [2] twice. o Press the Record button (9) to enable WiFi. The display [1] reads "ON". To disable WiFi, press the Record button [9] again. The display [1] reads "OFF". o Press the On/Off/Mode button [2] to switch to a different operating mode. The action camcorder starts preparing the WiFi mode. As soon as the status LED [3] flashes, WiFi is ready. Please note that the WiFi mode is automatically disabled after switching the camcorder off and back on. Enable WiFi on your smartphone or tablet PC. Please also see the User Manual for your device. English - 29
32 Have the smartphone or tablet PC search for any WiFi devices and select the "SCW5A1_" followed by a 6-digits number/character combination from the list of found WiFi devices. Enter the password " " and establish the connection. Next you can launch the "SilverCrest Action Camcorder" app on your smartphone or tablet PC and use it to control the action camcorder. The menu The menu lets you customise the camcorder settings and record parameters. Press and hold the On/Off/Mode button [2] for at least 3 seconds to switch the camcorder on. The camcorder initialises in Video mode automatically. To open the menu, press the On/Off/Mode button [2] six times. Press the record button [9] to open the menu. The following menu is shown: Press the On/Off/Mode button [2] to select the desired icon or option. Press the record button [9] to confirm your selection English
33 Menu icons Customise recording settings To set the video resolution To select the camera s field of view To set the time-lapse delay To rotate the recording by 180 To toggle the loop recording mode on/off To toggle the diving mode on/off To delete recordings/format the memory card To exit the menu Customise camcorder settings To rotate the display image by 180 To toggle the status LEDs on/off To customise the display brightness To customise the beeper volume To customise the auto power-off delay To set the date and time To connect a remote control (not included in the package) To reset to factory defaults To exit the menu Record button [9] to confirm On/Off/Mode button [2] to select English - 31
34 Setting the video resolution The resolution determines the size of the recording in pixels. As a general rule: the higher the resolution, the more storage space is required. To set the video resolution, proceed as follows: Press the On/Off/Mode button [2] multiple times to select the SETUP menu and then press the record button [9] to confirm. The VIDEO menu will be highlighted. Press the record button [9] to open the VIDEO menu. Press the On/Off/Mode button [2] to select an option. The following settings are available: 1080p 1920 x 1080 (30 fps) 960p 1280 x 960 (30 fps) 720p 1280 x 720 (60 fps) Press the record button [9] to confirm your selection. To exit the SETUP menu, press the On/Off/Mode button [2] multiple times until the EXIT item is highlighted and then press the record button [9] to confirm English
35 Selecting the camera s field of view To select the camera s field of view, proceed as follows: Press the On/Off/Mode button [2] multiple times to select the SETUP menu and then press the record button [9] to confirm. Press the On/Off/Mode button [2] multiple times until the FOV menu is highlighted. Press the record button [9] to open the FOV menu. Press the On/Off/Mode button [2] to select an option. The following settings are available: Ultra wide-angle lens Wide-angle lens Press the record button [9] to confirm your selection. To exit the SETUP menu, press the On/Off/Mode button [2] multiple times until the EXIT item is highlighted and then press the record button [9] to confirm. The "Ultra" and "Wide" settings only apply to picture recordings. For video recordings, the setting will always be "Ultra" (independently of the selection made in the menu). English - 33
36 Setting the time-lapse options To set the time-lapse options, proceed as follows: Press the On/Off/Mode button [2] multiple times to select the SETUP menu and then press the record button [9] to confirm. Press the On/Off/Mode button [2] multiple times until the LAPSE menu is highlighted. Press the record button [9] to open the LAPSE menu. Press the On/Off/Mode button [2] to select the desired option and then press the record button [9] to confirm. The following options are available: Use this menu to select to save the timelapse recording as a video or select to save it as a pictures series. Use this menu to select the recording interval. The following settings are available: 1 SEC (not for picture series), 3 SEC, 5 SEC, 10 SEC, 30 SEC and 60 SEC. Select this option to exit the LAPSE menu without making any changes. To exit the SETUP menu, press the On/Off/Mode button [2] multiple times until the EXIT item is highlighted and then press the record button [9] to confirm English
KN-CP50. MANUAL (p. 2) Digital compass. ANLEITUNG (s. 4) Digitaler Kompass. GEBRUIKSAANWIJZING (p. 10) Digitaal kompas
 Digital compass. ANLEITUNG (s. 4) Digitaler Kompass. GEBRUIKSAANWIJZING (p. 10) Digitaal kompas") KN-CP50 MANUAL (p. ) Digital compass ANLEITUNG (s. 4) Digitaler Kompass MODE D EMPLOI (p. 7) Boussole numérique GEBRUIKSAANWIJZING (p. 0) Digitaal kompas MANUALE (p. ) Bussola digitale MANUAL DE USO (p.
KN-CP50 MANUAL (p. ) Digital compass ANLEITUNG (s. 4) Digitaler Kompass MODE D EMPLOI (p. 7) Boussole numérique GEBRUIKSAANWIJZING (p. 0) Digitaal kompas MANUALE (p. ) Bussola digitale MANUAL DE USO (p.
Széchenyi István Egyetem www.sze.hu/~herno
 Oldal: 1/6 A feladat során megismerkedünk a C# és a LabVIEW összekapcsolásának egy lehetőségével, pontosabban nagyon egyszerű C#- ban írt kódból fordítunk DLL-t, amit meghívunk LabVIEW-ból. Az eljárás
Using the CW-Net in a user defined IP network
 Using the CW-Net in a user defined IP network Data transmission and device control through IP platform CW-Net Basically, CableWorld's CW-Net operates in the 10.123.13.xxx IP address range. User Defined
1. Gyakorlat: Telepítés: Windows Server 2008 R2 Enterprise, Core, Windows 7
 1. Gyakorlat: Telepítés: Windows Server 2008 R2 Enterprise, Core, Windows 7 1.1. Új virtuális gép és Windows Server 2008 R2 Enterprise alap lemez létrehozása 1.2. A differenciális lemezek és a két új virtuális
Proxer 7 Manager szoftver felhasználói leírás
 Proxer 7 Manager szoftver felhasználói leírás A program az induláskor elkezdi keresni az eszközöket. Ha van olyan eszköz, amely virtuális billentyűzetként van beállítva, akkor azokat is kijelzi. Azokkal
MINO V2 ÁLLVÁNY CSERÉJE V4-RE
 MINO V2 remote controlled MINO V2 ÁLLVÁNY CSERÉJE V4-RE Mino V3 circuit board replacement Mino V2-V4 csere készlet ezüst Art# 59348S, Mino V2-V4 csere készlet fehér Art# 59348W V4 áramköri lap Art# 75914
MAKING MODERN LIVING POSSIBLE. Danfoss Heating Solutions
 MAKING MODERN LIVING POSSIBLE Danfoss Danfoss Link Link HC Hidronikus HC Hydronic szabályozó Controller Szerelési Installation útmutató Guide Danfoss Heating Solutions Szerelési útmutató Tartalomjegyzék
Csatlakozás a BME eduroam hálózatához Setting up the BUTE eduroam network
 Csatlakozás a BME eduroam hálózatához Setting up the BUTE eduroam network Table of Contents Windows 7... 2 Windows 8... 6 Windows Phone... 11 Android... 12 iphone... 14 Linux (Debian)... 20 Sebők Márton
Utasítások. Üzembe helyezés
 HASZNÁLATI ÚTMUTATÓ Üzembe helyezés Utasítások Windows XP / Vista / Windows 7 / Windows 8 rendszerben történő telepítéshez 1 Töltse le az AORUS makróalkalmazás telepítőjét az AORUS hivatalos webhelyéről.
USER MANUAL Guest user
 USER MANUAL Guest user 1 Welcome in Kutatótér (Researchroom) Top menu 1. Click on it and the left side menu will pop up 2. With the slider you can make left side menu visible 3. Font side: enlarging font
MP3-FMTRANS50. MANUAL (p. 2) CAR MP3 FM+BLUETOOTH TRANSMITTER INCL. REMOTE CONTROL. ANLEITUNG (s. 4) AUTO MP3 FM+BT TRANSMITTER INKL.
 CAR MP3 FM+BLUETOOTH TRANSMITTER INCL. REMOTE CONTROL. ANLEITUNG (s. 4) AUTO MP3 FM+BT TRANSMITTER INKL.") MP3-FMTRANS50 MANUAL (p. 2) CAR MP3 FM+BLUETOOTH TRANSMITTER INCL. REMOTE CONTROL ANLEITUNG (s. 4) AUTO MP3 FM+BT TRANSMITTER INKL. FB MODE D EMPLOI (p. 6) Transmetteur MP3, FM + Bluetooth avec télécommande
MP3-FMTRANS50 MANUAL (p. 2) CAR MP3 FM+BLUETOOTH TRANSMITTER INCL. REMOTE CONTROL ANLEITUNG (s. 4) AUTO MP3 FM+BT TRANSMITTER INKL. FB MODE D EMPLOI (p. 6) Transmetteur MP3, FM + Bluetooth avec télécommande
T Á J É K O Z T A T Ó. A 1108INT számú nyomtatvány a http://www.nav.gov.hu webcímen a Letöltések Nyomtatványkitöltő programok fülön érhető el.
 T Á J É K O Z T A T Ó A 1108INT számú nyomtatvány a http://www.nav.gov.hu webcímen a Letöltések Nyomtatványkitöltő programok fülön érhető el. A Nyomtatványkitöltő programok fület választva a megjelenő
ANGOL NYELV KÖZÉPSZINT SZÓBELI VIZSGA I. VIZSGÁZTATÓI PÉLDÁNY
 ANGOL NYELV KÖZÉPSZINT SZÓBELI VIZSGA I. VIZSGÁZTATÓI PÉLDÁNY A feladatsor három részből áll 1. A vizsgáztató társalgást kezdeményez a vizsgázóval. 2. A vizsgázó egy szituációs feladatban vesz részt a
ANGOL NYELV KÖZÉPSZINT SZÓBELI VIZSGA I. VIZSGÁZTATÓI PÉLDÁNY
 ANGOL NYELV KÖZÉPSZINT SZÓBELI VIZSGA I. VIZSGÁZTATÓI PÉLDÁNY A feladatsor három részbol áll 1. A vizsgáztató társalgást kezdeményez a vizsgázóval. 2. A vizsgázó egy szituációs feladatban vesz részt a
THS710A, THS720A, THS730A & THS720P TekScope Reference
 THS710A, THS720A, THS730A & THS720P TekScope Reference 070-9741-01 Getting Started 1 Connect probes or leads. 2 Choose SCOPE 3 or METER mode. Press AUTORANGE. Copyright Tektronix, Inc. Printed in U.S.A.
Contact us Toll free (800) fax (800)
 fax (800)") Table of Contents Thank you for purchasing our product, your business is greatly appreciated. If you have any questions, comments, or concerns with the product you received please contact the factory.
Table of Contents Thank you for purchasing our product, your business is greatly appreciated. If you have any questions, comments, or concerns with the product you received please contact the factory.
INSTALLATION MANUAL For authorized service personnel only.
 Connection Method CHASSIS TYPE A AIR CONDITIONER OPTIONAL PARTS Communication box kit PART NO. 9317807005 INSTALLATION MANUAL For authorized service personnel only. 1. SAFETY PRES Contents 1. SAFETY PRES...
English Magyar Slovenščina Česky V 3.42
 English... 2 Magyar... 83 Slovenščina... 164 Česky... 245 V 3.42 Content Introduction... 5 Intended use... 6 Supplied items... 7 Overview... 8 LED indicators... 9 Technical data... 10 Safety instructions...
(Asking for permission) (-hatok/-hetek?; Szabad ni? Lehet ni?) Az engedélykérés kifejezésére a következő segédigéket használhatjuk: vagy vagy vagy
 (-hatok/-hetek?; Szabad ni? Lehet ni?) Az engedélykérés kifejezésére a következő segédigéket használhatjuk: vagy vagy vagy") (Asking for permission) (-hatok/-hetek?; Szabad ni? Lehet ni?) SEGÉDIGÉKKEL Az engedélykérés kifejezésére a következő segédigéket használhatjuk: vagy vagy vagy A fenti felsorolásban a magabiztosság/félénkség
(Asking for permission) (-hatok/-hetek?; Szabad ni? Lehet ni?) SEGÉDIGÉKKEL Az engedélykérés kifejezésére a következő segédigéket használhatjuk: vagy vagy vagy A fenti felsorolásban a magabiztosság/félénkség
DF 710 / DF 1040. Digitális képkeret. Használati utasítás
 DF 710 / DF 1040 Digitális képkeret Használati utasítás Bevezetés Köszönjük, hogy cégünk termékét választotta! Kérjük, használatba vétel előtt olvassa el figyelmesen ezt a használati utasítást, hogy a
Alkalmazás-shop (Internet-kapcsolat szükséges)
") Alkalmazás-shop (Internet-kapcsolat szükséges) 1) Lépj ide: Webszolgáltatások -> 1. kép: Alkalmazások indítása 2) Megjelenik az elérhető alkalmazások listája. 3) A távirányító navigációs gombjaival lépj
Alkalmazás-shop (Internet-kapcsolat szükséges) 1) Lépj ide: Webszolgáltatások -> 1. kép: Alkalmazások indítása 2) Megjelenik az elérhető alkalmazások listája. 3) A távirányító navigációs gombjaival lépj
BKI13ATEX0030/1 EK-Típus Vizsgálati Tanúsítvány/ EC-Type Examination Certificate 1. kiegészítés / Amendment 1 MSZ EN 60079-31:2014
 (1) EK-TípusVizsgálati Tanúsítvány (2) A potenciálisan robbanásveszélyes környezetben történő alkalmazásra szánt berendezések, védelmi rendszerek 94/9/EK Direktíva / Equipment or Protective Systems Intended
EL-ES03HQ. English Deutsch Français Nederlands Italiano Español Magyar Suomi Svenska Česky Română Ελληνικά. MANUAL (p. 2) TV SMART POWER SAVER
 TV SMART POWER SAVER") MANUAL (p. 2) TV SMART POWER SAVER MODE D EMPLOI (p. 8) Economiseur d énergie intelligent pour TV MANUALE (p. 14) RISPARMIATORE DI ENERGIA PER TV HASZNÁLATI ÚTMUTATÓ (o. 20.) INTELLIGENS TV ENERGIAMEGTAKARÍTÓ
MANUAL (p. 2) TV SMART POWER SAVER MODE D EMPLOI (p. 8) Economiseur d énergie intelligent pour TV MANUALE (p. 14) RISPARMIATORE DI ENERGIA PER TV HASZNÁLATI ÚTMUTATÓ (o. 20.) INTELLIGENS TV ENERGIAMEGTAKARÍTÓ
English PATROL 24VDC SOROMPÓ HASZNÁLATI UTASÍTÁS
 English PATROL 24VDC SOROMPÓ HASZNÁLATI UTASÍTÁS English 3.3 Hand configuration changing As standard the system is supplied in right-hand configuration. To fit the barrier in the left-hand position, follow
Hogyan használja az OROS online pótalkatrész jegyzéket?
 Hogyan használja az OROS online pótalkatrész jegyzéket? Program indítása/program starts up Válassza ki a weblap nyelvét/choose the language of the webpage Látogasson el az oros.hu weboldalra, majd klikkeljen
1. Ismerkedés a Hyper-V-vel, virtuális gépek telepítése és konfigurálása
 1. Ismerkedés a Hyper-V-vel, virtuális gépek telepítése és konfigurálása 1.1. Új virtuális gép és a Windows Server 2012 R2 Datacenter alap lemez létrehozása 1.2. A differenciális lemezek és a két új virtuális
Kezdőlap > Termékek > Szabályozó rendszerek > EASYLAB és TCU-LON-II szabályozó rendszer LABCONTROL > Érzékelő rendszerek > Típus DS-TRD-01
 Típus DS-TRD FOR EASYLAB FUME CUPBOARD CONTROLLERS Sash distance sensor for the variable, demand-based control of extract air flows in fume cupboards Sash distance measurement For fume cupboards with vertical
EN United in diversity EN A8-0206/419. Amendment
 22.3.2019 A8-0206/419 419 Article 2 paragraph 4 point a point i (i) the identity of the road transport operator; (i) the identity of the road transport operator by means of its intra-community tax identification
12.2.2 Laborgyakorlat: A Windows XP haladó telepítése
 12.2.2 Laborgyakorlat: A Windows XP haladó telepítése Bevezetés Nyomtasd ki a laborgyakorlatot és végezd el lépéseit! Ebben a laborgyakorlatban automatizálva fogjuk telepíteni a Windows XP Professional
Formula Sound árlista
 MIXERS FF-6000; FF6000P Formula Sound 160 6 channel dual format DJ mixer with removable fader panel. (Supplied with linear faders) Formula Sound 160P As above but with PRO X crossfade fitted. Formula Sound
REMOTE RADAR DETECTOR (connectable to GPS DETECTOR device.) BEÉPÍTHETŐ RADARDETEKTOR (GPS DETECTOR készülékhez) USER MANUAL / HASZNÁLATI ÚTMUTATÓ
 BEÉPÍTHETŐ RADARDETEKTOR (GPS DETECTOR készülékhez) USER MANUAL / HASZNÁLATI ÚTMUTATÓ") REMOTE RADAR DETECTOR (connectable to GPS DETECTOR device.) BEÉPÍTHETŐ RADARDETEKTOR (GPS DETECTOR készülékhez) USER MANUAL / HASZNÁLATI ÚTMUTATÓ 1 REMOTE RADAR DETECTOR (connectable to GPS DETECTOR device.)
REMOTE RADAR DETECTOR (connectable to GPS DETECTOR device.) BEÉPÍTHETŐ RADARDETEKTOR (GPS DETECTOR készülékhez) USER MANUAL / HASZNÁLATI ÚTMUTATÓ 1 REMOTE RADAR DETECTOR (connectable to GPS DETECTOR device.)
A JVE-3303B típusú többfunkciós minikamera felhasználói kézikönyve
 A JVE-3303B típusú többfunkciós minikamera felhasználói kézikönyve A kütyü tartozékai Mini kamera, USB kábel, Kézikönyv CD,Hátsó csipesz és tartó, Csíptető Kinézet és kezelőszervek 1. Ki/be kapcs 2. Felvétel/mentés
ENROLLMENT FORM / BEIRATKOZÁSI ADATLAP
 ENROLLMENT FORM / BEIRATKOZÁSI ADATLAP CHILD S DATA / GYERMEK ADATAI PLEASE FILL IN THIS INFORMATION WITH DATA BASED ON OFFICIAL DOCUMENTS / KÉRJÜK, TÖLTSE KI A HIVATALOS DOKUMENTUMOKBAN SZEREPLŐ ADATOK
Lexington Public Schools 146 Maple Street Lexington, Massachusetts 02420
 146 Maple Street Lexington, Massachusetts 02420 Surplus Printing Equipment For Sale Key Dates/Times: Item Date Time Location Release of Bid 10/23/2014 11:00 a.m. http://lps.lexingtonma.org (under Quick
Személyes adatváltoztatási formanyomtatvány- Magyarország / Personal Data Change Form - Hungary
 Személyes adatváltoztatási formanyomtatvány- Magyarország / Personal Data Change Form - Hungary KITÖLTÉSI ÚTMUTATÓ: A formanyomtatványon a munkavállaló a személyes adatainak módosítását kezdeményezheti.
Angol Középfokú Nyelvvizsgázók Bibliája: Nyelvtani összefoglalás, 30 kidolgozott szóbeli tétel, esszé és minta levelek + rendhagyó igék jelentéssel
 Angol Középfokú Nyelvvizsgázók Bibliája: Nyelvtani összefoglalás, 30 kidolgozott szóbeli tétel, esszé és minta levelek + rendhagyó igék jelentéssel Timea Farkas Click here if your download doesn"t start
Minta ANGOL NYELV KÖZÉPSZINT SZÓBELI VIZSGA II. Minta VIZSGÁZTATÓI PÉLDÁNY
 ANGOL NYELV KÖZÉPSZINT SZÓBELI VIZSGA II. A feladatsor három részből áll VIZSGÁZTATÓI PÉLDÁNY 1. A vizsgáztató társalgást kezdeményez a vizsgázóval. 2. A vizsgázó egy szituációs feladatban vesz részt a
TRENDnetVIEW Pro szoftvert. ŸGyors telepítési útmutató (1)
") TRENDnetVIEW Pro szoftvert ŸGyors telepítési útmutató (1) TRENDnetVIEW Pro/05.29.2014 Tartalomjegyzék TRENDnetVIEW Pro Management Software követelmények... 13 TRENDnetVIEW Pro Telepítése... 14 Videokamerák
TRENDnetVIEW Pro szoftvert ŸGyors telepítési útmutató (1) TRENDnetVIEW Pro/05.29.2014 Tartalomjegyzék TRENDnetVIEW Pro Management Software követelmények... 13 TRENDnetVIEW Pro Telepítése... 14 Videokamerák
1.1. EGYETLEN KÉSZÜLÉK ÜZEMBE HELYEZÉSE... 124 1.2. KÉT KÉSZÜLÉK ÜZEMBE HELYEZÉSE... 124 2.1. BEKAPCSOLT/KÉSZENLÉTI ÁLLAPOT... 125
 TÁRGYMUTATÓ Fejezet 1: ÜZEMBE HELYEZÉS...124 1.1. EGYETLEN KÉSZÜLÉK ÜZEMBE HELYEZÉSE... 124 1.2. KÉT KÉSZÜLÉK ÜZEMBE HELYEZÉSE... 124 Fejezet 2: FUNKCIÓK...125 2.1. BEKAPCSOLT/KÉSZENLÉTI ÁLLAPOT... 125
Correlation & Linear Regression in SPSS
 Petra Petrovics Correlation & Linear Regression in SPSS 4 th seminar Types of dependence association between two nominal data mixed between a nominal and a ratio data correlation among ratio data Correlation
Cashback 2015 Deposit Promotion teljes szabályzat
 Cashback 2015 Deposit Promotion teljes szabályzat 1. Definitions 1. Definíciók: a) Account Client s trading account or any other accounts and/or registers maintained for Számla Az ügyfél kereskedési számlája
Használati útmutató HANDELSINFORMATIONEN FÜR DEN KUNDEN COMMERCIËLE INFORMATIES VOOR DE KLANT SLT955 SLT955. ökocímke
 INFORMAZIONI COMMERCIALI PER I CONSUMATORI COMMERCIAL INFORMATION FOR THE CONSUMER INFORMATIONS COMMERCIALES POUR LE CLIENT INFORMACIONES COMERCIALES PARA EL CLIENTE Használati útmutató HANDELSINFORMATIONEN
4. Gyakorlat: Csoportházirend beállítások
 4. Gyakorlat: Csoportházirend beállítások 4.1. A Default Domain Policy jelszóra vonatkozó beállításai 4.2. Parancsikon, mappa és hálózati meghajtó megjelenítése csoport házirend segítségével 4.3. Alkalmazások
Comfort típusú kezelő egység
 Comfort típusú kezelő egység Felhasználói kézikönyv Kezelő egység Tartalom Oldal Rövidítések / Jelentések Rövidítések / jelentések... 2 Nyomógombok azonosítása... 3 Képernyő jelzések... 4 Gyors indítás...
quick installation guide
 quick installation guide The image is for reference only. ArIeS e1 2 in 1 GAMING COMBO English Thank you for purchasing the KWG ARIES E1 COMBO. The KWG ARIES E1 gaming keyboard has a comfortable design
Új funkciók az RBP-ben 2015. október 1-től New functions in RBP from 1 October 2015. Tatár Balázs
 Új funkciók az RBP-ben 2015. október 1-től New functions in RBP from 1 October 2015 Tatár Balázs Üzletfejlesztés vezető / Business Development Manager Rendszerhasználói Tájékoztató Nap, 2015. szeptember
Zephyr használati utasítás
 Zephyr használati utasítás fontos óvintézkedések Ez a termék háztartási használatra készült. Elektromos termékek használatánál, különösen gyermekek jelenlétében, mindig be kell tartani a következő alapvető
STUDENT LOGBOOK. 1 week general practice course for the 6 th year medical students SEMMELWEIS EGYETEM. Name of the student:
 STUDENT LOGBOOK 1 week general practice course for the 6 th year medical students Name of the student: Dates of the practice course: Name of the tutor: Address of the family practice: Tel: Please read
HAMBURG Használati útmutató Vezérlőmodul UKSM 24VDC Cikkszám: 260.033
 HABURG Használati útmutató Vezérlőmodul UKS 24VDC Cikkszám: 260.033 Brandschutz-Technik und Rauchabzug GmbH Schnackenburgallee 41d D-22525 Hamburg Germany +49 40 89 71 20-0 Fax: +49 40 89 71 20-20 Internet:
Ültetési és öntözési javaslatok. Planting and watering instructions
 Ültetési és öntözési javaslatok Planting and watering instructions 1 Önöntöző-rendszer Sub-irrigation 2 Kedves növénykedvelő A LECHUZA önöntöző rendszerrel növényeink természetüknél fogva gyönyörű virágokat
Features. Preparation
 Contents Features... 2 Introduction... 2 Preparation... 2 Safety Precautions... 3 Connection to a Television Distribution System (Cable TV etc.) from Tuner... 4 Package Contents... 4 Environmental Information...
ASUS GX800 lézeres játékegér
 ASUS GX800 lézeres játékegér 1 6 Felhasználói kézikönyv HUG5761 Elsö kiadás (V1) Május 2010 Copyright 2010 ASUSTeK Computer Inc. All Rights Reserved. Az ASUSTeK COMPUTER INC. ( ASUS ) előzetes írásos engedélye
(NGB_TA024_1) MÉRÉSI JEGYZŐKÖNYV
 MÉRÉSI JEGYZŐKÖNYV") Kommunikációs rendszerek programozása (NGB_TA024_1) MÉRÉSI JEGYZŐKÖNYV (5. mérés) SIP telefonközpont készítése Trixbox-szal 1 Mérés helye: Széchenyi István Egyetem, L-1/7 laboratórium, 9026 Győr, Egyetem
Kommunikációs rendszerek programozása (NGB_TA024_1) MÉRÉSI JEGYZŐKÖNYV (5. mérés) SIP telefonközpont készítése Trixbox-szal 1 Mérés helye: Széchenyi István Egyetem, L-1/7 laboratórium, 9026 Győr, Egyetem
Presenter SNP6000. Register your product and get support at HU Felhasználói kézikönyv
 Register your product and get support at www.philips.com/welcome Presenter SNP6000 HU Felhasználói kézikönyv 1 a b c d e 2 3 4 Federal Communication Commission Interference Statement This equipment has
Személyes adatváltoztatási formanyomtatvány - Magyarország / Personal Data Change Form - Hungary
 Személyes adatváltoztatási formanyomtatvány - Magyarország / Personal Data Change Form - Hungary Kitöltési útmutató: A formanyomtatványon a munkavállaló a személyes adatainak módosítását kezdeményezheti.
Digital High Definition Terrestrial Receiver SRT 8101/8105. Picture similar
 Digital High Definition Terrestrial Receiver SRT 8101/8105 Picture similar User manual Manuel d Utilisateur Manuale Utente Manual del usuario Manual do Usuário Felhasználói kézikönyv Instrukcja obsługi
PSP3404DUOBLACK MultiPhone 3404 DUO
 PSP3404DUOBLACK MultiPhone 3404 DUO MultiPhone PSP3404 DUO (Dual sim,4" WVGA 480x800 TFT, MT6572m Dual core 1Ghz, Android 4.4, RAM 512MB + emmc 4GB, 2MP AF + 0.3MP, 2000 mah battery) Black Retail Garancia,
9. Gyakorlat: Network Load Balancing (NLB)
") 9. Gyakorlat: Network Load Balancing (NLB) 9.1. Az NLB01 és az NLB02 szerverek létrehozása 9.2. Az NLB01 szerver konfigurálása 9.3. Az NLB02 szerver konfigurálása 9.4. Teszt weboldal létrehozása 9.5. Az
9. Gyakorlat: Network Load Balancing (NLB) 9.1. Az NLB01 és az NLB02 szerverek létrehozása 9.2. Az NLB01 szerver konfigurálása 9.3. Az NLB02 szerver konfigurálása 9.4. Teszt weboldal létrehozása 9.5. Az
Construction of a cube given with its centre and a sideline
 Transformation of a plane of projection Construction of a cube given with its centre and a sideline Exercise. Given the center O and a sideline e of a cube, where e is a vertical line. Construct the projections
Regisztrálja termékét és vegye igénybe a rendelkezésre álló HMP7001
 Regisztrálja termékét és vegye igénybe a rendelkezésre álló www.philips.com/welcome HMP7001 Trademark notice Interface are trademarks or registered trademarks of HDMI licensing LLC in ABOUT DIVX VIDEO:
SLE 2057M4. LED Television LED televizor LED televízor LED televízió Telewizor LED
 LED Television LED televizor LED televízor LED televízió Telewizor LED SLE 2057M4 USER'S MANUAL NÁVOD K OBSLUZE NÁVOD NA OBSLUHU HASZNÁLATI ÚTMUTATÓ INSTRUKCJA OBSŁUGI EN CZ SK HU PL Contents EN Warnings.......1
ASUS Transformer Pad útmutató
 útmutató TF300TG 3G kapcsolatkezelő A SIM-kártya behelyezése 1. Egy kiegyenesített gemkapocs segítségével nyomja meg a SIMkártyatartó kilökő gombját. HUG7210 2. Vegye ki a tartót. Helyezze el a kártyát
DANS és Narcis. Burmeister Erzsébet. HUNOR találkozó, Budapest 2013. március 13.
 DANS és Narcis Burmeister Erzsébet HUNOR találkozó, Budapest 2013. március 13. DANS DANS (Data Archiving and Network Services) http://www.dans.knaw.nl Kutatási adatok archiválása a saját fejlesztésű EASY
Paysera VISA cards are secured with "3-D technology" which ensures safer payments with payment cards online.
 Paysera VISA card Safe payments online Paysera VISA cards are secured with "3-D technology" which ensures safer payments with payment cards online. When purchasing at e-shops labelled with "Paysera VISA",
1. MINTAFELADATSOR KÖZÉPSZINT. Az írásbeli vizsga időtartama: 30 perc. III. Hallott szöveg értése
 Oktatáskutató és Fejlesztő Intézet TÁMOP-3.1.1-11/1-2012-0001 XXI. századi közoktatás (fejlesztés, koordináció) II. szakasz ANGOL NYELV 1. MINTAFELADATSOR KÖZÉPSZINT Az írásbeli vizsga időtartama: 30 perc
4-42 ELECTRONICS WX210 - WX240
 4-42 ELECTRONICS WX210 - WX240 PCS 40000499-en Fig. 8 WX210 - WX240 ELECTRONICS 4-43 PCS COMPONENTS 40000471-en Load-limit regulator Legend Fig. 1 Fig. 2 1 Power supply 2 PWM1 output, proportional valve
Útmutató a Computer Setup (F10) segédprogram használatához dx2300 minitorony
 segédprogram használatához dx2300 minitorony") Útmutató a Computer Setup (F10) segédprogram használatához dx2300 minitorony HP Compaq üzleti célú számítógép Copyright 2007 Hewlett-Packard Development Company, L.P. Az itt közölt információ értesítés
Útmutató a Computer Setup (F10) segédprogram használatához dx2300 minitorony HP Compaq üzleti célú számítógép Copyright 2007 Hewlett-Packard Development Company, L.P. Az itt közölt információ értesítés
16F628A megszakítás kezelése
 16F628A megszakítás kezelése A 'megszakítás' azt jelenti, hogy a program normális, szekvenciális futása valamilyen külső hatás miatt átmenetileg felfüggesztődik, és a vezérlést egy külön rutin, a megszakításkezelő
CMP-MEDIAREM12. ANLEITUNG (s. 5) IR-Fernbedienung für Media-Center. MANUAL (p. 2) RF media center remote
 IR-Fernbedienung für Media-Center. MANUAL (p. 2) RF media center remote") English CMP-MEDIAREM12 MANUAL (p. 2) RF media center remote MODE D EMPLOI (p. 8) Télécommande média infrarouge MANUALE (p. 14) Telecomando IR per media center HASZNÁLATI ÚTMUTATÓ (o. 20.) IR media center
English CMP-MEDIAREM12 MANUAL (p. 2) RF media center remote MODE D EMPLOI (p. 8) Télécommande média infrarouge MANUALE (p. 14) Telecomando IR per media center HASZNÁLATI ÚTMUTATÓ (o. 20.) IR media center
Budapest By Vince Kiado, Klösz György
 Budapest 1900 2000 By Vince Kiado, Klösz György Download Ebook : budapest 1900 2000 in PDF Format. also available for mobile reader If you are looking for a book Budapest 1900-2000 by Vince Kiado;Klosz
Kiegészítők telepítése Installing Addons
 Kiegészítők telepítése Installing Addons Válassz nyelvet: Please select a language: MAGYAR ENGLISH 1/8 Kiegészítők telepítése A BVE Klub oldaláról négyféle csomagot tölthetsz le:.7z fájlt OpenBVE-hez.ZIP
quick installation guide The image is for reference only.
 quick installation guide The image is for reference only. ArIeS M1 English Thank you for purchasing the KWG ARIES M1 COMBO. The KWG ARIES M1 gaming keyboard has a comfortable design and spill resistant
Operating Instructions Instrukcja obsługi Návod k použití Kezelési utasítás
 ENG.book 1 ページ 2007 年 1 月 10 日 水 曜 日 午 後 1 時 7 分 Operating Instructions Instrukcja obsługi Návod k použití Kezelési utasítás Digital Video Camera Model No. NV-GS60EP Before use, please read these instructions
Tavaszi Sporttábor / Spring Sports Camp. 2016. május 27 29. (péntek vasárnap) 27 29 May 2016 (Friday Sunday)
 27 29 May 2016 (Friday Sunday)") Tavaszi Sporttábor / Spring Sports Camp 2016. május 27 29. (péntek vasárnap) 27 29 May 2016 (Friday Sunday) SZÁLLÁS / ACCOMODDATION on a Hotel Gellért*** szálloda 2 ágyas szobáiban, vagy 2x2 ágyas hostel
Tavaszi Sporttábor / Spring Sports Camp 2016. május 27 29. (péntek vasárnap) 27 29 May 2016 (Friday Sunday) SZÁLLÁS / ACCOMODDATION on a Hotel Gellért*** szálloda 2 ágyas szobáiban, vagy 2x2 ágyas hostel
Out-Look. Display. Analog Bar. Testing Mode. Main Parameter. Battery Indicator. Second Parameter. Testing Frequency
 Out-Look Display Analog Bar Testing Mode Battery Indicator 1. LCD Display 2. Power Key 3. Mode Key 4. HOLD Key 5. Function Keys 6. Component socket (5Wire) 7. 2Wire Input Terminals Testing Frequency Main
XPS 8920 Setup and Specifications
 XPS 8920 Setup and Specifications Számítógép típusa: XPS 8920 Szabályozó modell: D24M Szabályozó típus: D24M001 Megjegyzések, figyelmeztetések és Vigyázat jelzések MEGJEGYZÉS: A MEGJEGYZÉSEK fontos tudnivalókat
Számlakezelés az ELO DocXtraktor modullal
 ELOECMSzakmai Kongresszus2013 Számlakezelés az ELO DocXtraktor modullal Kovács Eszter Kovacs.eszter@pentatrade.hu Projekt bemutatása A Cég Cégcsoport Éves árbevétel 140 mrd FT > 5 500 dolgozó ( 1 000 fı
10. Gyakorlat: Alkalmazások publikálása Remote Desktop Szervízen keresztül
 10. Gyakorlat: Alkalmazások publikálása Remote Desktop Szervízen keresztül 10.1. Jogosultságok és csoportok létrehozása 10.2. Az RDS szerver szerepkör telepítése a DC01-es szerverre 10.3. Az RDS01-es szerver
INSTRUCTION OF USE HASZNÁLATI UTASÍTÁS MANUALE D'USO
 INSTRUCTION OF USE HASZNÁLATI UTASÍTÁS MANUALE D'USO 105095101 105095104 105095101 105095104 Tisztelt Vásárló! Köszönjük, hogy az indukciós főzőlapunkat választotta. Annak érdekében, hogy a lehető legjobban
6. évfolyam Angol nyelv
 IDEGEN NYELVI MÉRÉS 2016. május 18. 6. évfolyam ngol nyelv Általános tudnivalók a feladatokhoz Ez a füzet nyelvi feladatokat tartalmaz. feladatsor két részből áll. z I. részben csak a füzetben kell dolgoznod.
TI connect, TI connect
 Fully automatic espresso machine Machine à expresso automatique Volautomatische espressomachine Ekspres do kawy Plně automatický kávovar Автоматическая кофемашина TI955... connect, TI957... connect en
Operating Instructions Instrukcja obsługi Návod k použití Kezelési utasítás
 _ENG.book 1 ページ 2006 年 12 月 16 日 土 曜 日 午 後 8 時 45 分 Operating Instructions Instrukcja obsługi Návod k použití Kezelési utasítás Digital Video Camera Model No. NV-GS80EP Before use, please read these instructions
OLYMPICS! SUMMER CAMP
 OLYMPICS! SUMMER CAMP YOUNG BUSINESS CAMP 3D DESIGN CAMP OLYMPICS SUMMER CAMP 20 24 JUNE AND 27 JUNE 1 JULY AGE: 6-14 Our ESB native-speaking teachers will provide a strong English learning content throughout
COMPLETE MANUAL version 2.0. TELJES ÚTMUTATÓ 2.0 változat BIZTONSÁGI ÚTMUTATÓ VISSZAÁLLÍTÁS
 ENGLISH PAGE 1 Kippy The Pet Finder YOU, YOUR PET, YOUR KIPPY COMPLETE MANUAL version 2.0 CONTENTS OF THE PACKAGE SAFETY BEFORE TURNING KIPPY ON battery application activation NOW YOU CAN TURN KIPPY ON
TVU43S298STWEB INSTRUCTION MANUAL HASZNÁLATI UTASÍTÁS
 TVU43S298STWEB INSTRUCTION MANUAL HASZNÁLATI UTASÍTÁS GB COLOUR TELEVISION WITH REMOTE CONTROL SZÍNES TELEVÍZIÓ TÁVSZABÁLYOZÓVAL HU HU Contents Safety Information...2 Markings on the Product...2 Environmental
EN United in diversity EN A8-0206/482. Amendment
 21.3.2019 A8-0206/482 482 Recital 13 g (new) (13g) In recognition of the need for specific treatment for the transport sector, in which movement is the very essence of the work undertaken by drivers, the
Dell Latitude E5270 Owner's Manual
 Dell Latitude E5270 Owner's Manual Regulatory Model: P23T Regulatory Type: P23T001 Megjegyzések, figyelmeztetések és Vigyázat jelzések MEGJEGYZÉS: A MEGJEGYZÉSEK fontos tudnivalókat tartalmaznak, amelyek
Az Ön kézikönyve SAMSUNG SMX-K40LP http://hu.yourpdfguides.com/dref/3584408
 Elolvashatja az ajánlásokat a felhasználói kézikönyv, a műszaki vezető, illetve a telepítési útmutató. Megtalálja a választ minden kérdésre az a felhasználói kézikönyv (információk, leírások, biztonsági
DVD Player HOME TECH KH 6525 KH 6524. DVD Player Operating instructions. DVD-lejátszó Használati utasítás
 4 HOME TECH DVD Player KH 6525 KH 6524 DVD Player Operating instructions DVD-lejátszó Használati utasítás KOMPERNASS GMBH BURGSTRASSE 21 D-44867 BOCHUM www.kompernass.com ID-Nr.: KH6524/6525-04/10-V4 KH
LIBRETTO ISTRUZIONI. Használati útmutató
 Italiano English Deutsch Français Español Português LIBRETTO ISTRUZIONI на русском языке Cod. 110030252 (CAPPE AD ISOLA) Használati útmutató INSTRUCTIONS BOOKLET BEDIENUNGSSANLEITUNG Sziget páraelszívókhoz
Cloud computing. Cloud computing. Dr. Bakonyi Péter.
 Cloud computing Cloud computing Dr. Bakonyi Péter. 1/24/2011 1/24/2011 Cloud computing 2 Cloud definició A cloud vagy felhő egy platform vagy infrastruktúra Az alkalmazások és szolgáltatások végrehajtására
3. MINTAFELADATSOR KÖZÉPSZINT. Az írásbeli vizsga időtartama: 30 perc. III. Hallott szöveg értése
 Oktatáskutató és Fejlesztő Intézet TÁMOP-3.1.1-11/1-2012-0001 XXI. századi közoktatás (fejlesztés, koordináció) II. szakasz ANGOL NYELV 3. MINTAFELADATSOR KÖZÉPSZINT Az írásbeli vizsga időtartama: 30 perc
építészet & design ipari alkalmazás teherautó felépítmény
 A Design-Composit egy kompozitpaneleket gyártó vállalat, mely teherautó felépítményekhez, az építészet számára és design termékekhez készít paneleket. We are an innovative manufacturer of composite panels
MELLÉKLET / ANNEX. EU MEGFELELŐSÉGI NYILATKOZAT-hoz for EU DECLARATION OF CONFORMITY
 TRACON BUDAPEST KFT. TRACON BUDAPEST LTD. 2120 DUNAKESZI, PALLAG U. 23. TEL.: (27) 540-000, FAX: (27) 540-005 WWW.TRACON.HU EU MEGFELELŐSÉGI NYILATKOZAT, a 79/1997. (XII. 31.) IKIM számú és a 374/2012.
bladeless AR5T90RE ToWER FAn instruction MAnuAl AR5T90RE 220-240V / 50Hz / 45W 220-240v~50Hz 45W
 bladeless AR5T90RE ToWER FAn lapátkerék nélküli instruction MAnuAl torony ventilátor AR5T90RE 220-240V / 50Hz / 45W 220-240v~50Hz 45W PAge 1/7 A jelölt készülék összeszerelését, beüzemelését, használatát
Használati útmutató DG110. 2007 DreimGO.com All rights reserved. Website: www.dreimgo.com
 Használati útmutató DG110 2007 DreimGO.com All rights reserved. Website: www.dreimgo.com 1 TARTALOMJEGYZÉK Biztonsági Figyelmeztetések...3 Az akkumulátor töltése...3 Bekapcsolás...4 Beállítás...4 Az autóban...6
UPPLEVA 32-46" Design and Quality IKEA of Sweden
 UPPLEVA 32-46" Design and Quality IKEA of Sweden AV 1 adapter BACK EXIT INITIAL SETUP BACK EXIT BACK EXIT WELCOME CHANNEL INSTALL Automatic Search... Welcome to use the Wizard for Initial Setup!! Please
hp pro webkamera felhasználói útmutató
 hp pro webkamera felhasználói útmutató Version 1.4.HU Part number: 575739-001 Copyright 2009 Hewlett-Packard Development Company, L.P. Az itt szereplő információk előzetes értesítés nélkül változhatnak.
Tudományos Ismeretterjesztő Társulat
 Sample letter number 3. Russell Ltd. 57b Great Hawthorne Industrial Estate Hull East Yorkshire HU 19 5BV 14 Bebek u. Budapest H-1105 10 December, 2009 Ref.: complaint Dear Sir/Madam, After seeing your