CT 570 ERGOMETER BIKE GB D CZ SK H
|
|
|
- Borbála Kozma
- 9 évvel ezelőtt
- Látták:
Átírás
1 CT 570 ERGOMETER BIKE GB D CZ SK H 1

2 Table of contents - Inhaltsverzeichnis - Obsah - Obsah - Tájékoztató 1. English P Deutsch P esky P Slovensky P Magyar P. 63 The owner s manual is only for the customer reference. ENERGETICS can not guarantee for mistakes occurring due to translation or change in technical specification of the product. Die Gebrauchsanweisung dient nur zur Referenz für den Kunden. ENERGETICS übernimmt keine Haftung für Fehler die durch Übersetzung oder technische Änderungen des Produkts entstehen. Návod k použití je pouze doporuení pro zákazníky. ENERGETICS nepebírá žádné ruení za chyby zpsobené pekladem i zmnami v technické specfikaci výrobku. Tento návod je urený len pre potrebu zákazníkov. ENERGETICS nezodpovedá za chyby, ktoré sa môžu vyskytnú kvôli chybnému prekladu alebo zmenám v technickej špecifikácii produktu. A használati útmutató kizárólag felhasználói referenciaként szolgál. az ENERGETICS nem vállal felelsséget a fordítási hibákból vagy a termék mszaki módosításaiból ered hibákért. Copyright by ENERGETICS 2

3 Dear Customer, GB Congratulations on your purchase of an ENERGETICS home exerciser. This product has been designed and manufactured to meet the needs and requirements of in-home use. Please carefully read the instructions prior to assembly and first use. Be sure to keep the instructions for reference and/ or maintenance. If you have any further questions, please contact us. We wish you lots of success and fun while training, Your - Team Warranty ENERGETICS offers high quality home exercisers that have been tested and certified according to European Norm EN 957. ENERGETICS warrants to the original purchaser 3 years against possible defects in material and workmanship. Excluded are damages caused by misuse and wearing parts. All electronic parts are warranted for a period of 2 years. The warranty period starts at the date the product was purchased (retain your sales receipt). Safety Instructions Consult your physician before starting with any exercise programme to receive advice on the optimal training. Warning: incorrect/ excessive training can cause health injuries. Stop using the home exerciser when feeling uncomfortable. Ensure that training only starts after correct assembly, adjustment and inspection of the home exerciser. Always start with a warm-up session. Only use original ENERGETICS parts as delivered (see checklist). Follow the steps of the assembly instruction carefully. Only use suitable tools for assembly and ask for assistance if necessary. Place the home exerciser on an even, non-slippery surface. Use the height adjustment caps on the rear tube to ensure a stable position of the home exerciser. Make sure the front wheels are placed in the correct position: see assembly instruction. For all adjustable parts be aware of the maximum position to which they can be adjusted. Tighten all adjustable parts to prevent sudden movement while training. This product is designed for adults. Please ensure that children only use it under the supervision of an adult. Ensure that those present are aware of possible hazards, e.g. movable parts during training. The resistance level can be adjusted to your personal preference. Do not use the home exerciser without shoes or loose shoes. Ensure that sufficient space is available to use the home exerciser. Be aware of non-fixed or moving parts whilst mounting or dismounting the home exerciser. The resistance can be changed by computer. - This product is made for home use only and tested up to a maximum body weight of 130 kilograms. - Keep special attention to the minimum insertion depth of the seat post. 3

4 Pre-assembly notes OPEN THE BOXES Make sure to inventory all the parts that are included in the boxes. Check The Hardware Chart for a full count of the number of parts included for proper assembly. GATHER YOUR TOOLS Before starting the assembly of your unit, gather the necessary tools. Having all of the equipment at hand will save time and make the assembly quick and hassle-free. CLEAR YOUR WORK AREA Make sure that you have cleared away a large enough space to properly assemble the unit. Make sure the space is free from anything that may cause injury during assembly. After the unit is fully assembled, make sure there is a comfortable amount of free area around the unit for unobstructed operation. Hardware chart 5 M8 WASHER (T=1.2) 10 6 M8 SPRING WAHER 10 7 M8 CP NUT 2 10 M8*15mm ALLEN HEAD SCREW 8 4 M8*52mm CARRIAGE BOLT 2 21 SEAT KNOB 1 87 ALLEN KEY 1 89 TOOL 1 90 TOOL 1 4

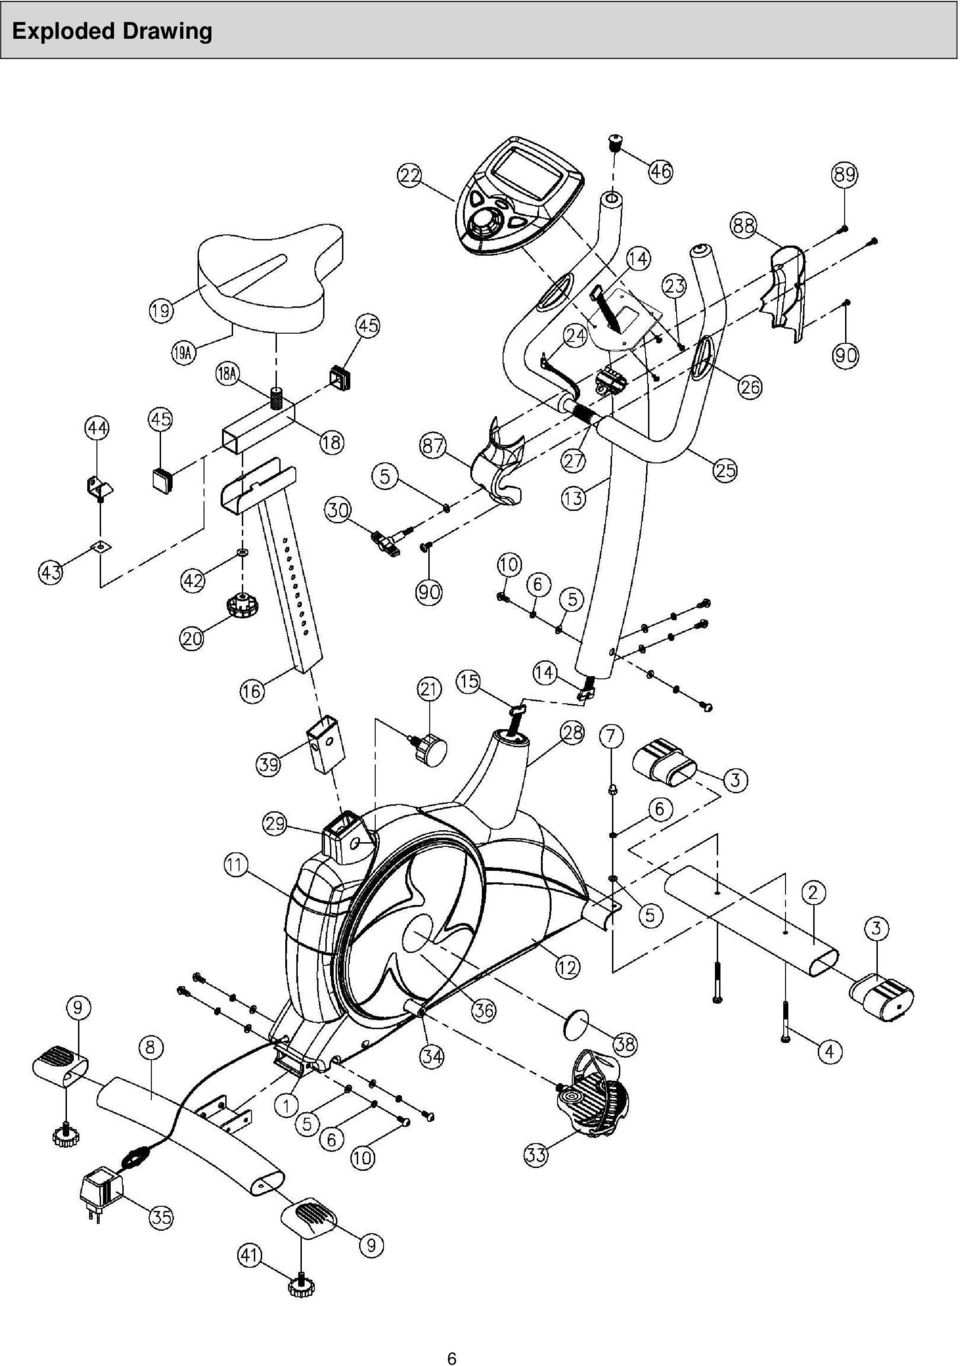
5 Part list NO. DESCRIPTION Q'TY NO. DESCRIPTION Q'TY 1 BASE FRAME 1 46 HANDLEBAR CAP 2 2 FRONT FOOT 1 47 SCREW M8 * 25 mm 2 3 FRONT FOOT COVER(L&R) 2 48 SERVO MOTOR 1 4 M8 * 52 mm CARRIAGE BOLT 2 49 DRIVE WIRE ROD WHEEL 1 5 M8 WASHER (t=1.2) CLIP C5 (ID 4.7mm) 1 6 M8 SPRING WASHER M6*10mm SCREW 2 7 M8 CAP NUT 2 52 SENSOR BRACKET 1 8 REAR FOOT 1 53 SENSOR WIRE 1 9 REAR FOOT COVER 2 54 #6-32 *12mm SCREW 1 10 M8*15mm ALLEN HEAD SCREW 8 55 WIRE ROD 1 11 LEFT CHAIN COVER 1 56 SMALL SPRING 1 12 RIGHT CHAIN COVER 1 57 M8 NYLON NUT 1 13 HANDLEBAR POST 1 58 M8*52MM HEX HEAD BOLT 1 14 COMPUTER UPPER CABLE 1 59 MAGNETIC HOLDER 1 15 COMPUTER LOWER CABLE 1 60 BEARING (6203ZZ) 4 16 SADDLE POST 1 61 CLIP C17(ID 15.7mm) 3 17 DC CABLE 1 62 MAGNET 1 18 MOVABEL SEAT POST 1 63 REAR PULLEY 1 18A SADDLE POST HOLDER 1 64 WASHER ID17 OD22 <t = 0.3 mm > 1 19 SADDLE 1 65 AXLE FOR PULLEY 1 19A SADDLE BRACKET 1 66 M6*15mm SCREW 4 20 MOVABEL SEAT POST KNOB 1 67 BELT 1 21 SEAT KNOB 1 68 M8*15mm HEX HEAD SCREW 2 22 COMPUTER 1 69 MAGNETIC HOLDER BRACKET 1 23 M5*12mm SCREW 4 70 BRACKET 1 24 HAND PULSE WIRE 1 71 LARGE SPRING 1 25 FOAM GRIP 2 72 SPACER SLEEVE 3 26 HAND PULSE PE M6*1.5mm WASHER 3 27 HANDLEBAR 1 74 M6*14mm SCREW 3 28 FRONT POST COVER 1 75 BEARING (6300ZZ) 1 29 SADDLE POST COVER 1 76 FRONT PULLEY 1 30 HANDLEBAR SCREW 1 77 FLYWHEEL 1 31 SCREW M5 * 12 mm FLYWHEEL AXLE /8" WH NUT 2 79 BEARING (6003ZZ) 2 33 PEDAL (L/R) 1 80 BEARING IC1735-FT 1 34 CROSS FRAME(R) 1 81 WASHER ID30 OD34 (0.8mm) 1 35 ADAPTOR 1 82 BEARING (6000ZZ) 1 36 TURNING PLATE (R) 1 83 M10 WASHER (t=1mm) /8" NUT (t=3mm) /8" NUT (t=7mm) 1 38 TURNUNG PLATE COVER 2 85 CLIP C10(ID 9.1mm) 1 39 SADDLE SUPPORT TUBE INSERT 1 86 CROSS FRAME(L) 1 40 TURNING PEDAL (L) 1 87 BACK HANDLEBAR COVER 1 41 ROUND SCREW FOR ADJ.HEIGHT 2 88 FRONT HANDLEBAR COVER 1 42 M10 WASHER (t=2mm) 3 89 SCREW M3 * 12 mm 2 43 PLASTIC PAD 1 90 SCREW M5 * 10 mm 2 44 FIX PLATE 1 45 PLASTIC BUSH 2 5
 1 6 M8 SPRING WASHER 12 51 M6*10mm SCREW 2 7 M8 CAP NUT 2 52 SENSOR BRACKET 1 8 REAR FOOT 1 53 SENSOR WIRE 1 9 REAR FOOT COVER 2 54 #6-32 *12mm SCREW 1 10 M8*15mm ALLEN HEAD SCREW 8 55 WIRE ROD")
6 Exploded Drawing 6
7 Assembly ALL THE PARTS SHOWN HERE HAVE BEEN PRE-ASSEMBLED AT THE FACTORY. 7

8 STEP 1 Fasten Front Stabilizer (2) to the Base (1) using 2 x (4), 2 x (5), 2 x (6) and 2 x (7). Tighten with the spanner. Note: It will help to place a piece of the polystyrene packaging under the bike when assembling the front stabilizer. STEP 2 Fasten Front Stabilizer (2) to the Base (1) using 2 x (4), 2 x (5), 2 x (6) and 2 x (7). Tighten with the spanner. Note: It will help to place a piece of the polystyrene packaging under the bike when assembling the front stabilizer. STEP 3 Connect computer Upper Cable (14) to Computer Lower Cable (15). A click can be felt when pushing The two parts together. Insert the handlebar post through the plastic cover and into the base and attach it with 4 x (10), 4 x (6) and 4 x (5). Tighten with the Allen key. Push plastic cover over the Allen head bolt once tightened. Step 4 Attach the Saddle Bracket (19A) to the Saddle Post holder (18A). Note: It may help to turn the saddle upside down. Place it on a piece of plastic to protect it. Tighten With the spanner. Step 5 Insert the Saddle Post (16) into the Base. Align one of the holes in the saddle post with the hole in the Base and insert the Seat Knob (21) through the hole in the Base into the hole in the Saddle Post. Tighten the Seat Knob into the Base. 8
, 4 x (6) and 4 x (5).")
9 Step 6 Attach the Handlebar (27) to the Handlebar Post (13) and secure with clamp, clamp decoration cover (87), star handle screw (30) and washer (5) in your desired position. Attach the handlebar cover (87+88) with 2 screws M5x10mm (90). Step 7 Attach the Computer Upper Cable (14) to the Computer (22). A click can be felt when the Cable is attached. Attach the Computer (22) to the Handlebar Post with 4 x (23). Tighten with the screwdriver. Step 8 Insert the Right Pedal (33) into the right arm of the Crank assembly(34) and finger tighten in a clockwise direction until the thread is fully inserted in the crank. Repeat for the Left Pedal (33) finger tighten in an anticlockwise direction. Tighten both with the spanner. Step 9 Plug the Adaptor (35) into the rear of the bike and into the main power, the console will beep when connected and the power is turned on. Well done! Your bike is now ready for use. Please go to the computer operation section in this manual for instructions on how to operate your console. 9
 into the right arm of the Crank assembly(34) and finger tighten in a clockwise direction until the thread is fully inserted in the crank.")
10 Computer Instruction Start or Stop status Display for active Program User no. 1~4 Level display for active resistance level (1~16) Display active function Current Heart Rate (BPM) Display current function value Display for active profile & resistance Rotation/ Minute (U/min) GESCHWINDIGKEIT (Km/h.) ZEIT (min; sec.) USER to store user personal data AB - to adjust data and resistance by turning the nut to left Energy consumption (cal.) Watt STRECKE (Km) Recovery - to get fitness note EINGABE- to enter training parameters AUF - to adjust data and resistance by turning the nut to right 10 Start/ Stop - to start or pause training by pressing the nut
 USER to store user personal data AB - to adjust data and resistance by turning the nut to left Energy consumption (cal.")
11 PROGRAM INTRODUCTION: Manual Program: Manual PROGRAM 1 is a manual program. Press ENTER key to select TIME, DISTANCE, and CAL. Then, turn the nut to adjust the values. The default level of loading is 6. After pressing START/STOP key to exercise, please also apply the heart rate detector appropriately. Users may exercise in any desire level (by turning the nut during the workout) with a period of time or a certain distance. Preset Programs: Rolling, Valley, Fat Burn, Ramp, Mountain, Intervals PROGRAM 2 to PROGRAM 7 is the preset program. Press ENTER key to select TIME, DISTANCE, and CAL. Then, turn the nut to adjust the values. Users may exercise with different level of loading in different intervals as the profiles show. After pressing START/STOP key to exercise, please also apply the heart rate detector appropriately. Users may also exercise in any desire level (by turning the nut during the workout) with a period of time or a certain distance. User Profile programs: User Setting Profile Program 8 is the user-setting program. Users are free to edit the values in the order of TIME, DISTANCE, CAL, and the level of loading in 10 intervals. The values and profiles will be stored in the memory after setup. Users may also change the ongoing loading in each interval by turning the nut, and they will not change the level of loading stored in the memory. Speed Independent Program: Watt Control Program 9 is a Speed Independent Program. Press ENTER key to select the values of TIME, DISTANCE, and WATT. Then, turn the nut to adjust the values. After pressing START/STOP key to exercise, please also apply the heart rate detector appropriately. During the exercise, the level of loading is not adjustable. In this program, computer will adjust the level of loading according to the value of WATT setup. For example, the level of loading may increase while the speed is too slow. Also, the level of loading may decrease while the speed is too fast. As a result, the calculated value of WATT will close to the value of WATT setup by users. Heart Rate Control Programs: 60% H.R.C. (Heart Rate Control Program), 75% H.R.C., 85% H.R.C. Program 10 to Program 12 is the Heart Rate Control Programs. In Program 10 to Program 12, press Enter key to select TIME, DISTANCE, Cal & AGE, and TARGET H.R. Then, turn the nut to adjust the values. Users may exercise in a period of time or a certain distance with 60% Max Heart Rate in Program10, 75% Max Heart Rate in Program 11, and 85% Max Heart Rate in Program 12. After pressing START/STOP key to exercise, please also apply the heart rate detector appropriately. Or you can choose Target H.R. working program under these 3 main programs, users may setup a target heart rate to exercise in a period of time or a certain distance. In these programs, the computer will adjust the level of loading according to the heart rate detected. For example, the level of loading may increase while the heart rate detected is lower than TARGET H.R. Also, the level of loading may decrease while the heart rate detected is higher than TARGET H.R. As a result, the user s heart rate will be adjusted to close the TARGET H.R. in the range of TARGET H.R. 5 and TARGET H.R. +5. Body Fat Program: Body Fat Measurement Program 13 is a special program designed to calculate users body fat ratio and to design a specific loading profile for users. With 9 different body types, the computer can generate 9 different profiles for each. Press ENTER key to select GENDER, HEIGHT, WEIGHT, and AGE. Then, turn the nut to adjust the values. After pressing START/STOP key to calculate body fat, please also apply the heart rate detector appropriately. If the detector cannot pick up any signals, an error message E3 will show up in the profile display. If it happens, press START/STOP key to calculate again. Then, the calculation values of FAT%, BMR, BMI, BODY TYPE, and a designed profile will show up shortly. Press START/STOP key to exercise. The profile shown in the display is specially designed for your body type. 11

12 Fitness Test: Press the Pulse Recovery Button The fitness note is for personal orientation and compares the pulse rate before and after training. You will notice that your fitness will improve when exercising regularly. 1. Press the pulse recovery button directly after a training session. 2. Hold the hand on pulse connections or leave the chest transmitter attached. 3. Time will count down from 60 to 0 seconds. 4. Your personal fitness note appears (F1.0 F6.0) on the display. F1.0 = Excellent F2.0 = Good F3.0 = Fair F4.0 = below average F5.0 = No Good F6.0 = Poor BUTTONS & POWER INTRODUCTION Power Auto on Auto off PULSE RECOVERY USER This model has been supplied with a power adapter. The specification for the adapter is 6V/1A. Press any button or begin pedaling to automatically turn on the computer. If any part of the display malfunctions check the power adaptor and all connections. Without peddling the equipment after 4 minutes 16 seconds, the monitor will turn off automatically. Press this button to enter the fitness test. The ranking of the test resolute is from F1.0 to F6.0. Press this button to the personal data input. ENTER 1. During the program choosing function, press this button to confirm the program you would like to do the exercise. 2. During the setting mode, Press this button to confirm the value you would like to set up. 3. During the start mode, press this button to chose the time, speed, distance, calorie, RPM, watt or pulse to display on the bigger digital number. 4. In the body fat measurement program, press this button to read the next result after body 1. Turn the MODUS button to select the program form Manual, Rolling, Valley, Fat Burn, Ramp, Mountain, Intervals, User Setting Profile, Watt Control, 60% H.R.C. (Heart Rate Control Program), 75% H.R.C., 85% H.R.C., Body fat test to User Data. 2. Turn the MODUS button to increase or decrease the setting value of Time, Distance, Calories, height, weight, age, sex, and pulse. 3. During the start mode, Press this button to increase or decrease the resistance level. 4. Press the MODUS button to start or stop exercise or begin to measure the body fat. 12

13 RESET Press the START/STOP button for 2 seconds to set all displayed values back to zero. OPERATION INSTRUCTION: A. Plug in the power Plug in the adaptor to the equipment. The monitor will produce a beep sound and turn on the monitor. B. Determine the User (Only Can Process in the STOP Mode.) 1. Press the User button to the USER DATA, only can use on the stop mode. 2. Press the Enter to the USER SELECT 3. Turn the MODUS button to select the User from U1 to U4 4. Press the Enter to decide the User 5. Turn the MODUS button to set up your height, and then press the Enter to confirm your setting value. 6. Turn the MODUS button to set up your weight, and then press the Enter to confirm your setting value. 7. Turn the MODUS button to set up your age, and then press the Enter to confirm your setting value. 8. Turn the MODUS button to set up your sex, and then press the Enter to confirm you are M (male) or F (female). 9. Finish the user data input. C. Program select and setting value C-1 Manual Program 1. Turn the MODUS button to select the Manual program. 2. Press the Enter Button to choose the manual program. 3. The Time display will flash, and then turn the MODUS button to set up the desired time to do the exercise. Press ENTER button to confirm your setting value. 4. The distance display will flash, and then turn the MODUS button to set up the desired distance value. Press ENTER button to confirm your setting value. 5. The Calories display will flash, and then turn the MODUS button to set up the desired calories to be consumed. Press ENTER button to confirm your setting value. 6. Press the start/stop MODUS to begin exercise. Note: 1. Time and distance cannot set up at the same time in this program. 2. When you reach the target, the monitor will produce beep sound and then stop. 3. If you set up more than one target and you would like to reach next target, press start to exercise again. C-2 Preset Program: Rolling, Valley, Fat Burn, Ramp, Mountain, Intervals Program 1. Turn the MODUS button to select one of the above programs. 2. Press the Enter Button to enter this program. 3. The Time display will flash, and then turn the MODUS button to set up the desired time to do the exercise. Press ENTER button to confirm your setting value. 4. The distance display will flash, and then turn the MODUS button to set up the desired distance value. Press ENTER button to confirm your setting value. 5. The Calories display will flash, and then turn the MODUS button to set up the desired calories to be consumed. Press ENTER button to confirm your setting value. 6. Press the start/stop MODUS to begin exercise. Note: 1. Time and distance cannot set up at the same time in this program. 2. When you reach the target, the monitor will produce beep sound and then stop. 3. If you set up more than one target and you would like to reach next target, press start to exercise again. 13

14 C-3 User Setting Profile 1. Turn the MODUS button to USER PROFILE. 2. Press the Enter Button to enter this program. 3. The Time display will flash, and then turn the MODUS button to set up the desired time to do the exercise. Press ENTER button to confirm your setting value. 4. The distance display will flash, and then turn the MODUS button to set up the desired distance value. Press ENTER button to confirm your setting value. 5. The Calories display will flash, and then turn the MODUS button to set up the desired calories to be consumed. Press ENTER button to confirm your setting value. 6. The column 1 will flash, and then turn the MODUS button to create your personal exercise profile. 7. Press the Enter button to confirm your first column of your exercise profile. 8. The column 2 will flash, and then turn the MODUS button to create your personal exercise profile. 9. Press the Enter button to confirm your second column of your exercise profile. 10. Follow the above descriptions to finish your personal exercise profile. 11. Press the START/ST0P to begin exercise. Note: Your personal exercise profile will be stored in the memory of the monitor. Note: 1. Time and distance cannot set up at the same time in this program. 2. When you reach the target, the monitor will produce beep sound and then stop. 3. If you set up more than one target and you would like to reach next target, press start to exercise again. C-4 Watt Control Program. 1. Turn the MODUS button to select the watt control program. 2. Press the Enter Button to choose the manual program. 3. The Time display will flash, and then turn the MODUS button to set up the desired time to do the exercise. Press ENTER button to confirm your setting value. 4. The distance display will flash, and then turn the MODUS button to set up the desired distance value. Press ENTER button to confirm your setting value. 5. The Calories display will flash, and then turn the MODUS button to set up the desired calories to be consumed. Press ENTER button to confirm your setting value. 6. The watt display will flash, and then turn the MODUS button to setup the watt to do the exercise. Press ENTER button to confirm your setting value. 7. Press the start/stop MODUS to begin exercise. NOTE: WATT = TORQUE (KGM) * RPM *1.03. In this program, the WATT value will keep constant value. It means that if you peddle quickly, the load will decrease and if you peddle slowly, the load will increase. Always try to keep you in the same watt value. Note: 1. Time and distance cannot set up at the same time in this program. 2. When you reach the target, the monitor will produce beep sound and then stop. 3. If you set up more than one target and you would like to reach next target, press start to exercise again. C-5 HEART RATE CONTROL PROGRAM: 60% H.R.C., 75%H.R.C., and 85% H.R.C. 1. Turn the MODUS button to select one of the heart rate control program, 2. Press the Enter Button to confirm your choice. 3. The Time display will flash, and then turn the MODUS button to set up the desired time to do the exercise. Press Enter button to confirm your setting value. 4. The distance display will flash, and then turn the MODUS button to set up the desired distance value. Press ENTER button to confirm you setting value. 5. The Calories display will flash, and then turn the MODUS button to set up the desired 14

15 calories to be consumed. Press ENTER button to confirm your setting value. 6. The Age display will flash, and then turn the MODUS button to set up your age. Press ENTER button to confirm your setting value. 7. The Target H.R. (Target Heart rate) display will flash. Please check this number is suitable for you. If you do not want to use this value for your target, you can turn the MODUS button to set up the desired target heart rate you would like to keep during your exercise. 8. Press the start/stop MODUS to begin exercise. Note: 1. Time and distance cannot set up at the same time in this program. 2. When you reach the target, the monitor will produce beep sound and then stop. 3. If you set up more than one target and you would like to reach next target, press start to exercise again. C-6 Body fat measurement 1. Turn the MODUS button to select BODY FAT TEST program, 2. Press the Enter Button to confirm your choice. 3. The HEIGHT display will flash, and then turn the MODUS button to set up your height. Press ENTER button to confirm your setting value. 4. The weight display will flash, and then turn the MODUS button to set up your height. Press ENTER button to confirm your setting value. 5. The AGE display will flash, and then turn the MODUS button to set up your sex. Press ENTER button to confirm your setting value. 6. The gender display will flash, and then turn the MODUS button to set up your gender. Press ENTER button to confirm your setting value. 7. Press START/STOP button to begin body fat measurement. 8. After finished your measurement, press the ENTER button to check your test results. 9. To quit this program, turn the MODUS button to select your desired program. NOTE: The personal data will recall from USER SETTING DATE. If the data is correct, just simply press the ENTER button to confirm the values. In this program, your personal data will not store in our memory. If you need to change your personal data, please press the USER button to change your personal information, 15

16 Things You Should Know Before Exercising A. The values calculated or measured by the computer are for exercise purpose only, not for medical purpose. B. The Variables May Need To Change In The Programs: Programs P1 ~ P7 P8 P9 P10 ~ P12 P13 Variables TIME, DISTANCE, KCAL TIME, DISTANCE, KCAL, 10 Intervals TIME, DISTANCE, KCAL, WATT. TIME, DISTANCE, KCAL, AGE,TARGET H.R. HEIGHT, WEIGHT, AGE, SEX, The Distance value could be change under Time = 0. The pre-set data will begin to count down after you start pedalling. Once a pre-set has been reached the computer will beep and end the training program. C. Body Types: There are 5 body types divided according to the FAT% calculated. Type 1 is from 5% to 14%. Type 2 is from 15% to 24%. Type 3 is from 25% to 29%. Type 4 is from 30% to 39%. Type 5 is from 40% to 50%. D. BMR: Basal Metabolic Rate (metabolism) is the energy (measured in calories) expended by the body at rest to maintain normal bodily function. E. BMI: BMI means Body Mass Index, which is used for body shape adjustment. F. FAT WEIGHT: The total body fat in our body measured by Kilogram. Please consult your physician to find your maximum and minimum heart rate. 16

17 Sehr geehrte Kundin, sehr geehrter Kunde, D wir gratulieren Ihnen zum Kauf eines ENERGETICS Heimtrainers. Dieses Produkt ist für den Heimbereich konzipiert um den Wünschen und Anforderungen dieses Bedarfs gerecht zu werden. Bitte lesen Sie vor dem Aufbau und dem ersten Gebrauch zunächst sorgfältig diese Anleitung. Bitte bewahren Sie die Anleitung als Referenz und für den richtigen Umgang mit Ihrem Fitness-Gerät auf. Bei weiteren Fragen dazu stehen wir Ihnen selbstverständlich gerne zur Verfügung. Wir wünschen Ihnen viel Spaß und Erfolg bei Ihrem Training. Ihr - Team Garantie ENERGETICS Qualitätsprodukte werden konstruiert und getestet um für ein engagiertes Fitness-Training eingesetzt zu werden. Dieses Gerät entspricht der europäischen Norm EN 957. ENERGETICS gewährt auf Material- und Verarbeitungsfehler eine Garantie von 3 Jahren. Von der Garantie ausgeschlossen sind sowohl Schäden, die durch unsachgemäße Anwendung des Produktes entstehen als auch auf Verschleißteile. Auf elektronische Komponenten wird eine Garantie von 2 Jahren offeriert. Die Garantiezeit beginnt mit dem Verkaufsdatum (bitte Kaufbeleg sorgfältig aufbewahren). Sicherheitshinweise Bei gesundheitlichen Einschränkungen oder für individuelle und persönliche Trainingsparameter konsultieren Sie bitte zunächst Ihren Arzt. Er kann Ihnen sagen, welche Art des Trainings und welche Belastung für Sie geeignet sind. Achtung: Falsches oder exzessives Training kann Ihre Gesundheit gefährden. Beginnen Sie erst mit dem Training, nachdem Sie sichergestellt haben, dass der Heimtrainer korrekt aufgebaut und eingestellt ist. Starten Sie immer mit einer Aufwärm-Phase. Verwenden Sie nur die der Lieferung beigelegten ENERGETICS Originalteile (siehe Check-Liste). Gehen Sie beim Aufbau des Geräts exakt nach der Montageanweisung vor. Verwenden Sie nur geeignetes Werkzeug für die Montage und lassen Sie sich ggf. von einer zweiten Person helfen Stellen Sie das Gerät auf einem ebenen, rutschfesten Untergrund auf. Verwenden Sie die Höhen-Einstellkappen an der hinteren Querstütze, um eine sichere Position des Heimtrainers zu gewährleisten. Stellen Sie sicher, dass die vorderen Transportrollen in der richtigen Position angebracht sind (siehe Aufbauanleitung). Stellen Sie bei allen verstellbaren Teilen sicher, dass die Maximalpositionen, in die sie verstellt werden können, richtig eingestellt sind. Schrauben Sie vor dem Training alle verstellbaren Teile fest, um eine Lockerung während des Trainings zu vermeiden. Das Gerät ist für das Training erwachsener Personen konzipiert. Stellen Sie sicher, dass eine Nutzung des Geräts von Kindern nur unter Aufsicht von Erwachsenen erfolgt. Weisen Sie anwesende Personen auf Gefährdung, z.b. durch bewegliche Teile, hin. Der Widerstand kann auf Ihre persönlichen Bedürfnisse eingestellt werden. Verwenden Sie den Heimtrainer nicht ohne Schuhe oder mit losem Schuhwerk. Stellen Sie sicher, dass ausreichend Platz vorhanden ist, um den Heimtrainer zu benutzen. Beachten Sie die nicht fixierten oder beweglichen Teile während der Montage/Demontage des Heimtrainers. - Der Widerstand kann durch den Computer verändert werden. - Dieses Gerät ist ausschließlich für den Heimanwendungsbereich konzipiert und einem maximalen Körpergewicht von 130 Kilogramm getestet. - Achten Sie besonders auf die niedrigste Einstellhöhe der Sattelstütze. 17

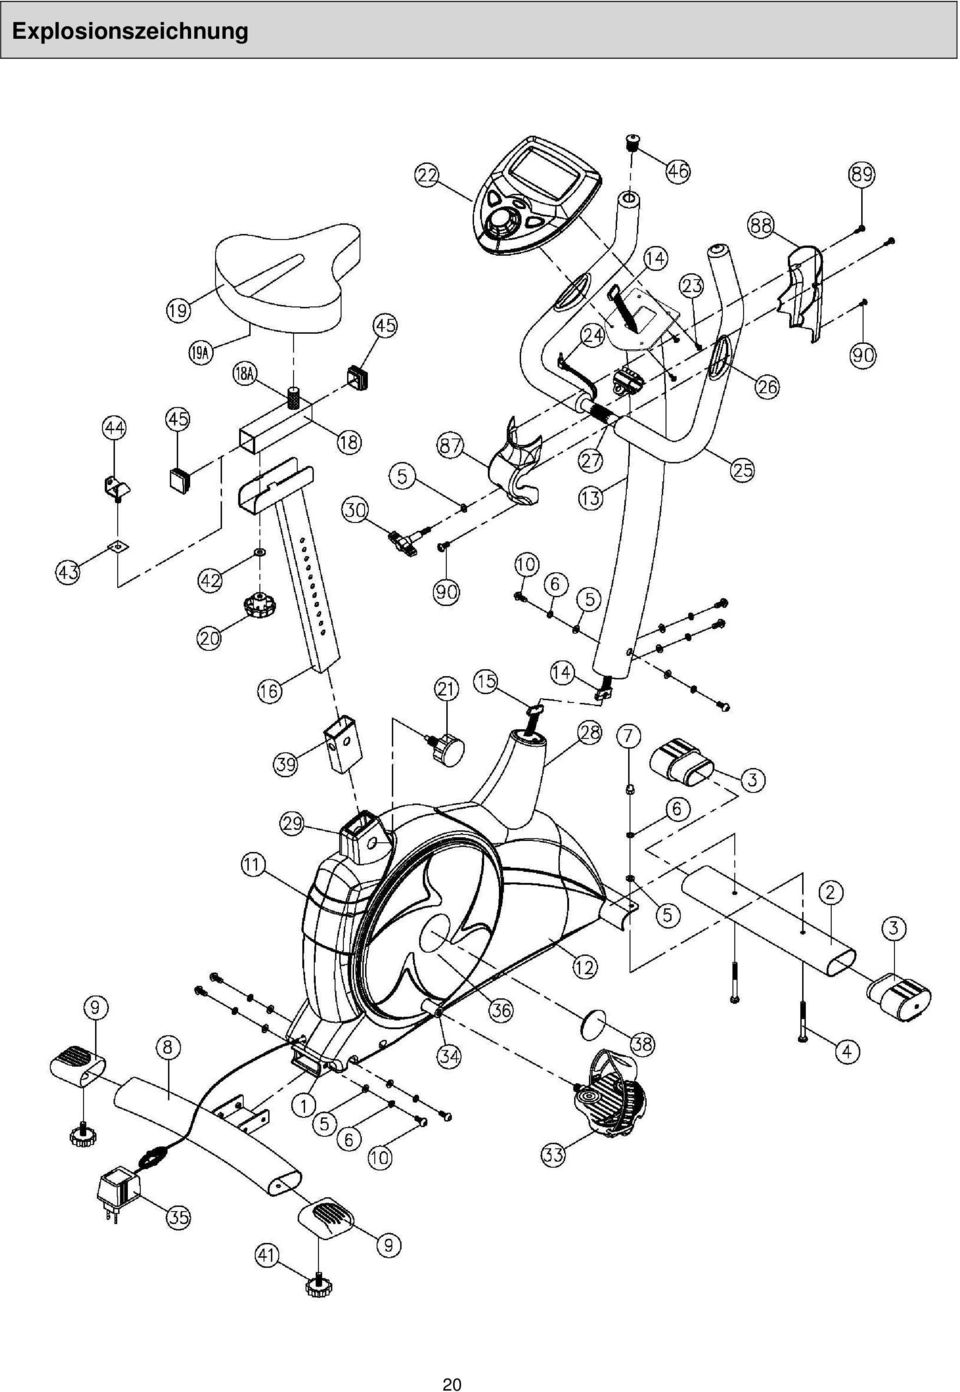
18 Hinweise vor dem Zusammenbau ÖFFNEN SIE DIE VERPACKUNG Vergewissern Sie sich das sämtliche Teile in der Verpackung sind. Überprüfen Sie anhand der Teileliste ob alle Schrauben und Teile beigelegt sind HALTEN SIE BENÖTIGTES WERKZEUG BEREIT Bevor Sie mit dem Zusammenbau beginnen, halten Sie alle benötigten Teile und Werkzeug griffbereit. Das spart Ihnen viel Zeit und erleichtert den Zusammenbau. ARBEITSPLATZVORBEREITUNGEN Suchen Sie einen sauberen und freien Platz wo Sie genug Bewegungsfreiheit haben um mit dem Zusammenbau zu beginnen. Geben Sie acht das keine Teile herumliegen wo Sie sich beim Zusammenbau stoßen oder verletzen können. Wenn Sie mit dem Zusammenbau fertig sind, stellen Sie das Gerät an einen Platz auf wo Sie Ihr Training ungestört ausüben können. Teile Set 5 M8 Beilagscheibe (T=1.2) 10 6 M8 Sicherungsring 10 7 M8 Hutmutter 2 10 M8*15mm Inbusschraube 8 4 M8*52mm Schlossschraube 2 21 Schraube für Sitzverstellung 1 87 Inbusschlüssel 1 89 Werkzeug 1 90 Werkzeug 1 18

19 Teileliste Nr. Beschreibung Q'TY Nr. Beschreibung Q'TY 1 Rahmen 1 46 Abdeckkappe für Lenker 2 2 Vordere Querstütze 1 47 Schraube M8 * 25 mm 2 3 Transportrollen (L+R) 2 48 Servomotor 1 4 M8 * 52 mm Schraube 2 49 Fixierung Widerstandskabel 1 5 M8 Beilagscheibe (t=1.2) Verschlußkappe C5 (ID 4.7mm) 1 6 M8 Sicherungsring M6*10mm Schraube 2 7 M8 Hut-Mutter 2 52 Befestigung für Sensor 1 8 Hintere Querstütze 1 53 Sensor Kabel 1 9 Hintere Abdeckung f. Querstütze (L+R) 2 54 #6-32 *12mm Schraube 1 10 M8*15mm Inbusschraube 8 55 Widerstandskabel 1 11 Linke Seitenverkleidung 1 56 Kleine Feder 1 12 Rechte Seitenverkleidung 1 57 M8 Mutter 1 13 Lenkerstütze 1 58 M8*52MM Schraube 1 14 Oberes Computerkabel 1 59 Bügelhalterung für die Magnete 1 15 Unteres Computerkabel 1 60 Kugellager (6203ZZ) 4 16 Sattelstütze 1 61 Kappe C17(ID 15.7mm) 3 17 Servo-Motor Kabel 1 62 Magnet 1 18 Horizontale Sattelverstellstrebe 1 63 Riemenscheibe 1 18A Halterung für Sattel auf Sattelstrebe 1 64 Beilagscheibe ID17 OD22 t = 0.3 mm > 1 19 Sattel 1 65 Achse für Riemenscheibe 1 19A Halterung für Sattel 1 66 M6*15mm Schraube 4 20 Horizontaler Sattelverstellknopf 1 67 Riemen 1 21 Sattelverstellschraube 1 68 M8*15mm Schraube 2 22 Computer 1 69 Befestigungsarm für den Magnet 1 23 M5*12mm Schraube 4 70 Bügel für Spannvorrichtung 1 24 Handpulskabel 1 71 Große Feder 1 25 Lenkerüberzug 2 72 Abstandshülse 3 26 Handpuls 2 73 M6*1.5mm Beilagscheibe 3 27 Lenker 1 74 M6*14mm Schraube 3 28 Lenkerstützabdeckung unten 1 75 Kugellager (6300ZZ) 1 29 Sattelstützabdeckung unten 1 76 Riemenscheibe 1 30 Lenkerverstellknopf 1 77 Schwungrad 1 31 Schraube M5 * 12 mm Achse für Schwungrad /8" Gewindemutter 2 79 Kugellager (6003ZZ) 2 33 Pedale (L/R) 1 80 Kugellager IC1735-FT 1 34 Kreuzgestänge (R) 1 81 Beilagscheibe ID30 OD34 (0.8mm) 1 35 Netzadapter 1 82 Kugellager (6000ZZ) 1 36 Abdeckung für Kreuzgestänge (R) 1 83 M10 Beilagscheibe (t=1mm) /8" Mutter (t=3mm) /8" Gewindemutter (t=7mm) 1 38 Abdeckkappe 2 85 Kappe C10(ID 9.1mm) 1 39 Sattelstützeneinsatz 1 86 Kreuzgestänge(L) 1 40 Abdeckung für Kreuzgestänge (L) 1 87 Vordere Lenkerabdeckung 1 41 Höhenausgleichskappen 2 88 Hintere Lenkerabdeckung 1 42 M10 Beilagscheibe (t=2mm) 3 89 Schraube M3 * 12 mm 2 43 Plastikkappe 1 90 Schraube M5 * 10 mm 2 44 Fixierplatte für Sattelstrebe 1 45 Plastikabdeckung f. Sattelstrebe 2 19
 1 6 M8 Sicherungsring 12 51 M6*10mm Schraube 2 7 M8 Hut-Mutter 2 52 Befestigung für Sensor 1 8 Hintere Querstütze 1 53 Sensor Kabel 1 9 Hintere Abdeckung f.")
20 Explosionszeichnung 20
21 Aufbauanleitung ALLE HIER ABGEBILDETEN TEILE WURDEN IM WERK VORMONTIERT. 21
22 SCHRITT 1 Montieren Sie die vordere Stütze (2) auf den Hauptrahmen (1) mit Hilfe von 2 x (4), 2 x (5), 2 x (6) und 2 x (7). Ziehen Sie die Schrauben fest an. Bemerkung: Es wird helfen, während der Montage der vorderen Stütze ein Stück der Polystyrolpackung unter den Ergometer zu bringen. SCHRITT 2 Montieren Sie die hintere Stütze (8) auf den Hauptrahmen (1) mit Hilfe von 2 x (4), 2 x (5), 2 x (6) und 2 x (7). Ziehen Sie die Schrauben fest an. Bemerkung: Es wird helfen, während der Montage der hinteren Stütze ein Stück der Polystyrolpackung unter den Ergometer zu bringen. SCHRITT 3 Verbinden Sie das obere Computerkabel (14) mit dem unteren Computerkabel (15). Sie können ein Klick hören, wenn Sie diese zwei Teile zusammenstecken. Stecken Sie die Lenkerstütze durch den Kunststoffdeckel in den Hauptrahmen und befestigen Sie sie mit 4 x (10), 4 x (6) und 4 x (5). Ziehen Sie die Schrauben mit dem Inbusschlüssel an und stecken Sie dann den Kunststoffdeckel über die Verschraubung. SCHRITT 4 Befestigen Sie den Sattelaufsatz (19A) zum Sattelstützenhalter (18A). Bemerkung: Es kann helfen, den Sattel zu wenden. Legen Sie ihn auf ein Stück Kunststoff, um ihn zu schützen. Ziehen Sie ihn danach fest an. 22
23 SCHRITT 5 Stecken Sie die Sattelstütze (16) in den Hauptrahmen. Richten Sie eines der Löcher in der Sattelstütze mit dem Loch im Hauptrahmen aus und stecken Sie den Höhenverstellknopf (21) durch das Loch im Hauptrahmen. Ziehen Sie danach den Höhenverstellknopf im Hauptrahmen an. SCHRITT 6 Befestigen Sie den Lenker (27) zur Lenkerstütze (13) und fixieren Sie ihn mit der Klemme, dem Zierklemmendeckel (87), Sternschraube (30) und Unterlage (5) in der von Ihnen gewünschten Position. Befestigen Sie den Lenkerdeckel (87+88) mit 2 Schrauben M5x10mm (90). SCHRITT 7 Stecken Sie das obere Computerkabel (14) in den Computer (22). Sie können ein Klick hören, wenn das Kabel verbunden ist. Fixieren Sie den Computer (22) auf der Lenkersäule mit 4 x M5x12 Schrauben (23). Ziehen Sie diese mit dem Schraubenzieher fest an. SCHRITT 8 Stecken Sie das rechte Pedal (33) in den rechten Arm der Kurbelgruppe (34) und ziehen Sie es mit den Fingern im Uhrzeigersinn an, bis das Gewinde in der Kurbel voll eingeführt ist. Wiederholen Sie dasselbe mit dem linken Pedal (33), ziehen Sie diesen mit den Fingern gegen den Uhrzeigersinn. Ziehen Sie beide Pedale danach fest an. 23
24 SCHRITT 9 Schließen Sie den Adapter (35) an der Hinterseite des Ergometers und an die Steckdose, die Konsole wird piepsen, wenn die Verbindung hergestellt und das Gerät eingeschaltet ist. Gut gemacht! Ihr Ergometer ist jetzt betriebsbereit. Im Anschluss finden Sie Weisungen zur Bedienung des Trainingscomputers. 24
25 Computerbeschreibung Benutzer-Nr. 1~4 Funktion Display aktiv Aktueller Wert der Displayfunktion ZEIT (min; sec.) Umdrehungen/Minute (U/min) GESCHWINDIGKEIT (Km/h.) BENUTZER zur Speicherung der Personaldaten des Benutzers AB zur Einstellung der Daten und des Widerstands durch Drehen des Knopfes nach links Start oder Stop Stand 25 Display für aktives Programm Start/ Stop zum Starten oder Pause des Trainings durch Drücken des Knopfes Level Display des Niveaus des aktiven Widerstands (1~16) Aktuelle Herzfrequenz (BPM) Display für aktiven Profil und Widerstand Energieverbrauch (cal.) Watt STRECKE (Km) Pulse Recovery - um Fitnessnote zu bekommen EINGABE- zur eingabe der Trainingparameter AUF zur Einstellung der Daten und des Widerstands durch Drehen des Knopfes nach rechts
26 PROGRAMMEINFÜHRUNG Manual Programm: Manual (Manuell) PROGRAMM 1 ist ein manuelles Programm. Drücken Sie die ENTER -Taste, um TIME (ZEIT), DISTANCE (DISTANZ), und CAL zu wählen. Dann drehen Sie den Knopf, um die Werte einzustellen. Die Standardbelastung ist Stufe 6. Nach nochmaligem Drücken der START/STOP -Taste können Sie mit dem Training beginnen. Die Benutzer können in jedem beliebigen Level trainieren (durch das Drehen des Knopfes während des Trainings). Voreingestellte Programme: Rolling, Valley, Fat Burn, Ramp, Mountain, Intervals (Fahren, Tal, Fettverbrennung, Rampe, Berg, Intervalle) PROGRAMM 2 bis PROGRAMM 7 sind voreingestellte Programme. Drücken Sie die ENTER -Taste, um TIME (ZEIT), DISTANCE (DISTANZ), und CAL zu wählen. Dann drehen Sie den Knopf, um die Werte einzustellen. Benutzer können mit verschiedenen Belastungslevels in verschiedenen Intervallen trainieren, wie die Profile zeigen. Nach dem Drücken der START/STOP -Taste können Sie mit dem Training starten. Benutzerprofilprogramme: Benutzereinstellungsprofil Programm 8 ist das vom Benutzer einzustellende Programm. Die Benutzer können die Werte in der Reihenfolge TIME (ZEIT), DISTANCE (DISTANZ), CAL, und dem Belastungslevel in 10 Intervallen frei bearbeiten. Die Werte und Profile werden nach der Einstellung im Speicher gespeichert. Die Benutzer können auch die bestehende Belastung in jedem Intervall durch drehen des Knopfes ändern, die gespeicherten Belastungslevels werden dabei nicht geändert. Geschwindigkeitsunabhängiges Programm: Wattkontrolle Programm 9 ist ein geschwindigkeitsunabhängiges Programm. Drücken Sie die ENTER -Taste, um die Werte TIME (ZEIT), DISTANCE (DISTANZ), und WATT zu wählen. Dann drehen Sie den Knopf, um die Werte einzustellen. Nach dem Drücken der START/STOP -Taste können Sie mit dem Training beginnen. Während des Trainings ist das Belastungsniveau nicht veränderbar. In diesem Programm wird der Computer das Belastungsniveau entsprechend dem eingestellten WATT-Wert anpassen. Zum Beispiel, das Belastungsniveau kann steigen, während die Geschwindigkeit zu langsam ist. Das Belastungsniveau kann auch sinken, wenn die Geschwindigkeit zu schnell ist. Dadurch wird sich der berechnete WATT-Wert der WATT-Werteinstellung vom Benutzer nähern. Programme zur Herzfrequenzkontrolle: 60% H.R.C. (Heart Rate Control), 75% H.R.C., 85% H.R.C. Programm 10 bis Programm 12 sind die Herzfrequenzkontrollprogramme. Im Programm 10 bis Programm 12 drücken Sie die ENTER -Taste, um TIME (ZEIT), DISTANCE (DISTANZ), CAL & AGE (ALTER) und TARGET H.R. (ZIELHERZFREQUENZ) zu wählen. Dann drehen Sie den Knopf, um die Werte einzustellen. Die Benutzer können in einem Zeitraum oder in einer bestimmten Distanz mit 60% der Max Heart Rate (Maximale Herzfrequenz) im Programm 10, 75% der Max Heart Rate im Programm 11, und 85% der Max Heart Rate im Programm 12 üben. Nach dem Drücken der START/STOP -Taste können Sie mit dem Training beginnen. Sie haben die Möglichkeit unter diesen 3 Hauptprogrammen Ihre Zielherzfrequenz auszuwählen, Sie können Ihre Zielherzfrequenz zum Training in einem bestimmten Zeitraum oder einer bestimmten Distanz einstellen. In diesen Programmen wird der Computer das Belastungsniveau entsprechend der festgelegten Herzfrequenz einstellen. Zum Beispiel, das Belastungsniveau kann steigen, während die festgestellte Herzfrequenz niedriger ist als Zielherzfrequenz (TARGET H.R). Das Belastungsniveau kann auch sinken, wenn die festgestellte Herzfrequenz höher ist als TARGET H.R. Dank dieser Anpassung wird Ihre Herzfrequenz an die TARGET H.R. im Bereich von TARGET H.R. -5 und TARGET H.R. +5 angepasst. 26
27 Körperfettprogramm: Körperfettmessung Programm 13 ist ein spezielles Programm, bestimmt zur Berechnung des Körperfettanteiles des Benutzers und zur Entwicklung von spezifischen Belastungsprofilen für die Benutzer. Mit 9 verschiedenen Körpertypen kann der Computer 9 verschiedene Profile für jeden generieren. Drücken Sie die ENTER -Taste, um GENDER (GESCHLECHT, HEIGHT (GRÖSSE), WEIGHT (GEWICHT), und AGE (ALTER) zu wählen. Dann drehen Sie den Knopf, um die Werte einzustellen. Nach dem Drücken der START/STOP -Taste zur Berechnung des Körperfetts legen Sie bitte Ihre Hände auf die Handpulssensoren. Wenn der Sensor keine Signale auffangen kann, erscheint im Profildisplay die Fehlermeldung E3. Wenn dies geschieht, drücken Sie die START/STOP -Taste zur erneuten Berechnung. Dann werden bald die Berechnungswerte FAT%, BMR, BMI, BODY TYPE und das vorgeschlagene Profil erscheinen. Drücken Sie die START/STOP -Taste um das Training zu starten. Das im Display abgebildete Profil ist für Ihren Körpertyp (Body Type) spezial entwickelt. Fitness Test: Drücken Sie die Pulse Recovery -Taste Die Fitnessnote ist für Ihre persönliche Orientierung und zum Vergleich der Herzfrequenz vor und nach dem Training. Sie werden bemerken, dass Ihre Fitness besser wird, wenn Sie regelmäßig trainieren. 1. Drücken Sie die Pulse Recovery -Taste sofort nach dem Training. 2. Halten Sie die Hände auf die Pulssensoren oder legen Sie den Brustgurt* an. 3. Die Zeit wird von 60 bis 0 Sekunden heruntergezählt. 4. Ihre persönliche Fitnessnote (F1.0 F6.0) wird auf dem Display erscheinen. * Brustgurt optional - nicht im Lieferumfang enthalten F1.0 = Ausgezeichnet F2.0 = Gut F3.0 = Ganz gut F4.0 = Unterdurchschnittlich F5.0 = Nicht gut F6.0 = Schlecht TASTEN UND STROMANSCHLUSS Power (Strom) Dieses Modell wurde mit einem Stromadapter geliefert. Die Adapterspezifizierung ist 6V/1A. Auto on (Auto ein) Auto off (Auto aus) PULSE RECOVERY USER (BENUTZER) Drücken Sie eine beliebige Taste oder fangen Sie an zu treten, um den Computer automatisch einzuschalten. Falls irgendwelche Teile des Displays eine Störung aufweisen, kontrollieren Sie den Stromadapter und alle Anschlüsse. Wenn das Gerät 4 Minuten und 16 Sekunden nicht benutzt wird, schaltet sich der Computer automatisch ab. Drücken Sie diese Taste, um den Fitnesstest zu beginnen. Der Bereich der Testergebnisse ist von F1.0 bis F6.0. Drücken Sie diese Taste, um persönliche Daten einzugeben. ENTER 1. Während der Funktion der Programmauswahl drücken Sie diese Taste, um das Programm zu bestätigen, mit dem Sie trainieren wollen. 2. Während des Einstellmodus drücken Sie diese Taste, um den Wert zu bestätigen, den Sie eingeben. 3. Während des Startmodus drücken Sie diese Taste, um die Zeit, Geschwindigkeit, Distanz, Kalorien, U/min., Watt oder Puls auszuwählen, der ausgewählte Wert wird im Display größer dargestellt. 4. Im Programm der Körperfettmessung drücken Sie diese Taste, um das nächste Ergebnis nach der Körperfettmessung zu lesen. 27
28 1. Drehen Sie die MODUS -Taste, um das Programm Manual (Manuell), Rolling (Fahren), Valley (Tal), Fat Burn (Fettverbrennung), Ramp (Rampe), Mountain (Berg), Intervals (Intervalle), User Setting Profile (Benutzereinstellungsprofil), Watt Control (Wattkontrolle), 60% H.R.C. (Herzfrequenzkontrolle), 75% H.R.C., 85% H.R.C., Body fat test (Körperfetttest) oder User Data (Benutzerdaten) zu wählen. 2. Drehen Sie die MODUS -Taste, um die Einstellwerte von TIME (ZEIT), DISTANCE (DISTANZ), CAL (KALORIEN), height (Größe), weight (Gewicht), age (Alter), sex (Geschlecht), und pulse (Puls) zu erhöhen oder zu senken. 3. Während des Startmodus, drücken Sie diese Taste, um das Widerstandsniveau zu erhöhen oder zu senken. 4. Drücken Sie die MODUS -Taste, um das Training zu starten oder zu stoppen oder die Körperfettmessung zu beginnen. RESET Drücken Sie die START/STOP -Taste für 2 Sekunden, um alle abgebildeten Werte auf Null zurückzusetzen. GEBRAUCHSANWEISUNG: A) Schalten Sie den Strom ein. Schließen Sie den Adapter am Gerät an. Der Bildschirm wird sich nach einem Piepsen einschalten. B) Bestimmen Sie den Benutzer (dies kann man nur im STOP-Modus machen.) 1. Drücken Sie die USER-Taste für USER DATA (BENUTZERDATEN), dies können Sie nur im Stoppmodus machen. 2. Drücken Sie Enter für USER SELECT (BENUTZERWAHL). 3. Drehen Sie die MODUS -Taste, um den Benutzer von U1 bis U4 zu wählen. 4. Drücken Sie Enter, um den Benutzer zu bestätigen. 5. Drehen Sie die MODUS -Taste, um Ihre Größe einzustellen, und dann drücken Sie ENTER, um Ihren Einstellwert zu bestätigen. 6. Drehen Sie die MODUS -Taste, um Ihr Gewicht einzustellen, und dann drücken Sie ENTER, um Ihren Einstellwert zu bestätigen. 7. Drehen Sie die MODUS -Taste, um Ihr Alter einzustellen, und dann drücken Sie ENTER, um Ihren Einstellwert zu bestätigen. 8. Drehen Sie die MODUS -Taste, um Ihr Geschlecht einzustellen, und dann drücken Sie ENTER, um Ihr Geschlecht zu bestätigen, M (Mann) oder F (Frau). 9. Beenden Sie die Benutzerdateneingabe. C) Programmwahl und Werteinstellungen C-1 Manual Programm 1. Drehen Sie die MODUS -Taste, um das manuelle Programm zu wählen. 2. Drücken Sie die ENTER-Taste, um das manuelle Programm zu bestätigen. 3. Das Time (Zeit)-Display wird aufblinken, und dann drehen Sie die MODUS -Taste, um die gewünschte Zeit zum Trainieren einzustellen. Drücken Sie die ENTER-Taste, um Ihren Einstellwert zu bestätigen. 4. Das Distance (Distanz)-Display wird aufblinken, und dann drehen Sie die MODUS -Taste, um die gewünschte Distanz einzustellen. Drücken Sie die ENTER-Taste, um Ihren Einstellwert zu bestätigen. 28
29 5. Das Calories (Kalorie)-Display wird aufblinken, und dann drehen Sie die MODUS -Taste, um die gewünschten, zu verbrauchenden Kalorien einzustellen. Drücken Sie die ENTER-Taste, um Ihren Einstellwert zu bestätigen. 6. Drücken Sie START/STOP MODUS, um mit Ihrem Training zu beginnen. Bemerkung: 1. Zeit und Distanz können in diesem Programm nicht gleichzeitig eingestellt werden. 2. Wenn Sie das Ziel erreichen, wird der Bildschirm piepsen und dann stoppen. 3. Wenn Sie mehr als ein Ziel einstellen und das nächste Ziel erreichen möchten, drücken Sie Start, um weiter zu trainieren. C-2 Voreingestellte Programme: Rolling, Valley, Fat Burn, Ramp, Mountain, Intervals (Fahren, Tal, Fettverbrennung, Rampe, Berg, Intervalle) 1. Drehen Sie die MODUS -Taste, um eines der oben angeführten Programme zu wählen. 2. Drücken Sie die ENTER-Taste, um in dieses Programm zu gelangen. 3. Das Time (Zeit)-Display wird aufblinken, und dann drehen Sie die MODUS -Taste, um die gewünschte Zeit zum Trainieren einzustellen. Drücken Sie die ENTER-Taste, um Ihren Einstellwert zu bestätigen. 4. Das Distance (Distanz)-Display wird aufblinken, und dann drehen Sie die MODUS -Taste, um die gewünschte Distanz einzustellen. Drücken Sie die ENTER-Taste, um Ihren Einstellwert zu bestätigen. 5. Das Calories (Kalorien)-Display wird aufblinken, und dann drehen Sie die MODUS -Taste, um die gewünschten zu verbrauchenden Kalorien einzustellen. Drücken Sie die ENTER-Taste, um Ihren Einstellwert zu bestätigen. 6. Drücken Sie die START/STOP-Taste, um das Training zu beginnen. Bemerkung: 1. Zeit und Distanz können in diesem Programm nicht gleichzeitig eingestellt werden. 2. Wenn Sie das Ziel erreichen, wird der Bildschirm piepsen und dann stoppen. 3. Wenn Sie mehr als ein Ziel einstellen und das nächste Ziel erreichen möchten, drücken Sie Start, um weiter zu trainieren. C-3 User Setting Profile (Benutzereinstellungsprofil) 1. Drehen Sie die MODUS -Taste, um USER PROFILE zu wählen. 2. Drücken Sie die ENTER-Taste, um in dieses Programm zu gelangen. 3. Das Time (Zeit)-Display wird aufblinken, und dann drehen Sie die MODUS -Taste, um die gewünschte Zeit zum Trainieren einzustellen. Drücken Sie die ENTER-Taste, um Ihren Einstellwert zu bestätigen. 4. Das Distance (Distanz)-Display wird aufblinken, und dann drehen Sie die MODUS -Taste, um die gewünschte Distanz einzustellen. Drücken Sie die ENTER-Taste, um Ihren Einstellwert zu bestätigen. 5. Das Calories (Kalorien)-Display wird aufblinken, und dann drehen Sie die MODUS -Taste, um die gewünschten, zu verbrauchenden Kalorien einzustellen. Drücken Sie die ENTER-Taste, um Ihren Einstellwert zu bestätigen. 6. Die Spalte 1 wird aufblinken, und dann drehen Sie die MODUS -Taste, um Ihr persönliches Übungsprofil zu bilden. 7. Drücken Sie die ENTER-Taste, um die erste Spalte Ihres Übungsprofils zu bestätigen. 8. Die Spalte 2 wird aufblinken, und dann drehen Sie die MODUS Taste, um Ihr persönliches Übungsprofil zu bilden. 9. Drücken Sie die ENTER-Taste, um die zweite Spalte Ihres Übungsprofils zu bestätigen. 10. Beenden Sie Ihr persönliches Übungsprofil nach der oben angeführten Beschreibung. 11. Drücken Sie START/ST0P-Taste, um das Training zu beginnen. Bemerkung: Ihr persönliches Übungsprofil wird im Bildschirmspeicher gespeichert. 29
30 Bemerkung: 1. Zeit und Distanz können in diesem Programm nicht gleichzeitig eingestellt werden. 2. Wenn Sie das Ziel erreichen, wird der Bildschirm piepsen und dann stoppen. 3. Wenn Sie mehr als ein Ziel einstellen und das nächste Ziel erreichen möchten, drücken Sie Start, um weiter zu trainieren. C-4 Watt Control Program (Wattkontrollprogramm) 1. Drehen Sie die MODUS -Taste, um das Wattkontrollprogramm zu wählen. 2. Drücken Sie die ENTER-Taste, um das manuelle Programm zu wählen. 3. Das Time (Zeit)-Display wird aufblinken, und dann drehen Sie die MODUS -Taste, um die gewünschte Zeit zum Trainieren einzustellen. Drücken Sie die ENTER-Taste, um Ihren Einstellwert zu bestätigen. 4. Das Distance (Distanz)-Display wird aufblinken, und dann drehen Sie die MODUS -Taste, um die gewünschte Distanz einzustellen. Drücken Sie die ENTER-Taste, um Ihren Einstellwert zu bestätigen. 5. Das Calories (Kalorien)-Display wird aufblinken, und dann drehen Sie die MODUS -Taste, um die gewünschten, zu verbrauchenden Kalorien einzustellen. Drücken Sie die ENTER-Taste, um Ihren Einstellwert zu bestätigen. 6. Das Watt-Display wird aufblinken, und dann drehen Sie die MODUS -Taste, um die Wattbelastung einzustellen. Drücken Sie die ENTER-Taste, um Ihren Einstellwert zu bestätigen. 7. Drücken Sie die START/STOP-Taste, um das Training zu beginnen. Bemerkung: WATT = TORQUE (KGM) * RPM *1.03. In diesem Programm wird WATT einen gleichbleibenden Wert behalten. Das bedeutet, dass wenn Sie schnell treten, wird die Belastung sinken, und wenn Sie langsam treten, wird die Belastung steigen. Bemühen Sie sich immer, denselben Wattwert einzuhalten. Bemerkung: 1. Zeit und Distanz können in diesem Programm nicht gleichzeitig eingestellt werden. 2. Wenn Sie das Ziel erreichen, wird der Bildschirm piepsen und dann stoppen. 3. Wenn Sie mehr als ein Ziel einstellen und das nächste Ziel erreichen möchten, drücken Sie Start, um weiter zu trainieren. C-5 HEART RATE CONTROL PROGRAM (HERZFREQUENZKONTROLLPROGRAMM): 60% H.R.C., 75%H.R.C., und 85% H.R.C. 1. Drehen Sie die MODUS -Taste, um eines der Herzfrequenzkontrollprogramme zu wählen. 2. Drücken Sie die ENTER-Taste, um Ihre Wahl zu bestätigen. 3. Das Time (Zeit)-Display wird aufblinken, und dann drehen Sie die MODUS -Taste, um die gewünschte Zeit zum trainieren einzustellen. Drücken Sie die ENTER-Taste, um Ihren Einstellwert zu bestätigen. 4. Das Distance (Distanz)-Display wird aufblinken, und dann drehen Sie die MODUS -Taste, um die gewünschte Distanz einzustellen. Drücken Sie die ENTER-Taste, um Ihren Einstellwert zu bestätigen. 5. Das Calories (Kalorien)-Display wird aufblinken, und dann drehen Sie die MODUS -Taste, um die gewünschten zu verbrauchenden Kalorien einzustellen. Drücken Sie die ENTER-Taste, um Ihren Einstellwert zu bestätigen. 6. Das Age (Alter)-Display wird aufblinken, und dann drehen Sie die MODUS -Taste, um Ihr Alter einzustellen. Drücken Sie die ENTER-Taste, um Ihren Einstellwert zu bestätigen. 7. Das Target H.R. (Zielherzfrequenz)-Display wird aufblinken. Überprüfen Sie bitte, ob dieser Wert für Sie geeignet ist. Wenn Sie diesen Wert für Ihr Ziel nicht verwenden wollen, können Sie die 30
ET 570 CROSSTRAINER GB D CZ SK H
 ET 570 CROSSTRAINER GB D CZ SK H Table of contents - Inhaltsverzeichnis - Obsah - Obsah - Tájékoztató 1. English P. 3 2. Deutsch P. 17 3. esky P. 34 4. Slovensky P. 49 5. Magyar P. 64 The owner s manual
Madison ellipszistréner
 Madison ellipszistréner A szervizért és az alkatrészekért az eladó cég felel. Insportline Hungary kft. Kossuth Lajos u. 65, 2500 Esztergom tel. +36 (33) 313242, +36 (70) 211 8227, www.insportline.hu Figyelmeztetés:
KN-CP50. MANUAL (p. 2) Digital compass. ANLEITUNG (s. 4) Digitaler Kompass. GEBRUIKSAANWIJZING (p. 10) Digitaal kompas
 Digital compass. ANLEITUNG (s. 4) Digitaler Kompass. GEBRUIKSAANWIJZING (p. 10) Digitaal kompas") KN-CP50 MANUAL (p. ) Digital compass ANLEITUNG (s. 4) Digitaler Kompass MODE D EMPLOI (p. 7) Boussole numérique GEBRUIKSAANWIJZING (p. 0) Digitaal kompas MANUALE (p. ) Bussola digitale MANUAL DE USO (p.
KN-CP50 MANUAL (p. ) Digital compass ANLEITUNG (s. 4) Digitaler Kompass MODE D EMPLOI (p. 7) Boussole numérique GEBRUIKSAANWIJZING (p. 0) Digitaal kompas MANUALE (p. ) Bussola digitale MANUAL DE USO (p.
Széchenyi István Egyetem www.sze.hu/~herno
 Oldal: 1/6 A feladat során megismerkedünk a C# és a LabVIEW összekapcsolásának egy lehetőségével, pontosabban nagyon egyszerű C#- ban írt kódból fordítunk DLL-t, amit meghívunk LabVIEW-ból. Az eljárás
Contact us Toll free (800) fax (800)
 fax (800)") Table of Contents Thank you for purchasing our product, your business is greatly appreciated. If you have any questions, comments, or concerns with the product you received please contact the factory.
Table of Contents Thank you for purchasing our product, your business is greatly appreciated. If you have any questions, comments, or concerns with the product you received please contact the factory.
Használati útmutató. Figyelem. Egészsége megőrzése érdekében a gépen való edzés megkezdése előtt kérje orvosa tanácsát.
 Használati útmutató Figyelem Egészsége megőrzése érdekében a gépen való edzés megkezdése előtt kérje orvosa tanácsát. Ha szédülést, émelygést észlel, azonnal hagyja abba a gépen való edzést. A gép helytelen
XT 910 CROSSTRAINER GB D CZ SK
 XT 10 CROSSTRAINER GB D CZ SK H Table of contents - Inhaltsverzeichnis - Obsah - Obsah - Tájékoztató English P 3 Deutsch P 22 Česky P 41 Slovensky P 60 Magyar P The owner s manual is only for the customer
Using the CW-Net in a user defined IP network
 Using the CW-Net in a user defined IP network Data transmission and device control through IP platform CW-Net Basically, CableWorld's CW-Net operates in the 10.123.13.xxx IP address range. User Defined
WiR gratulieren GRATULÁLUNK!
 Reflexmat Seit der Gründung im Jahre 2000 steht der Name CaSaDa für hochwertige Produkte im Bereich Wellness und fitness. WiR gratulieren GRATULÁLUNK! Mit dem Kauf dieser Fußreflexzonen-Matte haben sie
Komplex tehetséggondozási program a Ceglédi kistérségben TÁMOP - 3.4.3-08/1-2009- 0002
 Komplex tehetséggondozási program a Ceglédi kistérségben TÁMOP - 3.4.3-08/1-2009- 0002 A projekt az Európai Unió támogatásával, az Európai Szociális Alap társfinanszírozásával valósul meg Név: Iskola:
Utasítások. Üzembe helyezés
 HASZNÁLATI ÚTMUTATÓ Üzembe helyezés Utasítások Windows XP / Vista / Windows 7 / Windows 8 rendszerben történő telepítéshez 1 Töltse le az AORUS makróalkalmazás telepítőjét az AORUS hivatalos webhelyéről.
INSTALLATION MANUAL For authorized service personnel only.
 Connection Method CHASSIS TYPE A AIR CONDITIONER OPTIONAL PARTS Communication box kit PART NO. 9317807005 INSTALLATION MANUAL For authorized service personnel only. 1. SAFETY PRES Contents 1. SAFETY PRES...
THS710A, THS720A, THS730A & THS720P TekScope Reference
 THS710A, THS720A, THS730A & THS720P TekScope Reference 070-9741-01 Getting Started 1 Connect probes or leads. 2 Choose SCOPE 3 or METER mode. Press AUTORANGE. Copyright Tektronix, Inc. Printed in U.S.A.
Proxer 7 Manager szoftver felhasználói leírás
 Proxer 7 Manager szoftver felhasználói leírás A program az induláskor elkezdi keresni az eszközöket. Ha van olyan eszköz, amely virtuális billentyűzetként van beállítva, akkor azokat is kijelzi. Azokkal
Public-Key Kryptography mit Diskreten Logarithmen
 Public-Key Kryptography mit Diskreten Logarithmen Jan Schwarz Kristine Jetzke 11.01.2005 Gliederung Das ElGamal Kryptosystem Algorithmen zum Lösen von Diskreten Logarithmen Untere Komplexitätsgrenze Das
Mercedes-Benz : Six Sigma Black Belt, (135203 ) Six Sigma Black Belt, Werk Kecskemét, Ungarn (135203)
 Six Sigma Black Belt, Werk Kecskemét, Ungarn (135203)") Oktober 2014 Kecskemét, Mercedes-Benz Manufacturing Hungary Kft. Mercedes-Benz : Six Sigma Black Belt, (135203 ) Six Sigma Black Belt, Werk Kecskemét, Ungarn (135203) Aufgaben Feladatok: Stellennummer
Oktober 2014 Kecskemét, Mercedes-Benz Manufacturing Hungary Kft. Mercedes-Benz : Six Sigma Black Belt, (135203 ) Six Sigma Black Belt, Werk Kecskemét, Ungarn (135203) Aufgaben Feladatok: Stellennummer
PARTS LIST. Elna Lotus
 Lotus 0 0 KEY PARTS NO. NO. DESCRIPTION 0 0000 000 00000 0000 0000 00 00000 000000 0000 0000 000 000 0000 000000 00000 000000 000 00 00000 00000 0000 0000 000 00000 000000 Upper shaft (unit) Hexagonal
MAKING MODERN LIVING POSSIBLE. Danfoss Heating Solutions
 MAKING MODERN LIVING POSSIBLE Danfoss Danfoss Link Link HC Hidronikus HC Hydronic szabályozó Controller Szerelési Installation útmutató Guide Danfoss Heating Solutions Szerelési útmutató Tartalomjegyzék
1. Gyakorlat: Telepítés: Windows Server 2008 R2 Enterprise, Core, Windows 7
 1. Gyakorlat: Telepítés: Windows Server 2008 R2 Enterprise, Core, Windows 7 1.1. Új virtuális gép és Windows Server 2008 R2 Enterprise alap lemez létrehozása 1.2. A differenciális lemezek és a két új virtuális
FELHASZNÁLÓI KÉZIKÖNYV
 Típusszám: NTIVEX99.0 Sorozatszám: FELHASZNÁLÓI KÉZIKÖNYV Sorozatszám: Címke A visszakereshetőség végett tüntesse fel a sorozatszámot a fenti sorban. KÉRDÉSE VAN? Ha kérdése van, vagy valamilyen alkatrész
KRISTALLRoll. TERASZOK.HU Élet a teraszon
 TERASZOK.HU Élet a teraszon A KristallRoll egy innovatív, teleszkópos oldalsínekkel és speciális feszítő rendszerrel ellátott függőleges napellenző, szélvédő oldalfal. Ez az ideális megoldás, hogy verandáját,
Flight Tool V2. Basic setting. The interface is as follow when running the software: A szoftver felülete:
 Flight Tool V2 Basic setting The interface is as follow when running the software: A szoftver felülete: Close button, you can close the software by clicking this button Az alkalmazás bezárásoz kattints
Oktatáskutató és Fejlesztő Intézet TÁMOP / XXI. századi közoktatás (fejlesztés, koordináció) II. szakasz NÉMET NYELV
 II. szakasz NÉMET NYELV") Oktatáskutató és Fejlesztő Intézet TÁMOP-3.1.1-11/1-2012-0001 XXI. századi közoktatás (fejlesztés, koordináció) II. szakasz NÉMET NYELV 2. MINTAFELADATSOR KÖZÉPSZINT Az írásbeli vizsga időtartama: 30 perc
Oktatáskutató és Fejlesztő Intézet TÁMOP-3.1.1-11/1-2012-0001 XXI. századi közoktatás (fejlesztés, koordináció) II. szakasz NÉMET NYELV 2. MINTAFELADATSOR KÖZÉPSZINT Az írásbeli vizsga időtartama: 30 perc
Kezdőlap > Termékek > Szabályozó rendszerek > EASYLAB és TCU-LON-II szabályozó rendszer LABCONTROL > Érzékelő rendszerek > Típus DS-TRD-01
 Típus DS-TRD FOR EASYLAB FUME CUPBOARD CONTROLLERS Sash distance sensor for the variable, demand-based control of extract air flows in fume cupboards Sash distance measurement For fume cupboards with vertical
Correlation & Linear Regression in SPSS
 Petra Petrovics Correlation & Linear Regression in SPSS 4 th seminar Types of dependence association between two nominal data mixed between a nominal and a ratio data correlation among ratio data Correlation
Csatlakozás a BME eduroam hálózatához Setting up the BUTE eduroam network
 Csatlakozás a BME eduroam hálózatához Setting up the BUTE eduroam network Table of Contents Windows 7... 2 Windows 8... 6 Windows Phone... 11 Android... 12 iphone... 14 Linux (Debian)... 20 Sebők Márton
Oktatáskutató és Fejlesztő Intézet TÁMOP-3.1.1-11/1-2012-0001 XXI. századi közoktatás (fejlesztés, koordináció) II. szakasz NÉMET NYELV
 II. szakasz NÉMET NYELV") Oktatáskutató és Fejlesztő Intézet TÁMOP-3.1.1-11/1-2012-0001 XXI. századi közoktatás (fejlesztés, koordináció) II. szakasz NÉMET NYELV 1. MINTAFELADATSOR KÖZÉPSZINT Az írásbeli vizsga időtartama: 30 perc
Oktatáskutató és Fejlesztő Intézet TÁMOP-3.1.1-11/1-2012-0001 XXI. századi közoktatás (fejlesztés, koordináció) II. szakasz NÉMET NYELV 1. MINTAFELADATSOR KÖZÉPSZINT Az írásbeli vizsga időtartama: 30 perc
English PATROL 24VDC SOROMPÓ HASZNÁLATI UTASÍTÁS
 English PATROL 24VDC SOROMPÓ HASZNÁLATI UTASÍTÁS English 3.3 Hand configuration changing As standard the system is supplied in right-hand configuration. To fit the barrier in the left-hand position, follow
A U T O M A T A M O S Ó G É P WMB6510J BEKO
 A U T O M A T A M O S Ó G É P WMB6510J BEKO Kérem először elolvasni! Tisztelt felhasználó, ennek a készüléknek a megvásárlásával, Önnek egy modern, kiváló minőségű mosógépe van, hosszú élettartammal, nagyfokú
Tavaszi Sporttábor / Spring Sports Camp. 2016. május 27 29. (péntek vasárnap) 27 29 May 2016 (Friday Sunday)
 27 29 May 2016 (Friday Sunday)") Tavaszi Sporttábor / Spring Sports Camp 2016. május 27 29. (péntek vasárnap) 27 29 May 2016 (Friday Sunday) SZÁLLÁS / ACCOMODDATION on a Hotel Gellért*** szálloda 2 ágyas szobáiban, vagy 2x2 ágyas hostel
Tavaszi Sporttábor / Spring Sports Camp 2016. május 27 29. (péntek vasárnap) 27 29 May 2016 (Friday Sunday) SZÁLLÁS / ACCOMODDATION on a Hotel Gellért*** szálloda 2 ágyas szobáiban, vagy 2x2 ágyas hostel
REMOTE RADAR DETECTOR (connectable to GPS DETECTOR device.) BEÉPÍTHETŐ RADARDETEKTOR (GPS DETECTOR készülékhez) USER MANUAL / HASZNÁLATI ÚTMUTATÓ
 BEÉPÍTHETŐ RADARDETEKTOR (GPS DETECTOR készülékhez) USER MANUAL / HASZNÁLATI ÚTMUTATÓ") REMOTE RADAR DETECTOR (connectable to GPS DETECTOR device.) BEÉPÍTHETŐ RADARDETEKTOR (GPS DETECTOR készülékhez) USER MANUAL / HASZNÁLATI ÚTMUTATÓ 1 REMOTE RADAR DETECTOR (connectable to GPS DETECTOR device.)
REMOTE RADAR DETECTOR (connectable to GPS DETECTOR device.) BEÉPÍTHETŐ RADARDETEKTOR (GPS DETECTOR készülékhez) USER MANUAL / HASZNÁLATI ÚTMUTATÓ 1 REMOTE RADAR DETECTOR (connectable to GPS DETECTOR device.)
T Á J É K O Z T A T Ó. A 1108INT számú nyomtatvány a http://www.nav.gov.hu webcímen a Letöltések Nyomtatványkitöltő programok fülön érhető el.
 T Á J É K O Z T A T Ó A 1108INT számú nyomtatvány a http://www.nav.gov.hu webcímen a Letöltések Nyomtatványkitöltő programok fülön érhető el. A Nyomtatványkitöltő programok fület választva a megjelenő
ANGOL NYELV KÖZÉPSZINT SZÓBELI VIZSGA I. VIZSGÁZTATÓI PÉLDÁNY
 ANGOL NYELV KÖZÉPSZINT SZÓBELI VIZSGA I. VIZSGÁZTATÓI PÉLDÁNY A feladatsor három részbol áll 1. A vizsgáztató társalgást kezdeményez a vizsgázóval. 2. A vizsgázó egy szituációs feladatban vesz részt a
MINO V2 ÁLLVÁNY CSERÉJE V4-RE
 MINO V2 remote controlled MINO V2 ÁLLVÁNY CSERÉJE V4-RE Mino V3 circuit board replacement Mino V2-V4 csere készlet ezüst Art# 59348S, Mino V2-V4 csere készlet fehér Art# 59348W V4 áramköri lap Art# 75914
Modellszám MM TABLE SAW
 Oldal 1 / 4 Oldal 2 / 4 Oldal 3 / 4 Oldal 4 / 4 Oldal 1 / 4 Tétel Cikkszám Megnevezés ÁtalakMenny. N/O Opc 1 Opc 2 Megjegyzés 001 JM27100031 CROSS HEAD SCREW M5 4 002 JM27100032 FLAT WASHER 5 4 003 JM27100033
OPTIMUM MASCHINEN - GERMANY
 Tartalékalkatrészek - Spare parts B24H - B28H OPTIMUM 6 Tartalékalkatrészek - Spare parts B24H - B28H 6.1 Áttekintés - Overview B24H 37 OPTIMUM Tartalékalkatrészek - Spare parts B24H - B28H 6.1.1 Tartalékalkatrész
Carsten Kümmel Dipl. Tonmeister www.tonmeister-online.de
 Carsten Kümmel Dipl. Tonmeister www.tonmeister-online.de Carsten Kümmel, Starenweg 8a, 82140 Olching DATUM: 23.10.13 Tel.: 08142 6551752 Fax.: 08142 4628228 carsten@tonmeister-online.de Betreff: Beurteilung
Oktatáskutató és Fejlesztő Intézet TÁMOP-3.1.1-11/1-2012-0001 XXI. századi közoktatás (fejlesztés, koordináció) II. szakasz NÉMET NYELV
 II. szakasz NÉMET NYELV") Oktatáskutató és Fejlesztő Intézet TÁMOP-3.1.1-11/1-2012-0001 XXI. századi közoktatás (fejlesztés, koordináció) II. szakasz NÉMET NYELV 3. MINTAFELADATSOR KÖZÉPSZINT Az írásbeli vizsga időtartama: 30 perc
Oktatáskutató és Fejlesztő Intézet TÁMOP-3.1.1-11/1-2012-0001 XXI. századi közoktatás (fejlesztés, koordináció) II. szakasz NÉMET NYELV 3. MINTAFELADATSOR KÖZÉPSZINT Az írásbeli vizsga időtartama: 30 perc
Lexington Public Schools 146 Maple Street Lexington, Massachusetts 02420
 146 Maple Street Lexington, Massachusetts 02420 Surplus Printing Equipment For Sale Key Dates/Times: Item Date Time Location Release of Bid 10/23/2014 11:00 a.m. http://lps.lexingtonma.org (under Quick
Construction of a cube given with its centre and a sideline
 Transformation of a plane of projection Construction of a cube given with its centre and a sideline Exercise. Given the center O and a sideline e of a cube, where e is a vertical line. Construct the projections
BUNDESGESETZBLATT FÜR DIE REPUBLIK ÖSTERREICH. Jahrgang 1999 Ausgegeben am 13. April 1999 Teil III
 P. b. b. Verlagspostamt 1030 Wien WoGZ 213U BUNDESGESETZBLATT FÜR DIE REPUBLIK ÖSTERREICH Jahrgang 1999 Ausgegeben am 13. April 1999 Teil III 70. Abkommen zwischen der Österreichischen Bundesregierung
16F628A megszakítás kezelése
 16F628A megszakítás kezelése A 'megszakítás' azt jelenti, hogy a program normális, szekvenciális futása valamilyen külső hatás miatt átmenetileg felfüggesztődik, és a vezérlést egy külön rutin, a megszakításkezelő
ANGOL NYELV KÖZÉPSZINT SZÓBELI VIZSGA I. VIZSGÁZTATÓI PÉLDÁNY
 ANGOL NYELV KÖZÉPSZINT SZÓBELI VIZSGA I. VIZSGÁZTATÓI PÉLDÁNY A feladatsor három részből áll 1. A vizsgáztató társalgást kezdeményez a vizsgázóval. 2. A vizsgázó egy szituációs feladatban vesz részt a
MUNKASZERZŐDÉS. amely egyrészről az. név: S.C. NUMELE FIRMEI SR.L. székhely: STR., NR. _LOCALITATEA, JUDET, TARA. cégjegyzékszám: NR.REG.
 MUNKASZERZŐDÉS amely egyrészről az név: S.C. NUMELE FIRMEI SR.L. székhely: STR., NR. LOCALITATEA, JUDET, TARA cégjegyzékszám: NR.REG.COMERTULUI adószám: CUI bankszámlaszám: COD IBAN képviseli: _NUME REPREZENTANT
Supporting Information
 Supporting Information Cell-free GFP simulations Cell-free simulations of degfp production were consistent with experimental measurements (Fig. S1). Dual emmission GFP was produced under a P70a promoter
USER MANUAL Guest user
 USER MANUAL Guest user 1 Welcome in Kutatótér (Researchroom) Top menu 1. Click on it and the left side menu will pop up 2. With the slider you can make left side menu visible 3. Font side: enlarging font
építészet & design ipari alkalmazás teherautó felépítmény
 A Design-Composit egy kompozitpaneleket gyártó vállalat, mely teherautó felépítményekhez, az építészet számára és design termékekhez készít paneleket. We are an innovative manufacturer of composite panels
MÁGNESES ELLIPTIKUS TRÉNER. Termék száma: 1012
 MÁGNESES ELLIPTIKUS TRÉNER Termék száma: 1012 Fontos, hogy a használati leírást figyelmesen elolvassa, mielőtt a terméket elkezdené használni. Őrizze meg ezt a leírást a későbbi kérdések felmerülésének
EK-TípusVizsgálati Tanúsítvány EG-Baumusterprüfbescheinigung
 ROBBANÁSBIZTOS BERENDEZÉSEK VIZSGÁLÓ ÁLLOMÁSA Prüfstelle für Explosionsgeschützte Betriebsmittel 1/5 Ungarn, 1037 Budapest, Mikoviny S. u. 2-4. tel/fax: 36 1 250 1720 E-mail: bkiex@elender.hu (1) EK-TípusVizsgálati
SIMSON KOMPAKT JACKS SIMSON KOMPAKT HEBER SIMSON KOMPAKT HIDRAULIKUS EMELŐK
 SIMSON KOMPAKT JACKS SIMSON KOMPAKT HEBER SIMSON KOMPAKT HIDRAULIKUS EMELŐK Lifting Heben Emelés Pushing Drucken Nyomatás Pulling Ziehen Húzás UNIQUE FEATURES EINZIGARTIGE EIGENSCHAFTEN EGYEDÜLÁLLÓ JELLEMZŐK
ANGOL NYELVI SZINTFELMÉRŐ 2013 A CSOPORT. on of for from in by with up to at
 ANGOL NYELVI SZINTFELMÉRŐ 2013 A CSOPORT A feladatok megoldására 45 perc áll rendelkezésedre, melyből körülbelül 10-15 percet érdemes a levélírási feladatra szánnod. Sok sikert! 1. Válaszd ki a helyes
A modern e-learning lehetőségei a tűzoltók oktatásának fejlesztésében. Dicse Jenő üzletfejlesztési igazgató
 A modern e-learning lehetőségei a tűzoltók oktatásának fejlesztésében Dicse Jenő üzletfejlesztési igazgató How to apply modern e-learning to improve the training of firefighters Jenő Dicse Director of
NÉMET NYELV. Célok és feladatok. Fejlesztési, kimeneti követelmények
 NÉMET NYELV Célok és feladatok A nyelvoktatás célja a kommunikatív kompetencia kialakítása, azaz a tanuló képessé tétele arra, hogy idegen nyelvű környezetben képes legyen megoldani felmerülő problémáit,
A teszt a következő diával indul! The test begins with the next slide!
 A teszt a következő diával indul! The test begins with the next slide! A KÖVETKEZŐKBEN SZÁMOZOTT KÉRDÉSEKET VAGY KÉPEKET LÁT SZÁMOZOTT KÉPLETEKKEL. ÍRJA A SZÁMOZOTT KÉRDÉSRE ADOTT VÁLASZT, VAGY A SZÁMOZOTT
4-42 ELECTRONICS WX210 - WX240
 4-42 ELECTRONICS WX210 - WX240 PCS 40000499-en Fig. 8 WX210 - WX240 ELECTRONICS 4-43 PCS COMPONENTS 40000471-en Load-limit regulator Legend Fig. 1 Fig. 2 1 Power supply 2 PWM1 output, proportional valve
A rosszindulatú daganatos halálozás változása 1975 és 2001 között Magyarországon
 A rosszindulatú daganatos halálozás változása és között Eredeti közlemény Gaudi István 1,2, Kásler Miklós 2 1 MTA Számítástechnikai és Automatizálási Kutató Intézete, Budapest 2 Országos Onkológiai Intézet,
Correlation & Linear Regression in SPSS
 Correlation & Linear Regression in SPSS Types of dependence association between two nominal data mixed between a nominal and a ratio data correlation among ratio data Exercise 1 - Correlation File / Open
HAMBURG Használati útmutató Vezérlőmodul UKSM 24VDC Cikkszám: 260.033
 HABURG Használati útmutató Vezérlőmodul UKS 24VDC Cikkszám: 260.033 Brandschutz-Technik und Rauchabzug GmbH Schnackenburgallee 41d D-22525 Hamburg Germany +49 40 89 71 20-0 Fax: +49 40 89 71 20-20 Internet:
NASODRILL ORRSPRAY: TARTÁLY- ÉS DOBOZFELIRAT, VALAMINT A BETEGTÁJÉKOZTATÓ SZÖVEGE. CSECSEMŐ GYERMEK FELNŐTT 100 ml-es üveg
 NASODRILL ORRSPRAY: TARTÁLY- ÉS DOBOZFELIRAT, VALAMINT A BETEGTÁJÉKOZTATÓ SZÖVEGE TARTÁLY - BOTTLE NASAL LAVAGE For chronic or recurring infection NASODRILL Formulated with thermal Luchon water naturally
TP600 HASZNÁLATI UTASÍTÁS
 TP600 HASZNÁLATI UTASÍTÁS GARANCIA TERMÉK-GARANCIA Gyártási garancia: A Medencére egy 5 éves időszakra szóló szín és színtartóssági Garanciát nyújtunk. 2 év az alap és választható spa berendezésekre medence
Can/be able to. Using Can in Present, Past, and Future. A Can jelen, múlt és jövő idejű használata
 Can/ Can is one of the most commonly used modal verbs in English. It be used to express ability or opportunity, to request or offer permission, and to show possibility or impossibility. A az egyik leggyakrabban
3. MINTAFELADATSOR KÖZÉPSZINT. Az írásbeli vizsga időtartama: 30 perc. III. Hallott szöveg értése
 Oktatáskutató és Fejlesztő Intézet TÁMOP-3.1.1-11/1-2012-0001 XXI. századi közoktatás (fejlesztés, koordináció) II. szakasz ANGOL NYELV 3. MINTAFELADATSOR KÖZÉPSZINT Az írásbeli vizsga időtartama: 30 perc
Out-Look. Display. Analog Bar. Testing Mode. Main Parameter. Battery Indicator. Second Parameter. Testing Frequency
 Out-Look Display Analog Bar Testing Mode Battery Indicator 1. LCD Display 2. Power Key 3. Mode Key 4. HOLD Key 5. Function Keys 6. Component socket (5Wire) 7. 2Wire Input Terminals Testing Frequency Main
 R FABRYKA ARMATUR SA 8007 Földfeletti tűzcsap OVERGROUND HYDRANT ÜBERFLURHYDRANT KETTŐS ZÁRÁSÚ KITÖRÉSBIZTOS MONOLIT FEJ GGG-40 FEJ ELFORDÍTHATÓ 0-TÓL 360-IG Műszaki adatok: Technical data: Technische
ELEKTRONIKAI ALAPISMERETEK ANGOL NYELVEN
 ÉRETTSÉGI VIZSGA 2013. május 23. ELEKTRONIKAI ALAPISMERETEK ANGOL NYELVEN KÖZÉPSZINTŰ ÍRÁSBELI VIZSGA 2013. május 23. 8:00 Az írásbeli vizsga időtartama: 180 perc Pótlapok száma Tisztázati Piszkozati EMBERI
KAPOSVÁRI VILLAMOSSÁGI GYÁR
 KAPOSVÁRI VILLAMOSSÁGI GYÁR EN 900 ISO Típusú Hengeres biztosító betétek Typ Zylindrische Sicherungseinsätze Type ilindrical fuse-links Az erõsáramú biztosító betétek villamos áramkörök, készülékek és
BKI13ATEX0030/1 EK-Típus Vizsgálati Tanúsítvány/ EC-Type Examination Certificate 1. kiegészítés / Amendment 1 MSZ EN 60079-31:2014
 (1) EK-TípusVizsgálati Tanúsítvány (2) A potenciálisan robbanásveszélyes környezetben történő alkalmazásra szánt berendezések, védelmi rendszerek 94/9/EK Direktíva / Equipment or Protective Systems Intended
Miskolci Egyetem Gazdaságtudományi Kar Üzleti Információgazdálkodási és Módszertani Intézet. Hypothesis Testing. Petra Petrovics.
 Hypothesis Testing Petra Petrovics PhD Student Inference from the Sample to the Population Estimation Hypothesis Testing Estimation: how can we determine the value of an unknown parameter of a population
Öt évfolyamos képzés nyelvi előkészítő angol német - reál Kód: 04
 Öt évfolyamos képzés nyelvi előkészítő angol német - reál Kód: 04 A XXI. században senkinek sem kell magyarázni az idegen nyelvek és az informatika fontosságát. Ebben a nyelvi előkészítő osztályban elsőbbséget
ÓRATERV. Nevelési-oktatási stratégia Módszerek Tanulói munkaformák Eszközök
 ÓRATERV A pedagógus neve: dr. Horváth Beáta Éva Műveltségi terület: Idegen nyelvek (Élő idegen nyelvek) Tantárgy: Német nyelv Osztály: 12/C Nyelvi előkészítő osztály Az óra témája: Zukunftspläne, Interview
4. Gyakorlat: Csoportházirend beállítások
 4. Gyakorlat: Csoportházirend beállítások 4.1. A Default Domain Policy jelszóra vonatkozó beállításai 4.2. Parancsikon, mappa és hálózati meghajtó megjelenítése csoport házirend segítségével 4.3. Alkalmazások
GÉPKEZELŐI KÉZIKÖNYV... ÚTMUTATÓ LÉPÉSRŐL LÉPÉSRE
 GÉPKEZELŐI KÉZIKÖNYV... ÚTMUTATÓ LÉPÉSRŐL LÉPÉSRE Biztonság Gép áttekintése Ember-gép interfész Bekapcsolás és bejelentkezés Termékváltás Termékre történő nyomtatás Feltöltés Kijelentkezés és kikapcsolás
Üzleti élet Nyitás. Nagyon hivatalos, a címzettnek meghatározott rangja van, aminek szerepelnie kell
 - Nyitás angol magyar Dear Mr. President, Tisztelt Elnök Úr! Nagyon hivatalos, a címzettnek meghatározott rangja van, aminek szerepelnie kell Dear Sir, Hivatalos, férfi címzett, ismeretlen név Dear Madam,
Üzleti élet Nyitás. Nagyon hivatalos, a címzettnek meghatározott rangja van, aminek szerepelnie kell
 - Nyitás magyar angol Tisztelt Elnök Úr! Dear Mr. President, Nagyon hivatalos, a címzettnek meghatározott rangja van, aminek szerepelnie kell Tisztelt Uram! Hivatalos, férfi címzett, ismeretlen név Tisztelt
Klasszikus szinkron. Classic synchron. Klassische synchron
 SITAG Reality Klasszikus szinkron Classic synchron Klassische synchron Áttekinthető és funkcionális. A SITAG Reality valódi mérföldkövet jelent a forgószékek fejlesztésében mind használati mind ökológiai
Oktatáskutató és Fejlesztő Intézet TÁMOP / XXI. századi közoktatás (fejlesztés, koordináció) II. szakasz NÉMET NYELV
 II. szakasz NÉMET NYELV") Oktatáskutató és Fejlesztő Intézet TÁMOP-3.1.1-11/1-2012-0001 XXI. századi közoktatás (fejlesztés, koordináció) II. szakasz NÉMET NYELV 3. MINTAFELADATSOR KÖZÉPSZINT Az írásbeli vizsga időtartama: 60 perc
Oktatáskutató és Fejlesztő Intézet TÁMOP-3.1.1-11/1-2012-0001 XXI. századi közoktatás (fejlesztés, koordináció) II. szakasz NÉMET NYELV 3. MINTAFELADATSOR KÖZÉPSZINT Az írásbeli vizsga időtartama: 60 perc
Használati utasítás PV-AC2610-CE
 Használati utasítás PV-AC2610-CE - 1 - Biztonsági instrukciók Köszönjük, hogy termékünk megvásárlása mellett döntött. Annak ellenére, hogy igyekszünk minden gyártással kapcsolatos hibát elhárítani, azok
Eintritt mit der Familie familiäre Sportbewegung im Zeichen der gesunden Lebensweise
 Eintritt mit der Familie familiäre Sportbewegung im Zeichen der gesunden Lebensweise Auf Grund meiner jahrzehntelangen Erfahrungen kann die Schule die Einbeziehung der Schüler und durch sie auch der Eltern
Hogyan használja az OROS online pótalkatrész jegyzéket?
 Hogyan használja az OROS online pótalkatrész jegyzéket? Program indítása/program starts up Válassza ki a weblap nyelvét/choose the language of the webpage Látogasson el az oros.hu weboldalra, majd klikkeljen
1.1. EGYETLEN KÉSZÜLÉK ÜZEMBE HELYEZÉSE... 124 1.2. KÉT KÉSZÜLÉK ÜZEMBE HELYEZÉSE... 124 2.1. BEKAPCSOLT/KÉSZENLÉTI ÁLLAPOT... 125
 TÁRGYMUTATÓ Fejezet 1: ÜZEMBE HELYEZÉS...124 1.1. EGYETLEN KÉSZÜLÉK ÜZEMBE HELYEZÉSE... 124 1.2. KÉT KÉSZÜLÉK ÜZEMBE HELYEZÉSE... 124 Fejezet 2: FUNKCIÓK...125 2.1. BEKAPCSOLT/KÉSZENLÉTI ÁLLAPOT... 125
Eladni könnyedén? Oracle Sales Cloud. Horváth Tünde Principal Sales Consultant 2014. március 23.
 Eladni könnyedén? Oracle Sales Cloud Horváth Tünde Principal Sales Consultant 2014. március 23. Oracle Confidential Internal/Restricted/Highly Restricted Safe Harbor Statement The following is intended
Egyéni edzés FITNESZ KERÉKPÁR. www.energetics.eu. Testedzési utasítások / HU
 www.energetics.eu FITNESZ KERÉKPÁR Testedzési utasítások / Tisztelt Vásárló, gratulálunk Önnek, hogy megvásárolta az új ENERGETICS fitnesz berendezést. A testgyakorlások elvégzésekor kellemes szórakozást
Cashback 2015 Deposit Promotion teljes szabályzat
 Cashback 2015 Deposit Promotion teljes szabályzat 1. Definitions 1. Definíciók: a) Account Client s trading account or any other accounts and/or registers maintained for Számla Az ügyfél kereskedési számlája
NYOMÁSOS ÖNTÉS KÖZBEN ÉBREDŐ NYOMÁSVISZONYOK MÉRÉTECHNOLÓGIAI TERVEZÉSE DEVELOPMENT OF CAVITY PRESSURE MEASUREMENT FOR HIGH PRESURE DIE CASTING
 Anyagmérnöki Tudományok, 39/1 (2016) pp. 82 86. NYOMÁSOS ÖNTÉS KÖZBEN ÉBREDŐ NYOMÁSVISZONYOK MÉRÉTECHNOLÓGIAI TERVEZÉSE DEVELOPMENT OF CAVITY PRESSURE MEASUREMENT FOR HIGH PRESURE DIE CASTING LEDNICZKY
1. MINTAFELADATSOR KÖZÉPSZINT. Az írásbeli vizsga időtartama: 30 perc. III. Hallott szöveg értése
 Oktatáskutató és Fejlesztő Intézet TÁMOP-3.1.1-11/1-2012-0001 XXI. századi közoktatás (fejlesztés, koordináció) II. szakasz ANGOL NYELV 1. MINTAFELADATSOR KÖZÉPSZINT Az írásbeli vizsga időtartama: 30 perc
SAJTÓKÖZLEMÉNY Budapest 2011. július 13.
 SAJTÓKÖZLEMÉNY Budapest 2011. július 13. A MinDig TV a legdinamikusabban bıvülı televíziós szolgáltatás Magyarországon 2011 elsı öt hónapjában - A MinDig TV Extra a vezeték nélküli digitális televíziós
Verpackungsanweisung Nr. Packaging Instruction No. Rev.: J V 1241434
 Verpackungsanweisung Nr. Packaging Instruction No. Rev.: J V 1241434 Bezeichnung/Name : AMPMODU II PIN-/TAB 2.8x0.8 Header, 108+13pos. Pack. Eng.: F. Witt Werkzeug/Tool-No.: 240.073, 240.680, 1014.119
Oktatáskutató és Fejlesztő Intézet TÁMOP / XXI. századi közoktatás (fejlesztés, koordináció) II. szakasz NÉMET NYELV
 II. szakasz NÉMET NYELV") Oktatáskutató és Fejlesztő Intézet TÁMOP-3.1.1-11/1-2012-0001 XXI. századi közoktatás (fejlesztés, koordináció) II. szakasz NÉMET NYELV 3. MINTAFELADATSOR EMELT SZINT Az írásbeli vizsga időtartama: 90
Oktatáskutató és Fejlesztő Intézet TÁMOP-3.1.1-11/1-2012-0001 XXI. századi közoktatás (fejlesztés, koordináció) II. szakasz NÉMET NYELV 3. MINTAFELADATSOR EMELT SZINT Az írásbeli vizsga időtartama: 90
Miskolci Egyetem Gazdaságtudományi Kar Üzleti Információgazdálkodási és Módszertani Intézet. Correlation & Linear. Petra Petrovics.
 Correlation & Linear Regression in SPSS Petra Petrovics PhD Student Types of dependence association between two nominal data mixed between a nominal and a ratio data correlation among ratio data Exercise
MAssAgEgERäT MASSZÍROZÓ KÉSZÜLÉK
 Quattromed IV-S MAssAgEgERäT MASSZÍROZÓ KÉSZÜLÉK Ergonomische Massage mit WohlfühlgARAntie ERGONÓMIKUS MASSZÁZS A KÉNYELEMÉRZÉS GARANCIÁJÁVAL QUATTROMED IV-s MAssAgEgERäT MASSZÍROZÓ KÉSZÜLÉK Unsere Wirbelsäule
Computer Architecture
 Computer Architecture Locality-aware programming 2016. április 27. Budapest Gábor Horváth associate professor BUTE Department of Telecommunications ghorvath@hit.bme.hu Számítógép Architektúrák Horváth
20+ Használati utasítás
 20+ Használati utasítás Kezdeti lépések... 4 Rider 20+ készüléke... 4 Tartozékok... 5 Állapot ikonok... 5 1. lépés: Töltse fel Rider 20+ készülékét... 6 2. lépés: Kapcsolja be Rider 20+ készülékét...
fátyolka tojásgy jtœ lap [CHRegg] összeszereléséhez
![fátyolka tojásgy jtœ lap [CHRegg] összeszereléséhez](/thumbs/91/107505505.jpg "fátyolka tojásgy jtœ lap [CHRegg] összeszereléséhez") Útmutató fátyolka tojásgy jtœ lap [CHRegg] összeszereléséhez (Assembling instructions to [CHRegg] lacewing egg concentrator) Tartozékok: 1 = csalétket tartalmazó alufólia tasak 2 = tojásgy jtœ lap tépœzár
Útmutató fátyolka tojásgy jtœ lap [CHRegg] összeszereléséhez (Assembling instructions to [CHRegg] lacewing egg concentrator) Tartozékok: 1 = csalétket tartalmazó alufólia tasak 2 = tojásgy jtœ lap tépœzár
Serial no. Description Order code Weight Piece no. Ordering possibility Price Note Picture. BT612 1100 1 Yes. BT622 600 1 Yes Ø 154 mm cast iron disc
 Type BT6877K Special Elpumps Kft. Fehérgyarmat, Szatmári u. 21. Tel.: +36-44/510-530 Fax.: +36-44/510-535 E-mail.: info@elpumps.hu Home Page: www.elpumps.hu Serial no. Description Order code Weight Piece
First experiences with Gd fuel assemblies in. Tamás Parkó, Botond Beliczai AER Symposium 2009.09.21 25.
 First experiences with Gd fuel assemblies in the Paks NPP Tams Parkó, Botond Beliczai AER Symposium 2009.09.21 25. Introduction From 2006 we increased the heat power of our units by 8% For reaching this
HU ORLANDO ELLIPSZISTRÉNER IN 3130 (93390)
") HU ORLANDO ELLIPSZISTRÉNER IN 3130 (93390) FONTOS: A berendezés használata előt figyelmesen olvassa el az összes intrukciót. Őrizze meg a használati útmutatót a későbbi használat esetére. A berendezés
HU ORLANDO ELLIPSZISTRÉNER IN 3130 (93390) FONTOS: A berendezés használata előt figyelmesen olvassa el az összes intrukciót. Őrizze meg a használati útmutatót a későbbi használat esetére. A berendezés
Személyes adatváltoztatási formanyomtatvány- Magyarország / Personal Data Change Form - Hungary
 Személyes adatváltoztatási formanyomtatvány- Magyarország / Personal Data Change Form - Hungary KITÖLTÉSI ÚTMUTATÓ: A formanyomtatványon a munkavállaló a személyes adatainak módosítását kezdeményezheti.
STUDENT LOGBOOK. 1 week general practice course for the 6 th year medical students SEMMELWEIS EGYETEM. Name of the student:
 STUDENT LOGBOOK 1 week general practice course for the 6 th year medical students Name of the student: Dates of the practice course: Name of the tutor: Address of the family practice: Tel: Please read
YOUR WORK HOLDING PARTNER
 2018 1976 2016 YOUR WORK HOLDING PARTNER Technology Development History Clamping Issues? Resolve all your clamping issues with our unique Lenzkes Clamping Tools services. Try our products absolutely free
ELEKTRONIKAI ALAPISMERETEK ANGOL NYELVEN
 ÉRETTSÉGI VIZSGA 200. május 4. ELEKTRONIKAI ALAPISMERETEK ANGOL NYELVEN KÖZÉPSZINTŰ ÍRÁSBELI VIZSGA 200. május 4. 8:00 Az írásbeli vizsga időtartama: 80 perc Pótlapok száma Tisztázati Piszkozati OKTATÁSI