Seat Arosa 1997/1 VW Lupo 1998/ C. Approval No.: e *94/20*
|
|
|
- Attila Nemes
- 9 évvel ezelőtt
- Látták:
Átírás
1 Seat Arosa 1997/1 VW Lupo 1998/ C Approval No.: e *94/20* BAF

2 2
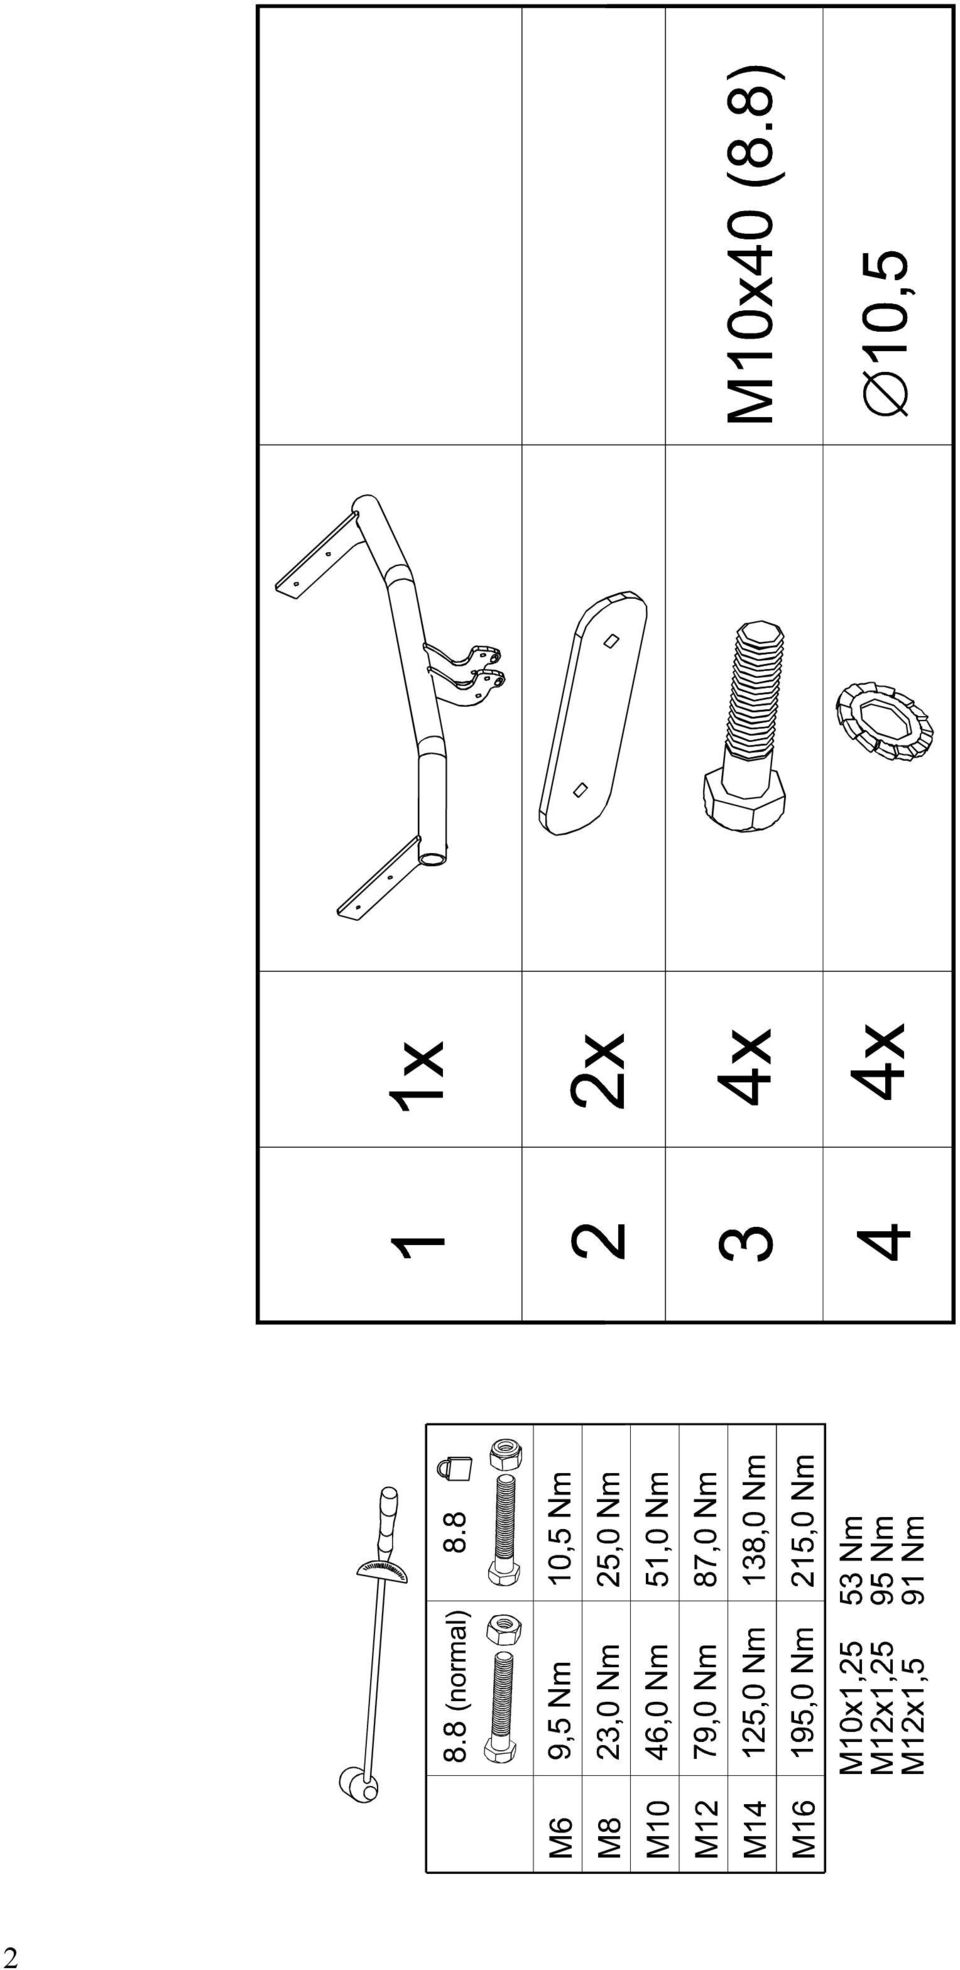
3 3

4 4 D Montage des Schleppkugels Typ C : E Montaje del globo de remolque del tipo C : F Montage du crochet d attelage, type C : GB Mounting of coupler ball type C : H C típusú vonógömb felszerelése:

5 5
6 D Montage- und Betriebsanleitung Kupplungskugel mit Halterung (KmH) EG-Genehmigungszeichen nach Richtlinie 94/20/EG: e Verwendungsbereich: Bestell - Nr.: Seat Arosa, VW Lupo (C) Technische Daten: Der geprüfte D-Wert beträgt... 5,42 kn. Dieser entspricht zum Beispiel einer Anhängelast von kg und einem zulässigen Gesamtgewicht von kg. Die geprüfte Stützlast beträgt kg. Für den Fahrbetrieb sind die Angaben des Fahrzeugherstellers bzgl. Anhängelast, Stützlast und zulässigen Gesamtgewicht (Fahrzeuggewicht + Anhängergewicht) maßgebend, wobei die geprüften Werte der KmH nicht überschritten werden dürfen. Indem Sie irgendwelche Fragen haben, steht unsere Firma Ihnen gerne zur Verfügung. Hinweise: Die KmH ist ein Sicherheitsteil und darf nur von Fachpersonal montiert werden. Sofern Ersatzteile erforderlich werden, dürfen auch diese nur von Fachpersonal am unbesch ädigten Originalteil verbaut werden. Jegliche Änderungen bzw. Umbauten an der KmH sind unzulässig. Bei Fahrt mit Anhänger sind die Fahrthinweise in der Betriebsanleitung des Fahrzeugherstellers zu beachten. Die Anhänger müssen mit einer entsprechenden Zugkugelkupplung ausgerüstet sein. Muß durch den Anbau der KmH die Abschleppöse entfernt werden, dient die KmH als Ersatz hierfür, sofern die zulässige Anhängelast nicht überschritten wird und der Abschleppvorgang auf verkehrsüblichen Straßen erfolgt. Die Kugel bzw. Kupplung ist sauber zu halten und zu fetten. Achtung: Bei Benutzung von Spurstabilisierungseinrichtungen, wie z. B. der Westfalia SSK muß die Kupplungskugel fettfrei sein. Die Hinweise in der Bedienungsanleitung beachten! Der Durchmesser der Kugel ist von Zeit zu Zeit zu überprüfen. Sobald an einer beliebigen Stelle eine Verschleißgrenze von 49,0 mm erreicht ist, darf die KmH aus Sicherheitsgründen nicht mehr benutzt werden. Die vom Fahrzeughalter angegebenen, serienmäßig genehmigten Befestigungspunkte sind eingehalten. Die Anbaumaße und Freiraummaße nach Anhang VII, Abbildung 30 der Richtlinie 94/20/EG sind gewährleistet. Der nachträgliche Anbau der mechanischen Verbindungseinrichtung ist entsprechend der Festlegung in Anhang I, Nr Nach den Anforderungen des Anhangs VII der Richtlinie 94/20/EG zu prüfen (Anbauabnahme durch Technischen Sachverständigen/Dienst). Die KmH sollte dann bei nächste Gelegenheit in den Fahrzeugpapieren eingetragen werden. Diese Montagenleitung ist den Kfz. - Papieren beizufügen. 6
 maßgebend, wobei die geprüften Werte der KmH nicht überschritten werden dürfen.")
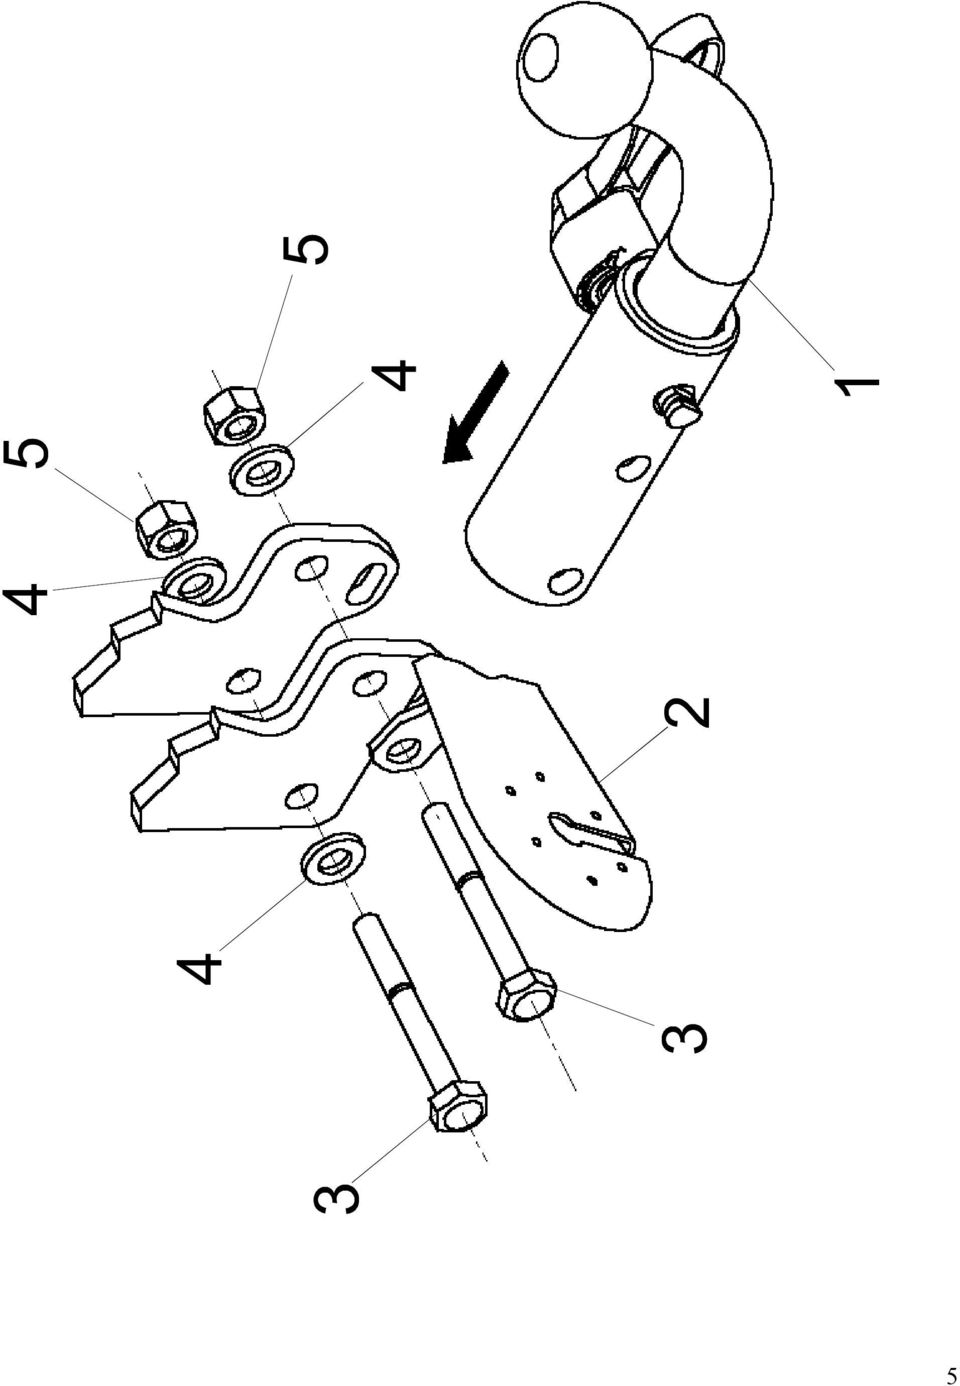
7 Allgemeine Montagehinweis: Isoliermasse bzw. Unterbodenschutz am Kfz. - falls vorhanden - im Bereich der Anlegefläche der KmH entfernen. Blanke Karosseriestellen mit Rostschutzfarbe bestreichen. Elektrische Anlage 7 - polig gemäß DINV montieren. Elektrische Anlage 13 - polig gemäß ISO montieren. Sämtliche Befestigungsschrauben der KmH nach ca Anhänger - km nachziehen. Bitte beachten Sie, daß sich das Gewicht Ihres Fahrzeuges nach der Montage des Schlepphakens ändert. Anbauanweisung: Die hinteren Lampen demontieren. Den Stoßfänger und die Stoßfängereinlage demontieren (letztere wird nicht zurückmontiert). Den Kunststoffmantel beim Auspuff, sowie die 4 Befestigungsschrauben des Auspuffes und die Belagplatte entfernen (das Auto muß gehoben werden). Den den hinteren Auspufftopf haltenden Gummibock aushaken. Die Speisepumpe aus dem Ziehband herausnehmen, und auch die Befestigungsschraube (M6) der Kraftstoffeinlaßleitung. Auf der inneren Seite des Fahrgestellbalkens die Halter entfernen, die Seitenplatten des Schlepphakens in den Fahrgestellbalken schieben und mit den mitgelieferten Zubehörplatten und Schrauben befestigen. Mit der Demontierung des hinteren Leitungbündels den elektrischen Anschluß vorschriftsmäßig durchführen. Alle Zubehöre in umgekehrter Reihenfolge zurückmontieren. Indem es nötig ist, den hinteren Teil des Stoßfängers in dem erwünschten Maß ausschneiden. Die Montierung des Schlepphakens darf ausschließlich durch eine Fachwerkstatt durchgeführt werden. 7
.")
8 Bedienungsaleitung Für die abnehmbare Kugelstange Hinweise: Lösen und Festziehen des Sicherungshebels (4) müssen ohne Hilfsmittel (manuell) durchgeführt werden. Die Kugelstange (1) verhindert die uneingeschränkte Sicht auf das Kennzeichen während der Fahrt ohne Hänger, deshalb muss diese bei Nichtgebrauch aus dem Gehäuse (3) demontiert werden. Damit die beweglichen Teile des Gehäuses zuverlässig funktionieren muss die Abdeckkappe nach der Demontage des Kugelhalses auf das offene Gehäuse (3) gesteckt werden. Die Zugkugel (1) muss im Interesse der Verscheißfestigkeit immer gefettet werden (mit LZS-2 oder Fett ähnlicher Qualität). Die Kugelstange inkl. des Sicherungshebels sollte im demontierten Zustand in der mitgelieferten Tragetasche mitgenommen werden (z.b. im Kofferraum). Demontage der Kugelstange: Den Sicherungsstift (5) vom hinteren Ende des Hebels (4) herunterziehen. Den Hebel (4) nach rechts bis zum Anschlag ziehen, dann nach unten 90 drehen, damit er nicht gegen die Sicherungsplatte (2) stößt, und an die Stelle zurücklassen. Den Hebel (4) lockern und drehen, bis er aus dem Gehaüse (3) ohne Mühe gezogen werden kann. Die Kugelstange (1) aus dem Gehaüse (3) herausnehmen. Die Abdeckkappe auf das offene Ende des Gehaüses (3) stecken, und so dass die Sicherungsplatte (2) in der Nut der Kappe steckt. Montage der Kugelstange: Die Abdeckkappe vom Gehaüse (3) abnehmen. Die Kugelstange (1) bis zum Anschlag in das Gehaüse (3) schieben, bis die Kugel nach oben zeigt.. Den Sicherungshebel (4) durch die Bohrung des Gehaüses (3) durch den Kugelhals (1) stecken. Den Sicherungsstift (5) auf das Ende des Hebels (4) stecken. Den Sicherungshebel (4) festziehen, danach nach außen ziehen und so nach oben drehen, dass der grüne Pfeil auf dem Hebel (4) auf die grüne Markierung am Kugelhals (1) zeigt. Der Hebel steht dann parallel zum Kugelhals (siehe Abbildung). 8
 muss im Interesse der Verscheißfestigkeit immer gefettet werden (mit LZS-2 oder Fett ähnlicher Qualität). Die Kugelstange inkl.")
9 9

10 E Instrucciones de servicio y montaje del enganche esférico con fijación Marca de autorización CE según la normativa 94/20/CE: e Ambito de aplicación: Seat Arosa, VW Lupo N. orden: (C) Datos técnicos: El valor D verificado es de... 5,42 kn. Este valor corresponde por ejemplo a una carga de remolque de kg y un peso total autorizado de kg. La carga de apoyo verificada es de kg. Para el servicio de marcha son normativos los datos del fabricante del vehículo en lo referente a la carga de remolque, carga de apoyo y peso autorizado del conjunto vehículo-remolque (peso del vehículo + peso del remolque), no debiendo sobrepasar los valores verificados del enganche para remolque con fijación. En cuanto tienen de las preguntas se pongan en relación con muestra empresa. Indicaciones: El enganche esférico es un elemento de seguridad y debe ser montado únicamente por personal especializado. En caso de ser necesario el montaje de piezas de repuesto, éstas deben ser montadas asimismo por personal especializado. No está autorizado efectuar modificaciones o adiciones en el enganche esférico. Estas originarían la anulación del certificado de aptitud técnica. Obsérvense las indicaciones contenidas en la documentación del vehículo relativas a la circulación con remolque. Los remolques deben estar dotados del correspondiente enganche esférico. Si debido al montaje del dispositivo de enganche resulta preciso desmontar la argolla de remolque, el dispositivo de enganche puede utilizarse para el remolcado de otro vehículo, en tanto no se sobrepase la carga de remolque autorizada y se efectúe el remolcado por calzadas abiertas al tráfico. Mantener limpia y engrasada la bola o asiento esférico. Atención: Utilizando dispositivos de estabilización direccional, como por ejemplo el SSK Westfalia, AKS 2000 ALKO, WS 300 Winterhoff, el enganche esférico deberá estar libre de grasa. Obsérvense las instrucciones de servicio. Deberá comprobarse de tiempo el diámetro del asiento esférico. Si en cualquier zona se advierte que el diámetro alcanza los 49,0 mm debe dejar de utilizarse el enganche esférico por motivos de seguridad. Deberán mantenerse los puntos de fijación citados y autorizados por el fabricante del vehículo. Quedan garantizadas las medidas de montaje y espacio libre según lo dispuesto en el anexo VII., figura 30, de la normativa 94/20/CE. Debe verificarse el montaje ulterior del 10

11 dispositivo mecánico de unión según lo especificado en el anexo I, núm. 5.10, basado en los requisitos fijados por el anexo VII. de la normativa 94/20/CE (control de montaje por especialista/servicio técnico). El montaje del enganche esférico para remolque debe anotarse en la documentación del vehículo. Guardar estas instrucciones de montaje con la documentación del vehículó. Indicaciones generales de montaje: Eliminar la masilla aislante o la protección de bajos del vehículó - en caso de existir - en la zona de la superficie de apoyo del dispositivo de enganche. Aplicar pintura protectora anticorrosión a las superficies desnudas de la chapa. Montar la instalación eléctrica de 7 polos según DINV Montar la istalación eléctrica de 13 polos según ISO Reapretar todos los tornillos de fijación del dispositivo de enganche después de aprox km de remolcado. Haga atención que después del montaje del gancho remolque se cambia el peso de su coche. Instruccions de montaje: Desmonte los faros posteriores. Quite los parachoques y los entredós del parachoques ( este último no hay que remontar después del montaje del gancho remolque ). Quite el revestimiento de plástica de la parte del tubo de escape, los 4 tornillos fijantes y la placa de revestimiento (hay que levar el coche para esta operación). Descolgue el sostén de goma del silenciador posterior. Quite la pompa alimentadora del collar u los tornillos fijantes (M6) del confluente del combustible. Desmonte los revestimientos que se encuentran en la parte interna de la chapa sostén de chasis, y resbale las placas laterales y fije con los tornillos adjuntos. Efectúe la ligación eléctrica de los cables con la ruptura de cables posteriores según las instrucciones. Remonte todos los accesorios en orden inverso. En cuanto sea necesario corte las partes bajas de los parachoques en el tama ńo exigido. El montaje del gancho remolque puede ser efectúado solo por una oficina profesional. 11

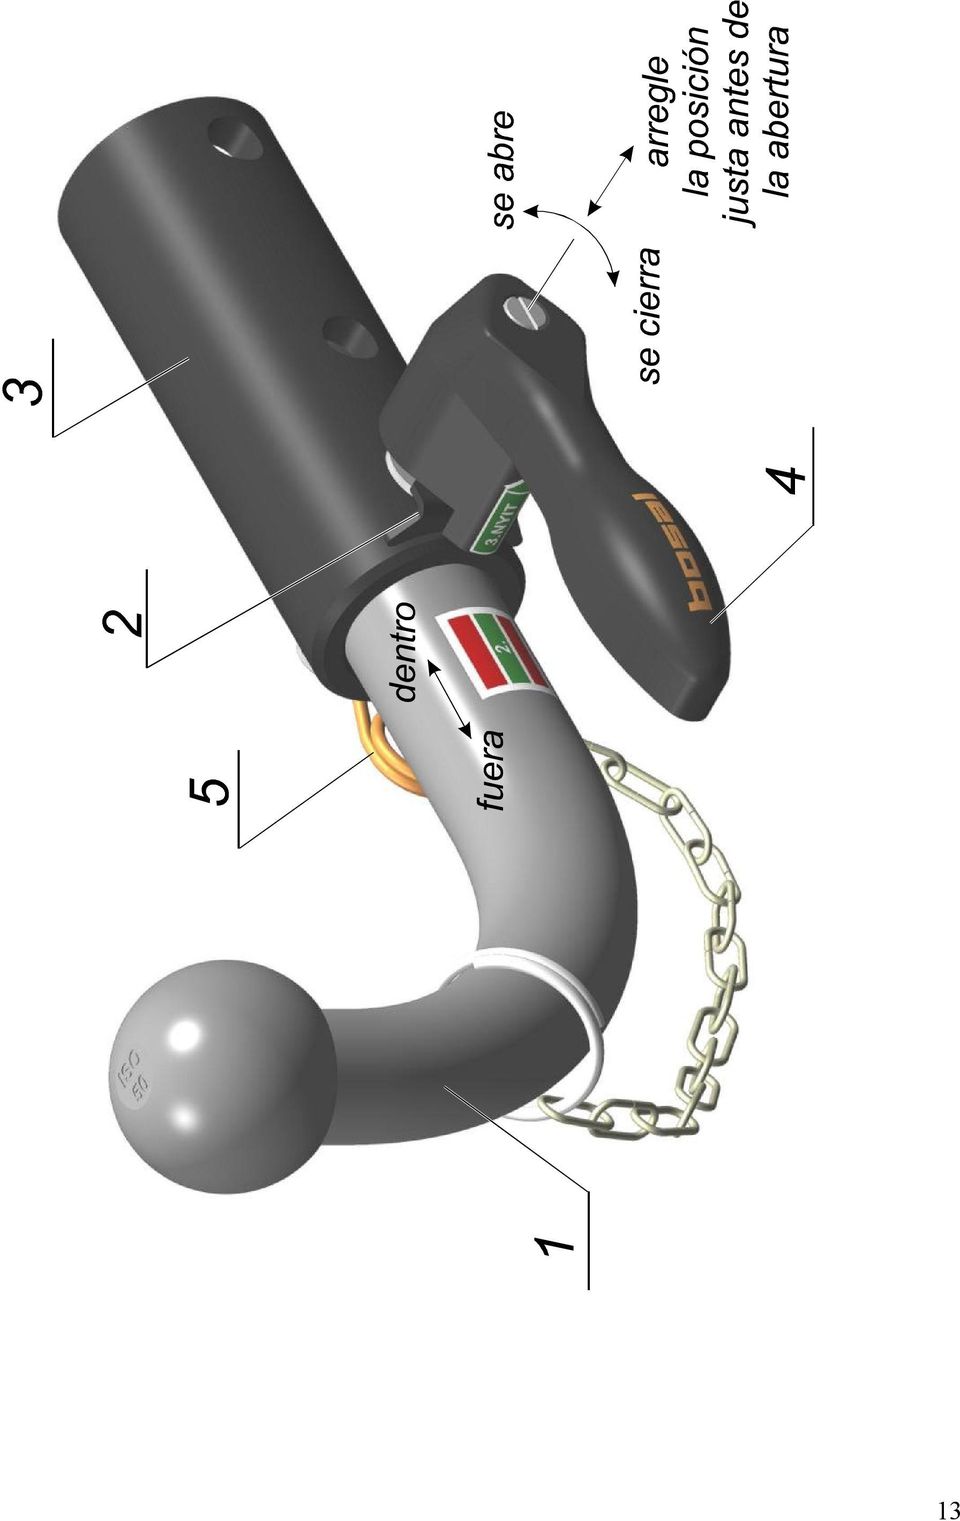
12 Instrucción de uso para el globo móvil con el sistema excenter Por saber: Efectúe el aflojamiento apretadura del brazo de seguridad (4) a mano. El globo remolque (1) limita la vista de la placa en el viaje sin remolque per eso hay que desmontarlo de la caja (3). Para que las piezas móviles de la caja (3) funcionen bien por tiempo garantido en el viaje sin remolque cuando habrá desmontado el globo pase la capa de cierre al fin abierto de la casa (3) Tiene que lubrificar el globo remolque (1) con lubrificante de LZS-2 o semejante para cautelar el desgaste. Tiene que llevar consigo siempre el globo remolque (con el tapón protector) y el brazo de seguridad desmontado (p.ej: en el maletero) en la bolsa adjunta. Desmontaje del globo remolque: Quite el clavo de seguridad (5) en los finales del brazo seguridad (4). Pase vuelta el brazo de seguridad (4) a la derecha hasta el choque, después si la placa de seguridad (2) permite lo pase en su lugar. Afloje el brazo de seguridad (4) y gire hasta que no puede quitarlo de la caja (3) sin tropiezo. Quite el globo remolque (1) de la caja (3). Pase la capa de cierre al fin abierto de la casa en modo que la placa de seguridad (2) sea en la capa de cierre. Montaje del globo remolque: Quite la capa de seguridad. Retire el globo remolque (1) en la caja (3) hasta choque en modo que esté arriba. Monte el brazo seguridad (4) através los agujeros de la caja (3) en el tallo del globo remolque (1). Pase el brazo de seguridad (4) y entorno al eje tiene que dar vuelta hasta que la placa de seguridad (2) no sea acunado y su posición no sea paralela a la tija del globo remolque. Ajuste el clavo de seguridad (5) al final del brazo de seguridad (4). 12
 con lubrificante de LZS-2 o semejante para cautelar el desgaste.")
13 13
14 F Instructions de montage et d emploi Boule d attelage avec support Référence d homologation CE selon la directive 94/20/CE: e Domaine d utilisation: Code de Type: Seat Arosa, VW Lupo (C) Caractéristiques tecniques: La valeur D contrôlée est de... 5,42 kn. Celle-ci correspond par exemple á une charge de remorquage de kg et á un poids total admissible de kg. La charge d appui contrôlée est de kg. Pour la marche du véhicule tirant une remorque, les indications qui comptent sont celles du constructeur du véhicule, la charge de remorquage, la charge d appui et le poids autorisé de tout l attelage (poids du véhicule + poids de la remorque) tout en spécifiant que les valeurs contrôlés de la piéce KmH ne doivent en aucun cas etre dépassées. En cas d incomprabilité pour avoir des instructions, nous recommandons de consulter notre service technique. Remarques: La boule d attelage est une piéce de sécurité qui doit seulement etre montée par des spécialistes. Si des piéces de rechange sont nécessaires, celles-ci doivent aussi etre montées seulement par des spécialistes sur la piéce d origine non endommagée. Toutes modifications ou transformations sur la boule d attelage sont interdites. Ces modifications entraînent alors l annulation de l autorisation de mise en circulation. Si on circule avec une remorque, il faut respecter les informations concernant la marche figurant sur les instructions d emploi du constructeur du véhicule. Les remorques doivent etre équipées d un attelage á boule de traction correspondant. Si l anneau de remorquage doit etre enlevé pour le montage de la boule d attelage avec support, cette boule d attelage sert alors de dispositif de remplacement dans la mesure oú la charge de remorquage admissible n est pas dépassée et si le remorquage est effectué sur des routes pour circulation normale. La boule ou l attelage doivent etre maintenus propres et il faut les graisser. Attention! Si on utilise des dispositifs de stabilisation de la voie, p.ex.: le dispositif SSK, AKS 2000 ALKO, WS 300 Winterhoff, la boule d attelage doit etre exempte de graisse. Il faut respecter les indications des instructions d emploi. De temps en temps, il faut contrôler le diamétre de la boul. Dés qu á un endroit quelconque, on atteint le diamétre de 49,0 mm ou moins, pour des raisons de sécurité, il ne faut plus utiliser la boule d attelage et son support. Les points de fixation autorisés et indiqués par le constructeur du véhicule sont respectés. Les cotes de montage et de dégagement suivant l annexe VII, figure 30, de la Directive 94/20/CE sont garanties. Le montage postérieur du dispositif de liaison mécanique doit etre 14

15 contrôlé conformément aux spécifications se trouvant sur l annexe I, N 5.10 suivant les prescriptions de l annexe VII de la Directive 94/20/CE (réception technique du montage par un expert agréé ou par le service de contrôle technique). La boule d attelage doit etre inscrite sur les documents d immatriculation du véhicule á la prochaine occasion. Ces instructions de montage doivent etre jointes aux documents du véhicule. Indications générales de montage: S il y en a, enlever le mastic isolant et/ou la couche de protection du dessous de caisse sur le véhicule, au voisinage de la surface d appui de la boule d attelage. Badigeonner d une couche antirouille les surfaces nues de la carrosserie en utilisant de la peinture antirouille. Monter l installation électrique á 7 pôles suivant la norme DINV Monter l installation électrique á 13 pôles suivant la norme ISO Au bout d environ km de remorquage resserrer toutes les vis de fixation de la boule d attelage et du support. Nous vous recommandons de prendre en évidence que votre véhicule est augmenté de volume apres l équipement du crochet d attelage. Instructions de montage: 15

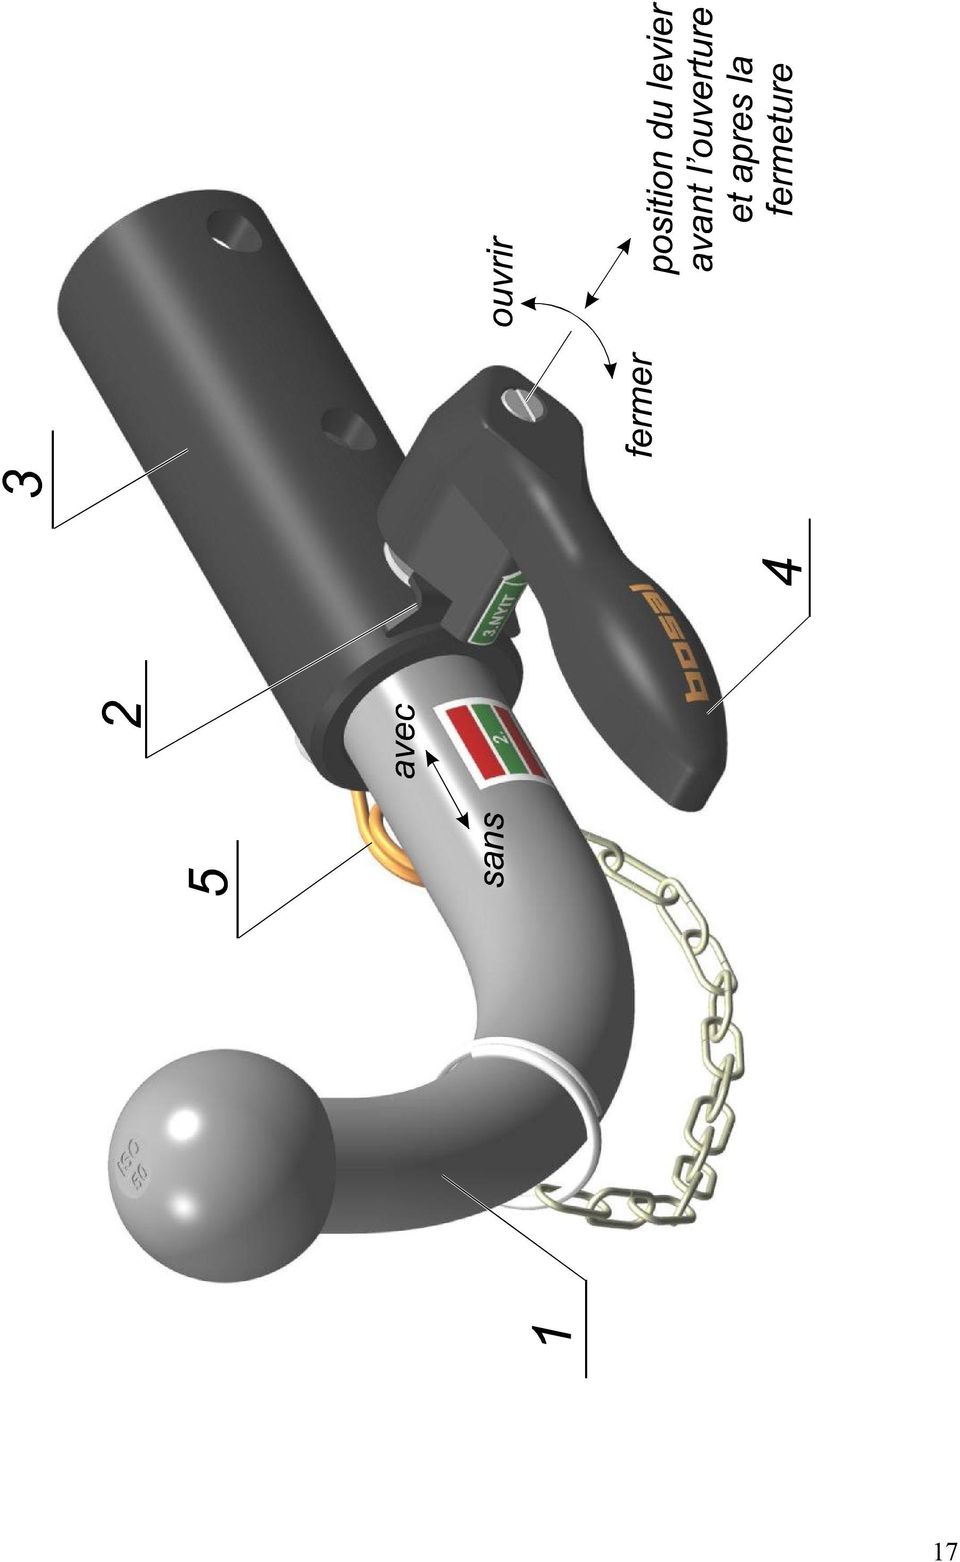
16 Mode d emploi du crochet mobil du systeme excentrique A savoir: Le serrage et deserrage du levier de sécurité (4) doit etre effectuer sans aucun outil, tout simplement manuellement. Le crochet (1) d attelage gene la plaque d immatriculation en voyageant sans charge, donc dans ces cas nous vous conseillons enlever le crochet de son support (3) Pour garantir le fontionnement fiable des pieces mobiles du support, en voyageant sans charge apres l enlevement du crochet d attelage il faut monter le capot de sécurité sur le support (ce capot peut etre utiliser comme capot de crochet aussi). Le crochet d attelage (1) doit etre lubrifier avec une graisse (LZS-2 ou d une graisse homogene), pour contre usage. En état démonté, mettez le crochet et le levier de sécurité dans votre coffre, emballez dans leur support. Démontage du crochet d attelage: Tirez le boulon de sécurité (5) du bout du levier de sécurité (4). Tirez le levier de sécurité (4) a droite jusqu au blocage, apres tournez-le vers le haut en 90 comme nous vous indiquons en cas de démontage il ne va pas se butter dans la plaque de sécurité (2) et liassez revenir en position. Deserrez le levier de sécurité (4) et tournez-le jusque vous pouvez le tirer du support (3) sans encombrement. Enlevez le crochet d attelage (1) de son support (3). Montez le capot de sécurité sur le bout ouvert du support (3), que la plaque de sécurité (2) soit en position de la rainure. Le montage du crochet d attelage: Enlevez le capot de sécurité. Poussez le crochet d attelage (1) jusque la butée du support (3), tel qu il est en position d haut. Traversez le levier (4) dans l alésage du support (3) la tige du crochet d attelage (1). Glissez le boulon de sécurité (5) sur le bout du levier de sécurité (4). Tirez sur le levier de sécurité (4), puis autour de son axe tournez-le vers le haut que le single fleche en vert-du levier de sécurité (4) soit en position de la plage verte du crochet d attelage (le levier de sécurité doit etre en parallele avec la tige du crochet d attelage). 16
. Le crochet d attelage (1) doit etre lubrifier avec une graisse (LZS-2 ou d une graisse homogene), pour contre usage.")
17 17
18 GB Installation and Operating Instructions towing bracket EC Approval No. as per Directive 94/20/EC: e Application: Order Nr.: Seat Arosa, VW Lupo (C) Technical Data: The tested D-value is... 5,42 kn. This corresponds, for example, to a towed weight of kg and a permissible total weight kg. The tested trailer nose weight is kg. For driving, the data of the vehicle manufacurer with regard to the towed weight, trailer nose weight and permissible combination weight (vehicle weight + trailer weight), are decisive, whereby the tested values may not be exceeded. Should you have any kind of questions, please do not hesitate to contact our company. Notes: The towing bracket is a safety part and may only be mounted by specially trained personnel. Should spare parts be required, these may also only be mounted on the undamaged original-equipment part by specially trained personnel. No changes or modifications to the towing bracket are permitted. Moreover, they lead to cancellation of authorization. When driving with a trailer, observe the driving instructions in the vehicle manufacturer s operating instructions. The trailer must be equipped with an appropriate towing coupling ball. If installing the towing bracket necessitates the removal of the towing eye, the towing bracket serves as a replacement, provided the premissible towed weight is not exceeded and the towing takes place on normal roads. The ball and coupling must be kept clean and greased. Important: When using track stabilising devices, e.g. the Westfalia SSK, AKS 2000 ALKO, WS 300 Winterhoff, the coupling ball must be grease-free. Follow the instructions inthe operating instructions. Check the ball diameter from time to time. As soon as a diameter of 49,0 mm is reached at any given point, the towing bracket may no longer be used for safety reasons. The approved mounting points indicated by the vehicle manufacture are used. The mounting and clearance dimensions specified in Annex VII, Figure 30 of Directive 94/20/EC are complied with. The retrofit of the mechanical coupling device must be inspected in accordance with the specifications in Annex I, No and in accordance with the requirements of Annex VII of Directive 94/20/EC (retrofit acceptance test by a Technical Expert/Inspectorate Service). 18
, are decisive, whereby the")
19 The fact that the towing bracket has been mounted to the vehicle must be entered in the vehicle papers at the next possible opportunity. The mounting instructions must be added to the vehicle papers. General Installation Intructions: If present, remove insulating compound and/or underseal in the area of the towing bracket contact surfaces. Coat bare bodywork with anti-corrosion paint. Mount 7-pin electrical system as per DINV Mount 13-pin electrical system as per ISO Retighten all mounting bolts of the towing bracket after aprox towing km. Please note, that after mounting the drawbar the mass of your vehicle will change. Mounting instructions: Dismantle the rear lamp Dismantle the rear bumper and the insert of the bumper (The latter will no be re-installed again after the installation of the drawhook.) Remove the plastic cover from the rear panel on the side of the exhaust manifold, as well as the 4 fixing bolts and the cover plate of the exhaust manifold. (For this operation it is necessary to lift the car.) Hang up the rubber support of the silencer. Take out the feed pump from the clamp and remove the fixing bolt of the fuel inlet (M6). Remove the covers from the inner side of the beam of the chassis, then slide the side plates of the drawhook into the beam of chassis and fix them by means of the enclosed accessory plates and screws. By means of opening the rear cable bundle, connect the electric wires according to the regulations. Install all the removed parts back in opposite order. If necessary, cut out the lower edge of the bumper in the required size. Only specialised workshops are allowed to install the drawhook. 19

20 Handling intructions for removable ball with eccentric system Remember: Manually (without applying any aids) carry out the releasing or engaging actions on the latch lever (4). When nothing is drawn, the drawing ball (1) shall be removed from the house (3), because it reduces the visibility of the car registration plate. In order to maintain a trouble-free operation of the moving component parts of the house (3) during the whole period of guarantee, when nothing is drawn for a while, after removing the drawing ball, put the end cap (wich can also be used as cover piece of the drawing ball) onto the open end of the house (3). Always apply grease onto the drawing ball (1) to achieve a better abrasion resistance (type LZS-2 or equivalent is recommended). The drawing ball and the latch lever should always be taken with yourself (for instance, in the luggage trunk), even when they are in dismounted state. The carrying case supplied should be used for this purpose. Dismounting the drawing ball: Pull down the guard pin (5) from the end of the latch lever (4). Pull aside the latch lever (4) to the right to the maximum possible extent, then turn it applying an angle of 90. In this case, it will not bump into the washer (2) when it is loosened. Finally, let it go back to its original position. Loosen the latch lever (4) and rotate until it can easily be pulled out of the house (3). Take the drawing ball (1) out of the house (3). Put the end cap onto the open end of the house (3), so that the washer (2) can fit into the groove of the cap. Mounting the drawing ball: Remove the end cap. Push the drawing ball (1) completely into the house (3) in upside-up position, until catch. Push the latch lever (4) through the bore of the house (3) and the stalk of the drawing ball (1). Slide the guard pin (5) onto the end of the latch lever (4). Fasten the latch lever (4), then pulling into left hand side direction, rotate it around its axis upwards, until the green arrow on the latch lever reaches the green zone on the stalk of the drawing ball (at this stage of the procedure the latch lever shall be parallel with the stalk of the drawing ball). 20
 onto the open end of the house (3).")
21 21
22 H Üzembe helyezési és használati útmutató vonóhorog A 94/20/EC előírás szerinti EC jóváhagyási szám: e Alkalmazása: Típus kód: Seat Arosa, VW Lupo (C) Műszaki adatok: A tesztelt D érték... 5,42 kn. Ez az érték alapján, a vontatható tömeg kg ha a gépjármű össztömege kg. A tesztelt utánfutó kapcsolófejének statikus függőleges terhelése...50 kg. A vontatásra vonatkozóan a jármű gyártója által vontatott tömegre, a kapcsolófej terhelésre és a maximálisan megengedett együttes tömegre (jármű tömege + utánfutó tömege) vonatkozó adatok a meghatározóak, míg a tesztelt értékekkel számítható tömegadatok nem léphetők túl. Amennyiben bármilyen kérdés merülne fel, kérjük lépjen kapcsolatba cégünkkel. Megjegyzés: A vonóhorog egy balesetvédelmi szempontból kiemelten fontos alkatrész, melynek felszerelését kizárólag szakműhely végezheti. Amennyiben pótalkatrészre volna szükség, ezek felszerelését az eredeti, sértetlen alkatrészre szintén csak szakműhely végezheti el. A vonóhorgon semmiféle változtatás vagy módosítás nem eszközölhető. Fentieken túl, ilyen esemény a felszerelési jog elvesztéséhez vezet. Az utánfutóval történő vezetés esetén kérjük, hogy vegye figyelembe a jármű gyártója által kiadott használati útmutatóban foglaltakat. Az utánfutóra egy megfelelő kapcsolófejet kell szerelni. Amennyiben a vonóhorog felszerelése szükségessé teszi a vonószem eltávolítását, akkor a vonóhorog helyettesítő eszközként szolgál feltéve, hogy a maximális vontatott tömeg nem haladja meg a megengedett értéket és a vontatás normál útviszonyok mellett történik. A kapcsolófejet és a vonógömböt tisztán kell tartani, annak kenésér ől gondoskodni kell. Fontos: Út stabilizáló eszközök - pl. Westfalia SSK, ALKO AKS 2000, valamint Winterhoff WS alkalmazása esetén a kapcsolófejnek zsírmentesnek kell lennie. Kövesse a használati útmutatóban foglaltakat. Időről-időre ellenőrizze a gömb átmérőjét. Amint az átmérő a gömb bármely részén eléri a 49,0 mm-es határt, biztonsági okokból a vonóhorog a továbbiakban nem használható. Elfogadott felfüggesztési pontokként a jármű gyártója által megjelölt pontok használatosak. Az újszerű vonógömb átmérőjének tűrésértékei megfelelnek a VII. Függelékben ismertetett 94/20/EC Előírás 30. ábráján feltüntetett adatokkal. A mechanikai kapcsoló szerkezet illeszkedésének vizsgálatát az I. Függelék 5.10 pontjában ismertetett műszaki 22
23 adatoknak megfelelően, ill. a 94/20/EC Előírás VII. Bekezdésének megfelelően kell elvégezni. (Műszaki szakértő vagy Ellenőrző állomás által elvégzett megfelelési teszt.) Annak tényét, hogy a vonóhorog a gépjárműre felszerelésre kerül, a legközelebbi adandó alkalommal a gépjármű okmányaiba be kell vezetni (ez országtól függő). A felszerelési útmutatót a gépjármű okmányaihoz mellékelni kell. Általános üzembe helyezési előírások: Amennyiben még nem történt meg, a vonóhorog érintkező felületéről távolítsa el a szigetelő réteget és/vagy védő borítást. A 7-tűs elektromos rendszert a DIN V szabványnak megfelelően szerelje fel. A 13-tűs elektromos rendszert az ISO szabványnak megfelelően szerelje fel. Körülbelül 1000 vontatott kilométerenként a vonóhorog rögzítő csavarjainak feszességét ellenőrizni kell, és szükség esetén utánhúzni. Kérjük vegye figyelembe, hogy a vonóhorog felszerelését követően az Ön járművének tömege megnövekszik. Felszerelési utasítás: Szerelje ki a hátsólámpákat. Szerelje le a lökhárítót és a lökhárítóbetétet (ez utóbbi a horog szerelése után nem kerül vissza). A kipufogó felöl a hátfalon lévő műanyag borítást,valamint a kipufogó 4db rögzítőcsavarját és a borítólemezét vegye le (ehhez meg kell emelni az autót). Akassza ki a hátsó kipufogódobot tartó gumibakot. Tápszivattyút vegye ki a szorítóbilincsből és az üzemanyagbeömlő rögzítőcsavarját is (M6). Az alvázgerenda belső oldalán lévő takarókat távolítsa el, majd csúsztassa a vonóhorog oldallemezeit az alvázgerendába és a mellékelt tartozéklemezekkel és csavarokkal rögzítse. Végezze el az elektromos bekötést a hátsó vezetékköteg megbontásával, az el őírásoknak megfelelően. Szereljen vissza minden alkatrészt fordított sorrendben. Amennyiben szükséges vágja ki a lökhárító alsó szélét a kívánt méretben. A vonóhorog felszerelését kizárólag szakműhely végezheti. 23
24 Kezelési utasítás az excenteres rendszerű kivehető gömbhöz Tudnivalók: A biztosítókar (4) lazítását és szorítását egyaránt segédeszköz nélkül (kézzel) végezze. A vonógömb (1) a vontatásmentes utazáskor a rendszámtábla láthatóságát korlátozza, ezért ilyenkor szerelje ki a házból (3). Annak érdekében, hogy a ház (3) mozgóalkatrészei a garantált ideig megbízhatóan működjenek vontatásmentes utazáskor miután kiszerelte a vonógömböt a zárósapkát (amely a vonógömb kupakjaként is használható) húzza rá a ház (3) nyitott végére. A vonógömböt (1) mindig zsírozza be (LZS-2 vagy hasonló minőségű zsírral) a kopásállóság végett. A vonógömböt és a biztosítókart leszerelt állapotban is vigye magával (pl. a csomagtérben) a mellékelt hordtáskában. A vonógömb leszerelése: A biztosítószeget (5) húzza le a biztosítókar (4) végéről. A biztosítókart (4) húzza ki jobbra ütközésig, majd fordítsa el lefelé 90 -kal, így lazításkor nem fog beleütközni a biztosítólemezbe (2) és engedje vissza a helyére. A biztosítókart (4) lazítsa meg és addig fordítsa, míg a házból (3) akadálymentesen ki nem tudja húzni. A vonógömböt (1) vegye ki a házból (3). A zárósapkát húzza rá a ház (3) nyitott végére, úgy hogy a biztosítólemez (2) a sapka nútjába kerüljön. A vonógömb beszerelése: A zárósapkát vegye le. A vonógömböt (1) ütközésig tolja a házba (3) úgy, hogy az felfelé álljon. A biztosítókart (4) dugja keresztül a ház (3) furatán át a vonógömb (1) szárán. A biztosítószeget (5) csúsztassa rá a biztosítókar (4) végére. A biztosítókart (4) húzza meg, majd jobbra kihúzva a tengelye körül addig fordítsa felfelé, hogy a biztosítókaron (4) jelölt zöld nyíl a vonógömb szárán lévő zöld sávba essen (ekkor a biztosítókarnak párhuzamosan kell állnia a vonógömb szárával). 24
25 25
VW Polo 2001/11- Seat Ibiza 2002/3- Seat Cordoba 2003/1-21-42 A. Approval No.: e11 00-3918 *94/20*
 VW Polo 2001/11- Seat Ibiza 2002/3- Seat Cordoba 2003/1-21-42 A Approval No.: e11 00-3918 *94/20* BAF31 2004.01.01. 2 3 4 D Montage des Schleppkugels Typ A : E Montaje del globo de remolque del tipo A
VW Transporter T4 (closed) 1996/1-2003/3 21-19 F. Approval No.: e11 00-3856 *94/20*
 1996/1-2003/3 21-19 F. Approval No.: e11 00-3856 *94/20*") VW Transporter T4 (closed) 1996/1-2003/3 21-19 F Approval No.: e11 00-3856 *94/20* BAF31 2004.01.01. 2 3 D Montage- und Betriebsanleitung Kupplungskugel mit Halterung (KmH) EG-Genehmigungszeichen nach
VW Transporter T4 (closed) 1996/1-2003/3 21-19 F Approval No.: e11 00-3856 *94/20* BAF31 2004.01.01. 2 3 D Montage- und Betriebsanleitung Kupplungskugel mit Halterung (KmH) EG-Genehmigungszeichen nach
Mercedes C-Klasse 2000/6- (Lim. and Kombi)
") Mercedes C-Klasse 2000/6- (Lim. and Kombi) Type Nr.: 22-28 A Part Nr.: 046-271 Approval No.: e11 00-4769 *94/20* BAF31 2004.01.01. 2 3 4 D Montage des Schleppkugels Typ A : E Montaje del globo de remolque
Mercedes C-Klasse 2000/6- (Lim. and Kombi) Type Nr.: 22-28 A Part Nr.: 046-271 Approval No.: e11 00-4769 *94/20* BAF31 2004.01.01. 2 3 4 D Montage des Schleppkugels Typ A : E Montaje del globo de remolque
Chrysler Voyager 2001/4- Chrysler Grand Voyager Dodge Caravan (Incl.: 7 seaters, 4x4)
") Chrysler Voyager 2001/4- Chrysler Grand Voyager Dodge Caravan (Incl.: 7 seaters, 4x4) Type Nr.: 48-16 A Part Nr.: 045-391 Approval No.: e11 00-4272 *94/20* BAF31 2004.01.01. 2 3 4 D Montage des Schleppkugels
Chrysler Voyager 2001/4- Chrysler Grand Voyager Dodge Caravan (Incl.: 7 seaters, 4x4) Type Nr.: 48-16 A Part Nr.: 045-391 Approval No.: e11 00-4272 *94/20* BAF31 2004.01.01. 2 3 4 D Montage des Schleppkugels
D Montage des Schleppkugels Typ C : E Montaje del globo de remolque del tipo C : F Montage du crochet d attelage, type C :
 Chrysler Voyager 2001/4- Chrysler Grand Voyager Dodge Caravan (Incl.: 7 seaters, 4x4) Type Nr.: 48-16 C Part Nr.: 045-394 Approval No.: e11 00-4270 *94/20* BAF31 2004.01.01. 2 3 4 D Montage des Schleppkugels
Opel Corsa Combo 2001/11-
 Opel Corsa Combo 2001/11- Type Nr.: 11-43 C Part Nr.: 045-754 Approval No.: e11 00-3966 *94/20* BAF31 2006.06.30. 2 3 4 D Montage des Schleppkugels Typ C : E Montaje del globo de remolque del tipo C :
Opel Astra-F (HB)
") Opel Astra-F (HB) 1991-2004 Type Nr.: 11-30 A Part Nr.: 017-852 Approval No.: e11 00-4140 *94/20* BAF31 2006.06.30. 2 3 4 D Montage des Schleppkugels Typ A : E Montaje del globo de remolque del tipo A
Opel Astra-F (HB) 1991-2004 Type Nr.: 11-30 A Part Nr.: 017-852 Approval No.: e11 00-4140 *94/20* BAF31 2006.06.30. 2 3 4 D Montage des Schleppkugels Typ A : E Montaje del globo de remolque del tipo A
Opel Kadett E (4 doors) Opel Astra F (4 doors) Opel Astra Cabrio
 Opel Astra F (4 doors) Opel Astra Cabrio") Opel Kadett E (4 doors) 1985-1991 Opel Astra F (4 doors) 1991- Opel Astra Cabrio Type Nr.: 11-04 A Part Nr.: 045-601 Approval No.: e11 00-1706 *94/20* BAF31 2004.01.01. 2 3 4 D Montage des Schleppkugels
Opel Kadett E (4 doors) 1985-1991 Opel Astra F (4 doors) 1991- Opel Astra Cabrio Type Nr.: 11-04 A Part Nr.: 045-601 Approval No.: e11 00-1706 *94/20* BAF31 2004.01.01. 2 3 4 D Montage des Schleppkugels
Peugeot 406 (4 doors) 1995/ A. Approval No.: e *94/20* BAF
 1995/ A. Approval No.: e *94/20* BAF") Peugeot 406 (4 doors) 1995/1-021-341 25-13 A Approval No.: e11 00-1666 *94/20* BAF31 2004.01.01. 2 3 4 D Montage des Schleppkugels Typ A : E Montaje del globo de remolque del tipo A : F Montage du crochet
Peugeot 406 (4 doors) 1995/1-021-341 25-13 A Approval No.: e11 00-1666 *94/20* BAF31 2004.01.01. 2 3 4 D Montage des Schleppkugels Typ A : E Montaje del globo de remolque del tipo A : F Montage du crochet
TRENDnetVIEW Pro szoftvert. ŸGyors telepítési útmutató (1)
") TRENDnetVIEW Pro szoftvert ŸGyors telepítési útmutató (1) TRENDnetVIEW Pro/05.29.2014 Tartalomjegyzék TRENDnetVIEW Pro Management Software követelmények... 13 TRENDnetVIEW Pro Telepítése... 14 Videokamerák
TRENDnetVIEW Pro szoftvert ŸGyors telepítési útmutató (1) TRENDnetVIEW Pro/05.29.2014 Tartalomjegyzék TRENDnetVIEW Pro Management Software követelmények... 13 TRENDnetVIEW Pro Telepítése... 14 Videokamerák
BKI13ATEX0030/1 EK-Típus Vizsgálati Tanúsítvány/ EC-Type Examination Certificate 1. kiegészítés / Amendment 1 MSZ EN 60079-31:2014
 (1) EK-TípusVizsgálati Tanúsítvány (2) A potenciálisan robbanásveszélyes környezetben történő alkalmazásra szánt berendezések, védelmi rendszerek 94/9/EK Direktíva / Equipment or Protective Systems Intended
KRISTALLRoll. TERASZOK.HU Élet a teraszon
 TERASZOK.HU Élet a teraszon A KristallRoll egy innovatív, teleszkópos oldalsínekkel és speciális feszítő rendszerrel ellátott függőleges napellenző, szélvédő oldalfal. Ez az ideális megoldás, hogy verandáját,
Contact us Toll free (800) fax (800)
 fax (800)") Table of Contents Thank you for purchasing our product, your business is greatly appreciated. If you have any questions, comments, or concerns with the product you received please contact the factory.
Table of Contents Thank you for purchasing our product, your business is greatly appreciated. If you have any questions, comments, or concerns with the product you received please contact the factory.
Construction of a cube given with its centre and a sideline
 Transformation of a plane of projection Construction of a cube given with its centre and a sideline Exercise. Given the center O and a sideline e of a cube, where e is a vertical line. Construct the projections
1002. Lot 8 db/st./pcs 2007 BU 1, 2, 5, 10, 20, 50, 50, 100 forint 5000 db/st./pcs Adamo: FO40, 10.-
 1002 1003 1002. Lot 8 db/st./pcs 2007 BU 1, 2, 5, 10, 20, 50, 50, 100 forint 5000 db/st./pcs Adamo: FO40, 10.- 1003. Lot 8 db/st./pcs 2007 PP 1, 2, 5, 10, 20, 50, 50, 100 forint 5000 db/st./pcs Adamo:
EK-TípusVizsgálati Tanúsítvány EG-Baumusterprüfbescheinigung
 ROBBANÁSBIZTOS BERENDEZÉSEK VIZSGÁLÓ ÁLLOMÁSA Prüfstelle für Explosionsgeschützte Betriebsmittel 1/5 Ungarn, 1037 Budapest, Mikoviny S. u. 2-4. tel/fax: 36 1 250 1720 E-mail: bkiex@elender.hu (1) EK-TípusVizsgálati
EN United in diversity EN A8-0206/419. Amendment
 22.3.2019 A8-0206/419 419 Article 2 paragraph 4 point a point i (i) the identity of the road transport operator; (i) the identity of the road transport operator by means of its intra-community tax identification
MUNKASZERZŐDÉS. amely egyrészről az. név: S.C. NUMELE FIRMEI SR.L. székhely: STR., NR. _LOCALITATEA, JUDET, TARA. cégjegyzékszám: NR.REG.
 MUNKASZERZŐDÉS amely egyrészről az név: S.C. NUMELE FIRMEI SR.L. székhely: STR., NR. LOCALITATEA, JUDET, TARA cégjegyzékszám: NR.REG.COMERTULUI adószám: CUI bankszámlaszám: COD IBAN képviseli: _NUME REPREZENTANT
Utasítások. Üzembe helyezés
 HASZNÁLATI ÚTMUTATÓ Üzembe helyezés Utasítások Windows XP / Vista / Windows 7 / Windows 8 rendszerben történő telepítéshez 1 Töltse le az AORUS makróalkalmazás telepítőjét az AORUS hivatalos webhelyéről.
MAKING MODERN LIVING POSSIBLE. Danfoss Heating Solutions
 MAKING MODERN LIVING POSSIBLE Danfoss Danfoss Link Link HC Hidronikus HC Hydronic szabályozó Controller Szerelési Installation útmutató Guide Danfoss Heating Solutions Szerelési útmutató Tartalomjegyzék
EURÓPAI PARLAMENT. Belső Piaci és Fogyasztóvédelmi Bizottság
 EURÓPAI PARLAMENT 2004 2009 Belső Piaci és Fogyasztóvédelmi Bizottság 2007/0248(COD) 15.5.2008 MÓDOSÍTÁS 61 292 Jelentéstervezet Malcolm Harbour (PE404.659v01-00) az egyetemes szolgáltatásról, valamint
INSTALLATION MANUAL For authorized service personnel only.
 Connection Method CHASSIS TYPE A AIR CONDITIONER OPTIONAL PARTS Communication box kit PART NO. 9317807005 INSTALLATION MANUAL For authorized service personnel only. 1. SAFETY PRES Contents 1. SAFETY PRES...
MINO V2 ÁLLVÁNY CSERÉJE V4-RE
 MINO V2 remote controlled MINO V2 ÁLLVÁNY CSERÉJE V4-RE Mino V3 circuit board replacement Mino V2-V4 csere készlet ezüst Art# 59348S, Mino V2-V4 csere készlet fehér Art# 59348W V4 áramköri lap Art# 75914
Using the CW-Net in a user defined IP network
 Using the CW-Net in a user defined IP network Data transmission and device control through IP platform CW-Net Basically, CableWorld's CW-Net operates in the 10.123.13.xxx IP address range. User Defined
Serial no. Description Order code Weight Piece no. Ordering possibility Price Note Picture. BT612 1100 1 Yes. BT622 600 1 Yes Ø 154 mm cast iron disc
 Type BT6877K Special Elpumps Kft. Fehérgyarmat, Szatmári u. 21. Tel.: +36-44/510-530 Fax.: +36-44/510-535 E-mail.: info@elpumps.hu Home Page: www.elpumps.hu Serial no. Description Order code Weight Piece
BUNDESGESETZBLATT FÜR DIE REPUBLIK ÖSTERREICH. Jahrgang 1999 Ausgegeben am 13. April 1999 Teil III
 P. b. b. Verlagspostamt 1030 Wien WoGZ 213U BUNDESGESETZBLATT FÜR DIE REPUBLIK ÖSTERREICH Jahrgang 1999 Ausgegeben am 13. April 1999 Teil III 70. Abkommen zwischen der Österreichischen Bundesregierung
4-42 ELECTRONICS WX210 - WX240
 4-42 ELECTRONICS WX210 - WX240 PCS 40000499-en Fig. 8 WX210 - WX240 ELECTRONICS 4-43 PCS COMPONENTS 40000471-en Load-limit regulator Legend Fig. 1 Fig. 2 1 Power supply 2 PWM1 output, proportional valve
fátyolka tojásgy jtœ lap [CHRegg] összeszereléséhez
![fátyolka tojásgy jtœ lap [CHRegg] összeszereléséhez](/thumbs/91/107505505.jpg "fátyolka tojásgy jtœ lap [CHRegg] összeszereléséhez") Útmutató fátyolka tojásgy jtœ lap [CHRegg] összeszereléséhez (Assembling instructions to [CHRegg] lacewing egg concentrator) Tartozékok: 1 = csalétket tartalmazó alufólia tasak 2 = tojásgy jtœ lap tépœzár
Útmutató fátyolka tojásgy jtœ lap [CHRegg] összeszereléséhez (Assembling instructions to [CHRegg] lacewing egg concentrator) Tartozékok: 1 = csalétket tartalmazó alufólia tasak 2 = tojásgy jtœ lap tépœzár
Mercedes-Benz : Six Sigma Black Belt, (135203 ) Six Sigma Black Belt, Werk Kecskemét, Ungarn (135203)
 Six Sigma Black Belt, Werk Kecskemét, Ungarn (135203)") Oktober 2014 Kecskemét, Mercedes-Benz Manufacturing Hungary Kft. Mercedes-Benz : Six Sigma Black Belt, (135203 ) Six Sigma Black Belt, Werk Kecskemét, Ungarn (135203) Aufgaben Feladatok: Stellennummer
Oktober 2014 Kecskemét, Mercedes-Benz Manufacturing Hungary Kft. Mercedes-Benz : Six Sigma Black Belt, (135203 ) Six Sigma Black Belt, Werk Kecskemét, Ungarn (135203) Aufgaben Feladatok: Stellennummer
Gypsyrobot DJ Technical Rider
 Gypsyrobot DJ Technical Rider DJtechnikai függelék 1. Available mixer: Verfügbarer Mixer: Rendelkezésre álló keverő: Mixer disponible: Pioneer DDJSB3 https://www.pioneerdj.com/en/product/controller/ddjsb3/black/overview/
Csatlakozás a BME eduroam hálózatához Setting up the BUTE eduroam network
 Csatlakozás a BME eduroam hálózatához Setting up the BUTE eduroam network Table of Contents Windows 7... 2 Windows 8... 6 Windows Phone... 11 Android... 12 iphone... 14 Linux (Debian)... 20 Sebők Márton
WiR gratulieren GRATULÁLUNK!
 Reflexmat Seit der Gründung im Jahre 2000 steht der Name CaSaDa für hochwertige Produkte im Bereich Wellness und fitness. WiR gratulieren GRATULÁLUNK! Mit dem Kauf dieser Fußreflexzonen-Matte haben sie
Probl me J1 - Le trident
 Probl me J1 - Le trident Directives pour l'évaluation : Il y a cinq cas d essai, qui valent 3 points chacun. entrée 1 Entrez la hauteur des pointes: 2 Entrez l espacement entre les pointes: 3 Entrez la
ASUS Transformer Pad útmutató
 útmutató TF300TG 3G kapcsolatkezelő A SIM-kártya behelyezése 1. Egy kiegyenesített gemkapocs segítségével nyomja meg a SIMkártyatartó kilökő gombját. HUG7210 2. Vegye ki a tartót. Helyezze el a kártyát
PARTS LIST. Elna Lotus
 Lotus 0 0 KEY PARTS NO. NO. DESCRIPTION 0 0000 000 00000 0000 0000 00 00000 000000 0000 0000 000 000 0000 000000 00000 000000 000 00 00000 00000 0000 0000 000 00000 000000 Upper shaft (unit) Hexagonal
Akkumulátor töltők # 85055 # 85058 # 85059. GÜDE Slovakia s.r.o Podtúreň-Roveň 208 SK-033 01 Liptovský Hrádok
 ő H Akkumulátor töltők # 85055 # 85058 # 85059 Güde GmbH & Co. KG Birkichstraße 6 D74549 Wolpertshausen www.guede.com Güde Scandinavia A/S Engelsholmvej 33 DK8900 Randers www.guede.com UNICORE nářadí s.r.o.
OPTIMUM MASCHINEN - GERMANY
 Tartalékalkatrészek - Spare parts B24H - B28H OPTIMUM 6 Tartalékalkatrészek - Spare parts B24H - B28H 6.1 Áttekintés - Overview B24H 37 OPTIMUM Tartalékalkatrészek - Spare parts B24H - B28H 6.1.1 Tartalékalkatrész
Carsten Kümmel Dipl. Tonmeister www.tonmeister-online.de
 Carsten Kümmel Dipl. Tonmeister www.tonmeister-online.de Carsten Kümmel, Starenweg 8a, 82140 Olching DATUM: 23.10.13 Tel.: 08142 6551752 Fax.: 08142 4628228 carsten@tonmeister-online.de Betreff: Beurteilung
LED UTCAI LÁMPATESTEK STREET LIGHTING
 LED UTCAI LÁMPATESTEK STREET LIGHTING LED Utcai lámpatestek Street Lights 1. Öntött ADC12 alumínium ház NOBEL porszórt festéssel 3. Edzett optikai lencsék irányított sugárzási szöggel 5. Meanwell meghajtó
Lexington Public Schools 146 Maple Street Lexington, Massachusetts 02420
 146 Maple Street Lexington, Massachusetts 02420 Surplus Printing Equipment For Sale Key Dates/Times: Item Date Time Location Release of Bid 10/23/2014 11:00 a.m. http://lps.lexingtonma.org (under Quick
Pótalkatrész Katalógus Kuplungmatika
 Spare Part Catalog Clutch-matic System We ll Clutch for you! Pótalkatrész Katalógus Kuplungmatika General Notes / Általános Információk Spare Part catalog is available only in English and Hungarian Language.
Széchenyi István Egyetem www.sze.hu/~herno
 Oldal: 1/6 A feladat során megismerkedünk a C# és a LabVIEW összekapcsolásának egy lehetőségével, pontosabban nagyon egyszerű C#- ban írt kódból fordítunk DLL-t, amit meghívunk LabVIEW-ból. Az eljárás
Kezdőlap > Termékek > Szabályozó rendszerek > EASYLAB és TCU-LON-II szabályozó rendszer LABCONTROL > Érzékelő rendszerek > Típus DS-TRD-01
 Típus DS-TRD FOR EASYLAB FUME CUPBOARD CONTROLLERS Sash distance sensor for the variable, demand-based control of extract air flows in fume cupboards Sash distance measurement For fume cupboards with vertical
Meghívó a gyermekkorcsoport 9. Nemzetközi Delphincupjára Simmeringen
 Meghívó a gyermekkorcsoport 9. Nemzetközi Delphincupjára Simmeringen Idöpont: Szombat 24.10.2009 Verseny helye: Medence: Idömérés: Fedett uszoda Simmering A -1110 Wien, Simmeringer Hauptstraße/ Florian
Használati útmutató. Altalajlazító
 Használati útmutató Altalajlazító EK - KONFORMITÁSI NYILATKOZAT Mi - a VOGEL & NOOT - ezennel kijelentjük, hogy az alábbi gép megfelel az EGK 89/392 sz. EK-gépirányelvek biztonsági követelményeinek. A
Proxer 7 Manager szoftver felhasználói leírás
 Proxer 7 Manager szoftver felhasználói leírás A program az induláskor elkezdi keresni az eszközöket. Ha van olyan eszköz, amely virtuális billentyűzetként van beállítva, akkor azokat is kijelzi. Azokkal
T Á J É K O Z T A T Ó. A 1108INT számú nyomtatvány a http://www.nav.gov.hu webcímen a Letöltések Nyomtatványkitöltő programok fülön érhető el.
 T Á J É K O Z T A T Ó A 1108INT számú nyomtatvány a http://www.nav.gov.hu webcímen a Letöltések Nyomtatványkitöltő programok fülön érhető el. A Nyomtatványkitöltő programok fület választva a megjelenő
Tavaszi Sporttábor / Spring Sports Camp. 2016. május 27 29. (péntek vasárnap) 27 29 May 2016 (Friday Sunday)
 27 29 May 2016 (Friday Sunday)") Tavaszi Sporttábor / Spring Sports Camp 2016. május 27 29. (péntek vasárnap) 27 29 May 2016 (Friday Sunday) SZÁLLÁS / ACCOMODDATION on a Hotel Gellért*** szálloda 2 ágyas szobáiban, vagy 2x2 ágyas hostel
Tavaszi Sporttábor / Spring Sports Camp 2016. május 27 29. (péntek vasárnap) 27 29 May 2016 (Friday Sunday) SZÁLLÁS / ACCOMODDATION on a Hotel Gellért*** szálloda 2 ágyas szobáiban, vagy 2x2 ágyas hostel
Public-Key Kryptography mit Diskreten Logarithmen
 Public-Key Kryptography mit Diskreten Logarithmen Jan Schwarz Kristine Jetzke 11.01.2005 Gliederung Das ElGamal Kryptosystem Algorithmen zum Lösen von Diskreten Logarithmen Untere Komplexitätsgrenze Das
Komplex tehetséggondozási program a Ceglédi kistérségben TÁMOP - 3.4.3-08/1-2009- 0002
 Komplex tehetséggondozási program a Ceglédi kistérségben TÁMOP - 3.4.3-08/1-2009- 0002 A projekt az Európai Unió támogatásával, az Európai Szociális Alap társfinanszírozásával valósul meg Név: Iskola:
(Asking for permission) (-hatok/-hetek?; Szabad ni? Lehet ni?) Az engedélykérés kifejezésére a következő segédigéket használhatjuk: vagy vagy vagy
 (-hatok/-hetek?; Szabad ni? Lehet ni?) Az engedélykérés kifejezésére a következő segédigéket használhatjuk: vagy vagy vagy") (Asking for permission) (-hatok/-hetek?; Szabad ni? Lehet ni?) SEGÉDIGÉKKEL Az engedélykérés kifejezésére a következő segédigéket használhatjuk: vagy vagy vagy A fenti felsorolásban a magabiztosság/félénkség
(Asking for permission) (-hatok/-hetek?; Szabad ni? Lehet ni?) SEGÉDIGÉKKEL Az engedélykérés kifejezésére a következő segédigéket használhatjuk: vagy vagy vagy A fenti felsorolásban a magabiztosság/félénkség
White Paper. Grounding Patch Panels
 White Paper Grounding Patch Panels Tartalom 1. Bevezető... 1 2. A földelés jelentőssége... 3 3. AC elosztó rendszer... 3 4. Földelési rendszerek... 3 4.1. Fa... 3 4.2. Háló... 5 5. Patch panel földelési
M10 A2, retaining nut for the impeller 9 Washer 1 No. 10 A2 Spring washer for the impeller retaining nut 10 Washer 1 No
 VB25/ 1300 Inox Type Serial no. Description Order code Weight Piece no. Ordering possibility Price Note Picture 1 Pump case JPV413 730 1 Yes 2 Screw 1 No 3 O ring 17*3 OR8 1 No 4 Plastic cap 2 No 5 O ring
KN-CP50. MANUAL (p. 2) Digital compass. ANLEITUNG (s. 4) Digitaler Kompass. GEBRUIKSAANWIJZING (p. 10) Digitaal kompas
 Digital compass. ANLEITUNG (s. 4) Digitaler Kompass. GEBRUIKSAANWIJZING (p. 10) Digitaal kompas") KN-CP50 MANUAL (p. ) Digital compass ANLEITUNG (s. 4) Digitaler Kompass MODE D EMPLOI (p. 7) Boussole numérique GEBRUIKSAANWIJZING (p. 0) Digitaal kompas MANUALE (p. ) Bussola digitale MANUAL DE USO (p.
KN-CP50 MANUAL (p. ) Digital compass ANLEITUNG (s. 4) Digitaler Kompass MODE D EMPLOI (p. 7) Boussole numérique GEBRUIKSAANWIJZING (p. 0) Digitaal kompas MANUALE (p. ) Bussola digitale MANUAL DE USO (p.
KAPOSVÁRI VILLAMOSSÁGI GYÁR
 KAPOSVÁRI VILLAMOSSÁGI GYÁR EN 900 ISO Típusú Hengeres biztosító betétek Typ Zylindrische Sicherungseinsätze Type ilindrical fuse-links Az erõsáramú biztosító betétek villamos áramkörök, készülékek és
ACO burkolható fedlapok. ACO műszaki katalógus ACO Burkolható fedlapok UNIFACE PAVING SOLID
 ACO burkolható fedlapok ACO burkolható fedlapok ACO műszaki katalógus ACO Burkolható fedlapok UNIFACE PAVING SOLID ACO gully Tartalom Általános információk 3 page ACO Uniface ACO UNIFACE burkolható fedlap
BALÁZS HORVÁTH. Escalator
 BALÁZS HORVÁTH Escalator per tromba in Do e pianorte / for trumpet in C and piano Original version for trumpet and orchestra was composed for the final round of the International Trumpet Competition, Debrecen,
WWW.LINEAMOTOR.HU. linea 50QT-6 PARTS CATALOGUE. linea 50QT-6 YY50QT01000. Model Part No. 图 1 消 声 器. 价 格 合 计 Total. Description
 图 Draft 消 声 器 Kipufogó PARTS CATALOGUE YY50QT0000 YY50QT0000 Kipufogó dob Exhaust Muffler YY50QT0000 gyűrű Washer, Exhaust Outlet 3 YY50QT00003 alátét Washer YY50QT0000 Cap Nut, M6 5 YY50QT00005 díszítő
A katalógusban szereplő adatok változásának jogát fenntartjuk. 2015. 02-es kiadás
 RUGÓKATALÓGUS A Biotek Kft. több mint 20 év tudásával és tapasztalatával valamint kiváló minőségű rögzítéstechnikai és gépépítő elemek nagy választékával kínál megoldásokat termékek tervezéséhez és gyártásához.
USER MANUAL Guest user
 USER MANUAL Guest user 1 Welcome in Kutatótér (Researchroom) Top menu 1. Click on it and the left side menu will pop up 2. With the slider you can make left side menu visible 3. Font side: enlarging font
MIKRON HSM 300 Száraz megmunkálás vagy minimál mennyiségû kenés
 MIKRON HSM 300 Száraz megmunkálás vagy minimál mennyiségû kenés Tulajdonságok Minimál kenéssel vagy grafitpor elszívással A bõvíthetõ gép, interfésszel az automatizáláshoz Integrált olajköd vagy grafitpor
 R FABRYKA ARMATUR SA 8007 Földfeletti tűzcsap OVERGROUND HYDRANT ÜBERFLURHYDRANT KETTŐS ZÁRÁSÚ KITÖRÉSBIZTOS MONOLIT FEJ GGG-40 FEJ ELFORDÍTHATÓ 0-TÓL 360-IG Műszaki adatok: Technical data: Technische
HAMBURG Használati útmutató Vezérlőmodul UKSM 24VDC Cikkszám: 260.033
 HABURG Használati útmutató Vezérlőmodul UKS 24VDC Cikkszám: 260.033 Brandschutz-Technik und Rauchabzug GmbH Schnackenburgallee 41d D-22525 Hamburg Germany +49 40 89 71 20-0 Fax: +49 40 89 71 20-20 Internet:
KELER KSZF Zrt. bankgarancia-befogadási kondíciói. Hatályos: 2014. július 8.
 KELER KSZF Zrt. bankgarancia-befogadási kondíciói Hatályos: 2014. július 8. A KELER KSZF a nem-pénzügyi klíringtagjaitól, és az energiapiaci alklíringtagjaitól a KELER KSZF Általános Üzletszabályzata szerinti
NASODRILL ORRSPRAY: TARTÁLY- ÉS DOBOZFELIRAT, VALAMINT A BETEGTÁJÉKOZTATÓ SZÖVEGE. CSECSEMŐ GYERMEK FELNŐTT 100 ml-es üveg
 NASODRILL ORRSPRAY: TARTÁLY- ÉS DOBOZFELIRAT, VALAMINT A BETEGTÁJÉKOZTATÓ SZÖVEGE TARTÁLY - BOTTLE NASAL LAVAGE For chronic or recurring infection NASODRILL Formulated with thermal Luchon water naturally
Construction-related services
 Construction-related services Info Version 1 Url http://com.mercell.com/permalink/43058345.aspx External tender id 38193-2014 Tender type Tender Document type Contract notice Procurement procedure Open
A golyók felállítása a Pool-biliárd 8-as játékának felel meg. A golyók átmérıje 57.2 mm. 15 számozott és egy fehér golyó. Az elsı 7 egyszínő, 9-15-ig
 A golyók elhelyezkedése a Snooker alaphelyzetet mutatja. A golyók átmérıje 52 mm, egyszínőek. 15 db piros, és 1-1 db fehér, fekete, rózsa, kék, barna, zöld, sárga. A garázsban állítjuk fel, ilyenkor az
REMOTE RADAR DETECTOR (connectable to GPS DETECTOR device.) BEÉPÍTHETŐ RADARDETEKTOR (GPS DETECTOR készülékhez) USER MANUAL / HASZNÁLATI ÚTMUTATÓ
 BEÉPÍTHETŐ RADARDETEKTOR (GPS DETECTOR készülékhez) USER MANUAL / HASZNÁLATI ÚTMUTATÓ") REMOTE RADAR DETECTOR (connectable to GPS DETECTOR device.) BEÉPÍTHETŐ RADARDETEKTOR (GPS DETECTOR készülékhez) USER MANUAL / HASZNÁLATI ÚTMUTATÓ 1 REMOTE RADAR DETECTOR (connectable to GPS DETECTOR device.)
REMOTE RADAR DETECTOR (connectable to GPS DETECTOR device.) BEÉPÍTHETŐ RADARDETEKTOR (GPS DETECTOR készülékhez) USER MANUAL / HASZNÁLATI ÚTMUTATÓ 1 REMOTE RADAR DETECTOR (connectable to GPS DETECTOR device.)
EGY SZIKLAGÖDÖR KERÁMIAANYAGA A HADTÖRTÉNETI MÚZEUM UDVARÁN
 BENCZE ZOLTÁN EGY SZIKLAGÖDÖR KERÁMIAANYAGA A HADTÖRTÉNETI MÚZEUM UDVARÁN 1990-ben a Hadtörténeti Múzeum udvarán, a IV. Béla kori városfal tornyától nyugatra egy feljáró építésének munkálatai során lehetőség
Modellszám MM TABLE SAW
 Oldal 1 / 4 Oldal 2 / 4 Oldal 3 / 4 Oldal 4 / 4 Oldal 1 / 4 Tétel Cikkszám Megnevezés ÁtalakMenny. N/O Opc 1 Opc 2 Megjegyzés 001 JM27100031 CROSS HEAD SCREW M5 4 002 JM27100032 FLAT WASHER 5 4 003 JM27100033
A vitorlázás versenyszabályai a 2013-2016. évekre angol-magyar nyelvű kiadásának változási és hibajegyzéke
 A vitorlázás versenyszabályai a 2013-2016. évekre angol-magyar nyelvű kiadásának változási és hibajegyzéke A dokumentum A vitorlázás versenyszabályai a 2013-2016. évekre angol-magyar nyelvű kiadásában
PIACI HIRDETMÉNY / MARKET NOTICE
 PIACI HIRDETMÉNY / MARKET NOTICE HUPX DAM Másnapi Aukció / HUPX DAM Day-Ahead Auction Iktatási szám / Notice #: Dátum / Of: 18/11/2014 HUPX-MN-DAM-2014-0023 Tárgy / Subject: Változások a HUPX másnapi piac
ENROLLMENT FORM / BEIRATKOZÁSI ADATLAP
 ENROLLMENT FORM / BEIRATKOZÁSI ADATLAP CHILD S DATA / GYERMEK ADATAI PLEASE FILL IN THIS INFORMATION WITH DATA BASED ON OFFICIAL DOCUMENTS / KÉRJÜK, TÖLTSE KI A HIVATALOS DOKUMENTUMOKBAN SZEREPLŐ ADATOK
Festival de la Francophonie 2014. Concours «dis-moi dix mots à la folie!»
 Festival de la Francophonie 2014 Concours «dis-moi dix mots à la folie!» Réalisez des productions littéraires avec vos classes autour de la poésie, du conte, du théâtre! Premier prix : un séjour pédagogique
EN United in diversity EN A8-0206/482. Amendment
 21.3.2019 A8-0206/482 482 Recital 13 g (new) (13g) In recognition of the need for specific treatment for the transport sector, in which movement is the very essence of the work undertaken by drivers, the
Személyes adatváltoztatási formanyomtatvány- Magyarország / Personal Data Change Form - Hungary
 Személyes adatváltoztatási formanyomtatvány- Magyarország / Personal Data Change Form - Hungary KITÖLTÉSI ÚTMUTATÓ: A formanyomtatványon a munkavállaló a személyes adatainak módosítását kezdeményezheti.
Phenotype. Genotype. It is like any other experiment! What is a bioinformatics experiment? Remember the Goal. Infectious Disease Paradigm
 It is like any other experiment! What is a bioinformatics experiment? You need to know your data/input sources You need to understand your methods and their assumptions You need a plan to get from point
P 2300 A #94135. Copyright Güde GmbH & Co. KG - Birkichstrasse 6-74549 Wolpertshausen - Germany. Deutsch English Français. Čeština.
 P 2300 A Deutsch English Français Dansk Čeština Slovenčina Nederlands Italiano Norsk Svenska Magyar Hrvatski Slovenščina Româneşte Български Bosanski Srpski #94135 Copyright Güde GmbH & Co. KG - Birkichstrasse
Ültetési és öntözési javaslatok. Planting and watering instructions
 Ültetési és öntözési javaslatok Planting and watering instructions 1 Önöntöző-rendszer Sub-irrigation 2 Kedves növénykedvelő A LECHUZA önöntöző rendszerrel növényeink természetüknél fogva gyönyörű virágokat
1.1. EGYETLEN KÉSZÜLÉK ÜZEMBE HELYEZÉSE... 124 1.2. KÉT KÉSZÜLÉK ÜZEMBE HELYEZÉSE... 124 2.1. BEKAPCSOLT/KÉSZENLÉTI ÁLLAPOT... 125
 TÁRGYMUTATÓ Fejezet 1: ÜZEMBE HELYEZÉS...124 1.1. EGYETLEN KÉSZÜLÉK ÜZEMBE HELYEZÉSE... 124 1.2. KÉT KÉSZÜLÉK ÜZEMBE HELYEZÉSE... 124 Fejezet 2: FUNKCIÓK...125 2.1. BEKAPCSOLT/KÉSZENLÉTI ÁLLAPOT... 125
Szundikáló macska Sleeping kitty
 Model: Peter Budai 999. Diagrams: Peter Budai 999.. Oda-visszahajtás átlósan. Fold and unfold diagonally. 2. Behajtunk középre. Fold to the center. 3. Oda-visszahajtások derékszögben. Fold and unfold at
BTSZ 600 Special. Type
 Type BTSZ 600 Special Elpumps Kft. Fehérgyarmat, Szatmári u. 21. Tel.: +36-44/510-530 Fax.: +36-44/510-535 E-mail.: info@elpumps.hu Home Page: www.elpumps.hu Serial no. Description Order code Weight Piece
Repair and maintenance services of electrical distribution equipment
 Repair and maintenance services of electrical distribution equipment Info Version 2 Url http://com.mercell.com/permalink/36880981.aspx External tender id 139519-2013 Tender type Contract Award Document
Engineering services. Info. Buyer. Version changes Contract award. Description. Version 3. Publish date 10/22/2013 4:26 AM
 Engineering services Info Version 3 Url http://com.mercell.com/permalink/38746327.aspx External tender id 355577-2013 Tender type Contract Award Document type Contract award Procurement procedure Open
Adott esetben születési név és korábbi házassági név Keresztnév Vorname ggf. Geburtsname und Name aus früherer Ehe
 Családi pótlék sz. Kindergeld-Nr. Familienkasse Az igénylést benyújtó személy adóazonosító száma Németországban (feltétlenül kitöltendő) Steuer-ID der antragstellenden Person in Deutschland (zwingend ausfüllen)
Angol Középfokú Nyelvvizsgázók Bibliája: Nyelvtani összefoglalás, 30 kidolgozott szóbeli tétel, esszé és minta levelek + rendhagyó igék jelentéssel
 Angol Középfokú Nyelvvizsgázók Bibliája: Nyelvtani összefoglalás, 30 kidolgozott szóbeli tétel, esszé és minta levelek + rendhagyó igék jelentéssel Timea Farkas Click here if your download doesn"t start
SZIGETELT LÉGVEZETÉKEK COVERED OVERHEAD CONDUCTORS ISOLIERTE FREILEITUNGEN
 COVERED OVERHEAD CONDUCTORS ISOLIERTE FREILEITUNGEN Szigetelt vezeték gyártás: A FUX Rt. 1996-tól szigetelt légvezetéket gyárt, amelyet az ISO 9001-nek megfelelő minőségirányítási rendszernek megfelelően
2 level 3 innovation tiles. 3 level 2 innovation tiles. 3 level 1 innovation tiles. 2 tribe pawns of each color. 3 height 3 tribe pawns.
 2 darab 3-as szintű találmány jelző Origin kártyaszövegek fordítása Vágd ki a az egyes kártyákhoz tartozó lapokat a vonalak és a színes terület mentén, majd csúsztasd be a kártyavédő fóliába úgy, hogy
DR. SZABÓ LÁSZLÓ 1 DOBOS GÁBOR 2
 Szolnoki Tudományos Közlemények XIII. Szolnok, 2009. DR. SZABÓ LÁSZLÓ 1 DOBOS GÁBOR 2 JAK-52 OKTATÓ REPÜLŐGÉP EGY KONSTRUKCIÓS PROBLÉMÁJÁNAK MEGOLDÁSI LEHETŐSÉGEI FESTO FLUIDSIM SZOFTVER FELHASZNÁLÁSÁVAL
Bel SE Hungary IDPA. Stage 1st: Running to you 1. pálya: Lerohanás. Course Designer:Attila Belme
 Stage 1st: Running to you 1. pálya: Lerohanás SCENARIO: You step out from your house, when 5 attackers raid you with firearms in hand. TÖRTÉNET: Épp a lakásodból lépsz ki, amikor 5 fegyveres támadó megindul
Személyes adatváltoztatási formanyomtatvány - Magyarország / Personal Data Change Form - Hungary
 Személyes adatváltoztatási formanyomtatvány - Magyarország / Personal Data Change Form - Hungary Kitöltési útmutató: A formanyomtatványon a munkavállaló a személyes adatainak módosítását kezdeményezheti.
Your contact person Úr Ottmar Schmid Technischer Vertrieb 0711 88718 500 0711 88718 100 o.schmid@mannesmann-demag.com.
 Powered by TCPDF (www.tcpdf.org) Sorjázási, csiszolási, marási, polirózási és öntvénytisztitási megmunkálásokra Robusztus kivitelezés, ER-befogó patron Biztonsági inditókar az EN 792 szabvàny szerint A
Alloy 718 UNS: N 07718
 Alloy 718 1 Alloy 718 UNS: N 07718 Autres appellations France : NC 19 Fe Nb Germany : 2.4668 / Ni Cr 19 Nb Mo Euronorm : Ni Cr 19 Nb Mo Aerospace (high-temperature working components, fasteners...). Naval
SIMSON KOMPAKT JACKS SIMSON KOMPAKT HEBER SIMSON KOMPAKT HIDRAULIKUS EMELŐK
 SIMSON KOMPAKT JACKS SIMSON KOMPAKT HEBER SIMSON KOMPAKT HIDRAULIKUS EMELŐK Lifting Heben Emelés Pushing Drucken Nyomatás Pulling Ziehen Húzás UNIQUE FEATURES EINZIGARTIGE EIGENSCHAFTEN EGYEDÜLÁLLÓ JELLEMZŐK
Contents. BandMask Tri-Valve Exhaust B CAUTION. 1.1 Tri-Valve Exhaust Assembly on Band Masks. 1.2 Tri-Valve Assembly Removal
 Tri-Valve Exhaust Assembly on Band Masks Contents BTRI-1 1.1 Tri-Valve Exhaust Assembly on Band Masks BTRI-5 1.4 Tri-Valve Assembly Installation BTRI-1 BTRI-2 1.2 Tri-Valve Assembly Removal 1.3 Tri-Valve
Vállalati kockázatkezelés jelentősége
 www.pwc.com/hu Vállalati kockázatkezelés jelentősége Fedor Péter 2013. szeptember 19. Miről lesz szó 1. Mi is az az ERM? 2. Miért fontos? 3. Gyakorlati sajátosságok PwC Magyarország Mi is az az ERM? PwC
HASZNÁLATI ÚTMUTATÓ INOX RÚDMIXER. Modell: OHBIN-9805
 HASZNÁLATI ÚTMUTATÓ INOX RÚDMIXER Modell: OHBIN-9805 Kérjük, olvassa el figyelmesen ezt a tájékoztatót a készülék üzembehelyezése és használata előtt és őrizze meg ezt az információt jövőbeli használatra.
General information for the participants of the GTG Budapest, 2017 meeting
 General information for the participants of the GTG Budapest, 2017 meeting Currency is Hungarian Forint (HUF). 1 EUR 310 HUF, 1000 HUF 3.20 EUR. Climate is continental, which means cold and dry in February
STUDENT LOGBOOK. 1 week general practice course for the 6 th year medical students SEMMELWEIS EGYETEM. Name of the student:
 STUDENT LOGBOOK 1 week general practice course for the 6 th year medical students Name of the student: Dates of the practice course: Name of the tutor: Address of the family practice: Tel: Please read
GSS 700 P # 94220 D GB F DK CZ SK NL I NOR S H HR SLO. Birkichstraße 6 D-74549 Wolpertshausen. P.O.Box 8 Poèernická 120 CZ-360 05 Karlovy Vary
 GSS 700 P D GB F DK CZ SK NL I NOR S H HR SLO # 94220 Güde GmbH & Co. KG Birkichstraße 6 D-74549 Wolpertshausen www.guede.com Güde Hungary KFT Kossuth u. 72 H-8420 Zirc info@gude.hu www.guede.com Güde/UNICORE