Instructions for use WASHING MACHINE. Contents ARTXF 109
|
|
|
- Dóra Zsuzsanna Ballané
- 8 évvel ezelőtt
- Látták:
Átírás
1 Instructions for use WASHING MACHINE GB English,1 CIS PL Polski,25 Contents Installation, 2-3 Unpacking and levelling Connecting the electricity and water supplies The first wash cycle Technical data GB HU Magyar,37 Care and maintenance, 4 Cutting off the water or electricity supply Cleaning the washing machine Caring for your appliance door and drum Cleaning the pump Checking the water inlet hose How to clean the detergent dispenser ARTXF 109 Precautions and tips, 5 General safety Disposal Saving energy and respecting the environment Description of the washing machine and starting a wash cycle, 6-7 Control panel Indicator lights How to open and shut the drum Starting a wash cycle Wash cycles, 8 Table of wash cycles Personalisation, 9 Setting the temperature Setting the spin speed Functions Detergents and laundry, 10 Detergent dispenser drawer Bleach cycle Preparing the laundry Garments requiring special care Load balancing system Troubleshooting, 11 Service, 12 1

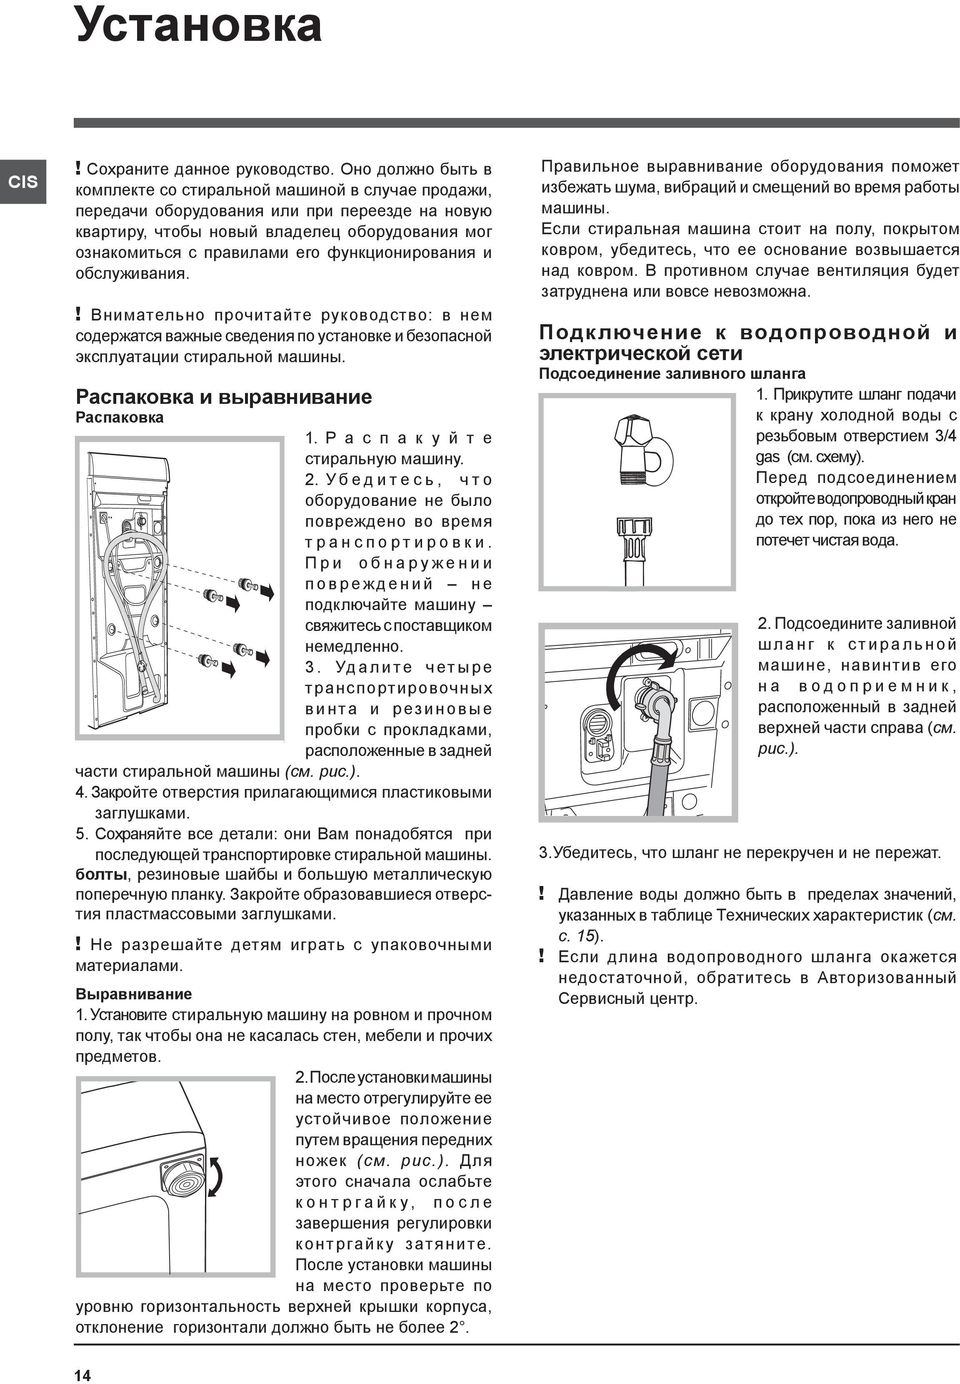
2 Installation GB! Keep this instruction manual in a safe place for future reference. Should the appliance be sold, transferred or moved, make sure the instruction manual accompanies the washing machine to inform the new owner as to its operation and features.! Read these instructions carefully: they contain vital information on installation, use and safety. Unpacking and levelling Unpacking 1. Unpack the washing machine. 2. Check whether the washing machine has been damaged during transport. If this is the case, do not install it and contact your retailer. 3. Remove the four protective screws and the rubber washer with the respective spacer, situated on the rear of the appliance (see figure). 4. Seal the gaps using the plastic plugs provided. 5. Keep all the parts: you will need them again if the washing machine needs to be moved to another location. Warning: should the screws be re-used, make sure you fasten the shorter ones at the top.! Packaging materials are not children s toys. Levelling 1. Install the washing machine on a flat sturdy floor, without resting it up against walls, furniture cabinets or other. 2. If the floor is not perfectly level, compensate for any unevenness by tightening or loosening the adjustable front feet (see figure); the angle of inclination, measured according to the worktop, must not exceed 2. Levelling your appliance correctly will provide it with stability and avoid any vibrations, noise and shifting during operation. If it is placed on a fitted or loose carpet, adjust the feet in such a way as to allow enough room for ventilation beneath the washing machine. Electric and water connections Connecting the water inlet hose 1. Connect the supply pipe by screwing it to a cold water tab using a ¾ gas threaded connection (see figure). Before performing the connection, allow the water to run freely until it is perfectly clear. 2. Connect the other end of the water inlet hose to the washing machine, screwing it onto the appliance s cold water inlet, situated on the top right-hand side on the rear of the appliance (see figure). 3. Make sure there are no kinks or bends in the hose.! The water pressure at the tap must be within the values indicated in the Technical details table (on the next page).! If the water inlet hose is not long enough, contact a specialist store or an authorised serviceman.! Never use hoses that have already been used. 2

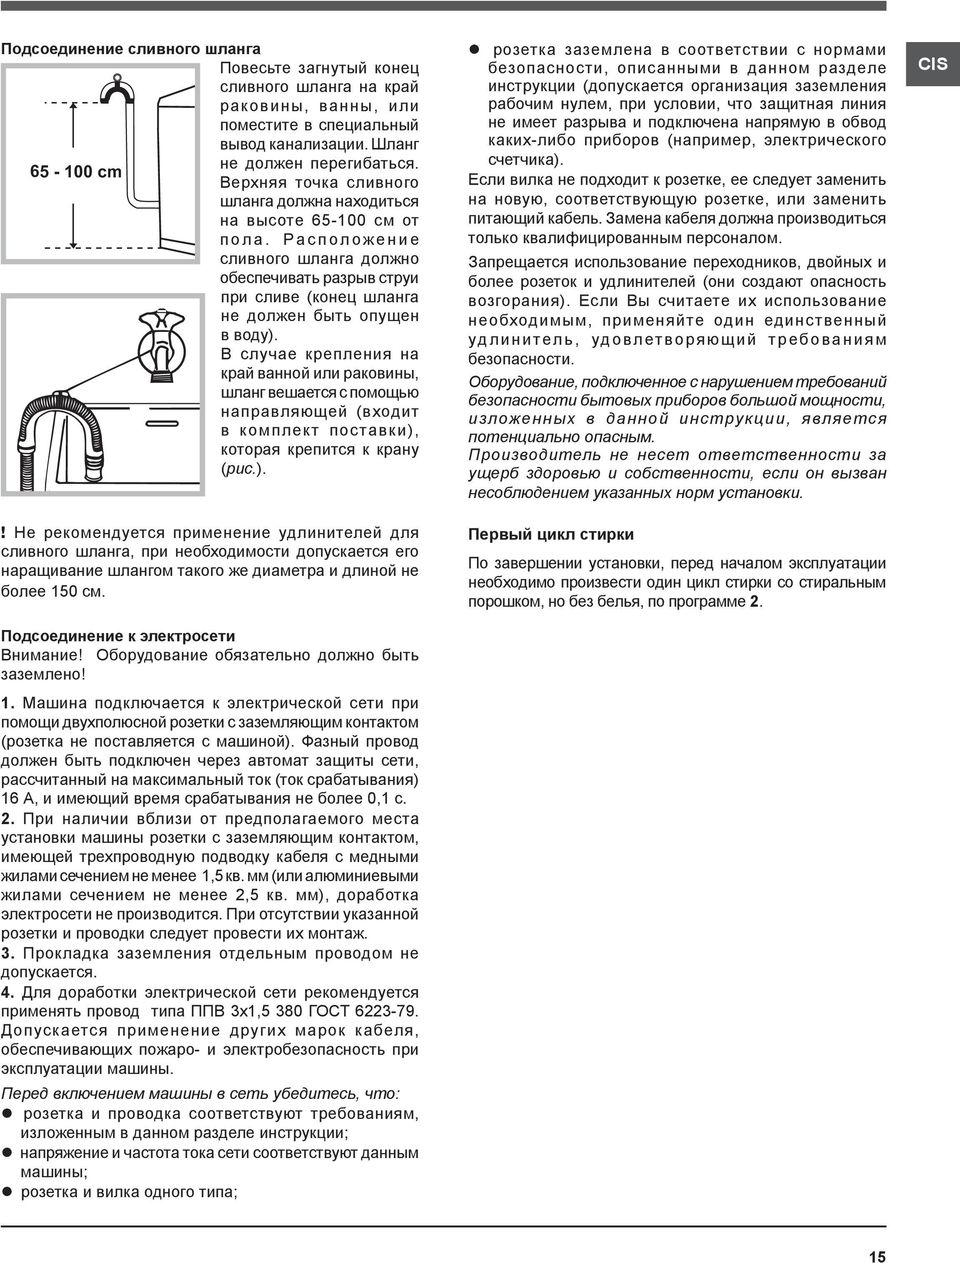
3 Connecting the drain hose cm Connect the drain hose, without bending it, to a drainage duct or a wall drain located at a height between 65 and 100 cm from the floor;! Do not use extension cords or multiple sockets.! The cable should not be bent or compressed.! The power supply cable must only be replaced by authorised technicians. Warning! The company shall not be held responsible in the event that these regulations are not respected. GB alternatively, rest it on the side of a washbasin or bathtub, fastening the duct supplied to the tap (see figure). The free end of the hose should not be underwater.! We advise against the use of hose extensions; if it is absolutely necessary, the extension must have the same diameter as the original hose and must not exceed 150 cm in length. Electrical connections Before plugging the appliance into the electricity socket, make sure that: the socket is earthed and complies with all applicable laws; the socket is able to withstand the maximum power load of the appliance as indicated in the Technical data table (see opposite); the power supply voltage falls within the values indicated in the Technical data table (see opposite); the socket is compatible with the plug of the washing machine. If this is not the case, replace the socket or the plug.! The washing machine must not be installed outdoors, even in covered areas. It is extremely dangerous to leave the appliance exposed to rain, storms and other weather conditions.! When the washing machine has been installed, the electricity socket must be within easy reach. The first wash cycle Once the appliance has been installed, and before you use it for the first time, run a wash cycle with detergent and no laundry, using the wash cycle. Technical details Model ARTXF 109 Dimensions Capacity Electric connections Water connections Spin speed Test wash cycles in accordance with directives 1061/ / cm wide 85 cm high 60 cm deep from 1 to 6 kg Please refer to the technical data plate fixed to the machine. maximum pressure 1 MPa (10 bar) minimum pressure 0.05 MPa (0.5 bar) drum capacity 42 litres up to 1000 rpm Programme ; Cotton Standard 60 C. Programme ; Cotton Standard 40 C. This appliance is compliant with the following European Community Directives: /108/CE (Electromagnetic Compatibility) /95/CE (Low Voltage) /96/CE 3
. The free end of the hose should not be underwater.")
4 Care and maintenance GB Cutting off the water and electricity supplies Turn off the water tap after every wash cycle. This will limit wear on the hydraulic system inside the washing machine and help to prevent leaks. Unplug the washing machine when cleaning it and during all maintenance work. Cleaning the washing machine The outer parts and rubber components of the appliance can be cleaned using a soft cloth soaked in lukewarm soapy water. Do not use solvents or abrasives. Caring for the door and drum of your appliance Always leave the porthole door ajar in order to prevent unpleasant odours from forming. Cleaning the pump The washing machine is fitted with a self-cleaning pump which does not require any maintenance. Sometimes, small items (such as coins or buttons) may fall into the pre-chamber which protects the pump, situated in its bottom part.! Make sure the wash cycle has finished and unplug the appliance. To access the pre-chamber: 1. using a screwdriver, remove the cover panel on the lower front part of the washing machine (see figure); 2. unscrew the lid by rotating it anti-clockwise (see figure): a little water may trickle out. This is perfectly normal; 3. clean the inside thoroughly; 4. screw the lid back on; 5. reposition the panel, making sure the hooks are securely in place before you push it onto the appliance. Checking the water inlet hose Check the inlet hose at least once a year. If there are any cracks, it should be replaced immediately: during the wash cycles, water pressure is very strong and a cracked hose could easily split open.! Never use second-hand hoses. How to clean the detergent dispenser Disassembly: Press lightly on the large button on the front of the detergent dispenser and pull it upwards (fig. 1). Cleaning: Then clean the dispenser under a tap (fig. 3) using an old toothbrush and, once the pair of siphons inserted in the top of compartments 1 and 2 (fig. 4) have been pulled out, check whether the same are not clogged and then rinse them. Reassembly: Do not forget to reinsert the pair of siphons into the special housings and then to replace the dispenser into its seat, clicking it into place (fig. 4, 2 and 1). Fig. 1 Fig. 2 Fig. 3 Fig. 4 4

5 Precautions and tips! This washing machine was designed and constructed in accordance with international safety regulations. The following information is provided for safety reasons and must therefore be read carefully. General safety This appliance was designed for domestic use only. This appliance can be used by children aged from 8 years and above and persons with reduced physical, sensory or mental capabilities or lack of experience and knowledge if they have been given supervision or instruction concerning use of the appliance in a safe way and understand the hazards involved. Children shall not play with the appliance. Cleaning and user maintenance shall not be made by children without supervision. Do not touch the machine when barefoot or with wet or damp hands or feet. Do not pull on the power supply cable when unplugging the appliance from the electricity socket. Hold the plug and pull. Do not touch the drained water as it may reach extremely high temperatures. Never force the porthole door. This could damage the safety lock mechanism designed to prevent accidental opening. If the appliance breaks down, do not under any circumstances access the internal mechanisms in an attempt to repair it yourself. Always keep children well away from the appliance while it is operating. If the appliance has to be moved, work in a group of two or three people and handle it with the utmost care. Never try to do this alone, because the appliance is very heavy. Before loading laundry into the washing machine, make sure the drum is empty. Disposal Disposing of the packaging materials: observe local regulations so that the packaging may be re-used. The European Directive 2002/96/EC on Waste Electrical and Electronic Equipment, requires that old household electrical appliances must not be disposed of in the normal unsorted municipal waste stream. Old appliances must be collected separately in order to optimise the recovery and recycling of the materials they contain and reduce the impact on human health and the environment. The crossed out wheeled bin symbol on the product reminds you of your obligation, that when you dispose of the appliance it must be separately collected. Consumers should contact their local authority or retailer for information concerning the correct disposal of their old appliance. Saving energy and respecting the environment Saving on detergent, water, energy and time To avoid wasting resources, the washing machine should be used with a full load. A full load instead of two half loads allows you to save up to 50% on energy. The pre-wash cycle is only necessary on extremely soiled garments. Avoiding it will save on detergent, time, water and between 5 and 15% energy. Treating stains with a stain remover or leaving them to soak before washing will cut down the need to wash them at high temperatures. A programme at 60 C instead of 90 C or one at 40 C instead of 60 C will save up to 50% on energy. Use the correct quantity of detergent depending on the water hardness, how soiled the garments are and the amount of laundry you have, to avoid wastage and to protect the environment: despite being biodegradable, detergents do contain ingredients that alter the natural balance of the environment. In addition, avoid using fabric softener as much as possible. If you use your washing machine from late in the afternoon until the early hours of the morning, you will help reduce the electricity board s peak load. The Delay Timer option helps to organise your wash cycles accordingly. If your laundry has to be dried in a tumble dryer, select a high spin speed. Having the least water possible in your laundry will save you time and energy in the drying process. GB 5

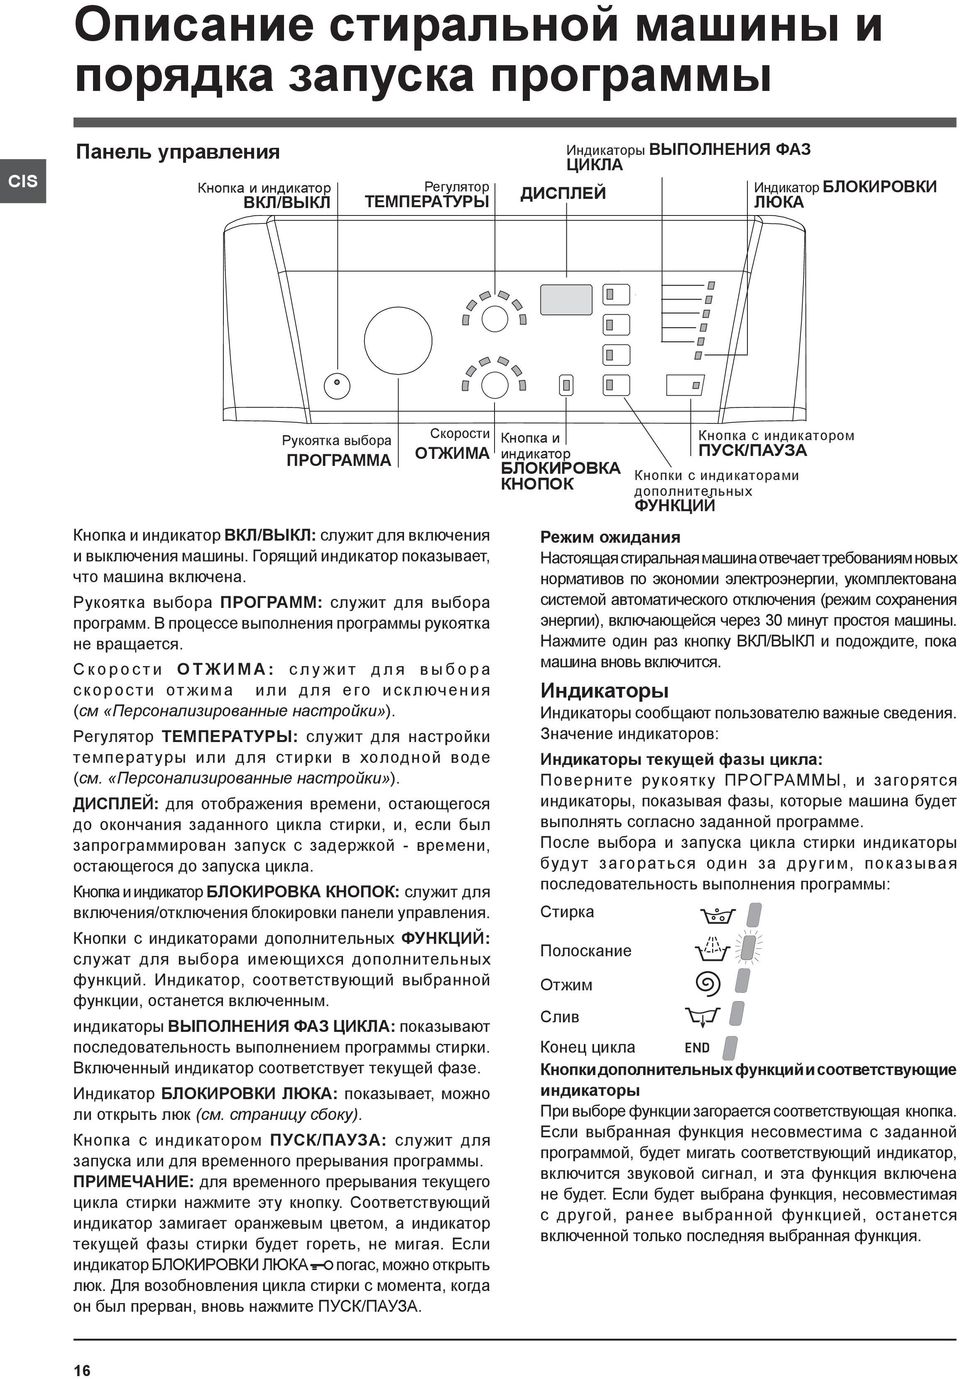
6 Description of the washing machine and starting a wash cycle GB Control panel ON/OFF button with indicator light TEMPERATURE button DISPLAY WASH CYCLE PROGRESS LID LOCKED indicator light WASH CYCLE knob SPIN SPEED button CONTROL PANEL LOCK button with indicator light START/PAUSE button with indicator light FUNCTION buttons with indicator lights ON/OFF button with indicator light: switches the machine on and off. If the indicator light is illuminated, this indicates that the machine is switched on. WASH CYCLE knob: programmes the wash cycles. During the wash cycle, the knob does not move. SPIN SPEED button: sets the spin speed or exclude the spin cycle completely (see Personalisation ). TEMPERATURE button: sets the temperature or the cold wash cycle (see Personalisation ). DISPLAY: indicates the time remaining for the selected wash cycle and, if a delayed start has been programmed, the time remaining until the start of the wash cycle. CONTROL PANEL LOCK button with indicator light: activates or deactivates the control panel lock. FUNCTION buttons with indicator light: used to select the available functions. The indicator light corresponding to the selected function will remain lit. WASH CYCLE PROGRESS indicator lights: used to monitor the progress of the wash cycle. The illuminated indicator light shows which phase is in progress. DOOR LOCKED indicator light: indicates whether the door may be opened or not (see next page). START/PAUSE button with indicator light: starts or temporarily interrupts the wash cycles. N.B. To pause the wash cycle in progress, press this button; the corresponding indicator light will flash orange, while the indicator light for the current wash cycle phase will remain lit in a fixed manner. If the DOOR LOCKED indicator light is switched off, the door may be opened. To start the wash cycle from the point at which it was Standby mode This washing machine, in compliance with new energy saving regulations, is fitted with an automatic standby system which is enabled after about 30 minutes if no activity is detected. Press the ON-OFF button briefly and wait for the machine to start up again.interrupted, press this button again. Consumption in off-mode: 0,5 W Consumption in Left-on: 0,5 W Indicator lights The indicator lights provide important information. This is what they can tell you: Wash cycle phase indicator lights As the WASH CYCLE knob is rotated, the indicator lights illuminate, indicating the stages which will be performed by the machine in accordance with the selected wash cycle. Once the desired wash cycle has been selected and has begun, the indicator lights switch on one by one to indicate which phase of the cycle is currently in progress. Wash Rinse Spin Drain End of wash cycle Function buttons and corresponding indicator lights When a function is selected, the corresponding indicator light will illuminate. If the selected function is not compatible with the programmed wash cycle, the corresponding indicator light will flash, a sound signal will be emitted and the function will not be activated. If a function which is incompatible with another function selected previously, only the most recent selection will remain active. 6
. TEMPERATURE button: sets the temperature or the cold wash cycle (see Personalisation ).")
7 Temperature indicator light When a temperature value is selected, the corresponding indicator light will illuminate. Spin indicator light When a spin value is selected, the corresponding indicator light will illuminate. Control panel lock indicator light To activate the control panel lock, press and hold the button for approximately 2 seconds. When the indicator light is illuminated, the control panel is locked. This means it is possible to prevent wash cycles from being modified accidentally, especially where there are children in the home. To deactivate the control panel lock, press and hold the button for approximately 2 seconds. Lid locked indicator light If this indicator light is on, the appliance door is locked to prevent it from being opened accidentally; to avoid any damage, wait for the indicator light to switch off (it will take about three minutes) before you open the appliance door. N.B. If the DELAY TIMER function is activated, the door cannot be opened; pause the machine by pressing the START/ PAUSE button if you wish to open it.! If the START/PAUSE indicator light (orange) flashes rapidly at the same time as the function indicator light, this indicates a problem has occurred (see Troubleshooting ). How to open and to close the drum Fig. 1 Fig. 2 A) Opening (Fig. 1): Lift the external lid and open it completely. B) Opening the drum (Soft opening): With one finger, push the button indicated in fig. 2 and the drum will open delicately. C) Loading the washing machine (Fig. 3). D) Shutting (Fig. 4): - close the drum fully by first shutting the front door followed by the rear one; - then ensure the hooks on the front door are perfectly housed within the seat of the rear door; - after the hooks have clicked into position, press both doors lightly downwards to make sure they do not come loose; - finally shut the external lid. E) Drum End Stop (Fig. 2): Once the wash cycle has been completed, the drum will position itself with doors facing upward for ease pf opening. Starting a wash cycle 1. Turn the washing machine on by pressing the ON/OFF button. All the indicator lights will turn on for a few seconds, then only the indicator lights relative to the selected programme settings will remain lit and the START/ PAUSE indicator light will flash. 2. Load the laundry, close the door and the lid. 3. Set the WASH CYCLE knob to the desired programme. 4. Set the washing temperature (see Personalisation ). 5. Set the spin speed (see Personalisation ). 6. Measure out the detergent and washing additives (see Detergents and laundry ). 7. Select the desired functions. 8. Start the wash cycle by pressing the START/PAUSE button and the corresponding indicator light will remain lit in a fixed manner, in green. To cancel the set wash cycle, pause the machine by pressing the START/PAUSE button and select a new cycle. 9. At the end of the wash cycle the indicator light will switch on. The LID LOCKED indicator light will switch off, indicating that the door may be opened. Take out your laundry and leave the appliance door ajar to make sure the drum dries completely. Switch the washing machine off by pressing the ON/OFF button. GB Fig. 3 Fig. 4 7

8 Wash cycles GB Table of wash cycles Wash cycles Description of the wash cycle Max. temp. ( C) Max. speed (rpm) Prewash Detergents Bleach Wash Fabric softener Max. load (kg) Residual dampness% Energy consumptionkwh Total water lt Cycle duration 1 Cotton + Prewash: extremely soiled whites , Cotton Standard 60 (1): heavily soiled whites and resistant colours ,04 50,0 165 Cotton Standard 40 (2): lightly soiled resistant and delicate colours , Cotton Standard 20 : lightly soiled resistant and delicate colours Synthetics: heavily soiled resistant colours , Synthetics (3): lightly soiled resistant colours , Mix 30': to refresh lightly soiled garments quickly (not suitable for wool, silk and clothes which require washing by hand) , Mix 15': to refresh lightly soiled garments quickly (not suitable for wool, silk and clothes which require washing by hand) ,5 71 0, Sanitizing cycle: extremely soiled whites Goodnigt cycle: lightly soiled delicate colours Baby cycle: heavily soiled delicate colours Shirts Silk/Curtains: for garments in silk and viscose, lingerie Wool: for wool, cashmere, etc Rinse Spin Drain The length of cycle shown on the display or in this booklet is an estimation only and is calculated assuming standard working conditions. The actual duration can vary according to factors such as water temperature and pressure, the amount of detergent used, the amount and type of load inserted, load balancing and any wash options selected. 1) Test wash cycle in compliance with directive 1061/2010: set wash cycle with a temperature of 60 C. This cycle is designed for cotton loads with a normal soil level and is the most efficient in terms of both electricity and water consumption; it should be used for garments which can be washed at 60 C. The actual washing temperature may differ from the indicated value. 2) Test wash cycle in compliance with directive 1061/2010: set wash cycle with a temperature of 40 C. This cycle is designed for cotton loads with a normal soil level and is the most efficient in terms of both electricity and water consumption; it should be used for garments which can be washed at 40 C. The actual washing temperature may differ from the indicated value. For all Test Institutes: 2) Long wash cycle for cottons: set wash cycle with a temperature of 40 C. 3) Long wash cycle for synthetics: set wash cycle 5 with a temperature of 40 C. Cotton Standard 20 (wash cycle 4). Ideal for heavily soiled cotton loads. The effective performance levels achieved at cold temperatures, which are comparable to washing at 40, are guaranteed by a mechanical action which operates at varying speed, with repeated and frequent peaks. Mix 30 (wash cycle 6) this wash cycle was designed to wash lightly soiled garments quickly: it lasts just 30 minutes and therefore saves both energy and time. By selecting this wash cycle (6 at 30 C), it is possible to wash different fabrics together (except for wool and silk items), with a maximum load of 3 kg. Mix 15 (wash cycle 7) this wash cycle was designed to wash lightly soiled garments quickly: it lasts just 15 minutes and therefore saves both energy and time. By selecting this wash cycle (7 at 30 C), it is possible to wash different fabrics together (except for wool and silk items), with a maximum load of 1.5 kg. Sanitizing cycle (wash cycle 8). A high-temperature hygienic wash cycle (over 60 C) which requires the use of bleach. Pour the bleach, the detergent and the additives into the relevant compartments (see paragraph entitled Detergent dispenser drawer ). Goodnigt cycle (wash cycle 9). This is a silent cycle which can be run at night, when the electricity prices are lower. The wash cycle is designed for cottons and synthetics. At the end of the cycle the machine stops while there is still water in the drum; to spin and drain the laundry press the START/PAUSE button; alternatively the machine will perform the spin cycle and drain the water automatically after 8 hours. Baby cycle (wash cycle 10). This wash cycle can be used to remove the soiling typically caused by babies, while ensuring that all detergent is removed from nappies in order to prevent the delicate skin of babies from suffering allergies. The cycle has been designed to reduce the amount of bacteria by using a greater quantity of water and optimising the effect of special disinfecting additives added to the detergent. At the end of the wash cycle, the machine will slowly rotate the drum to prevent the formation of creases; to end the cycle press the START/PAUSE button. 8

9 Personalisation Setting the temperature By pressing the TEMPERATURE button to set the wash temperature (see Table of wash cycles). The temperature may be lowered, or even set to a cold wash ( ). The washing machine will automatically prevent you from selecting a temperature which is higher than the maximum value set for each wash cycle. GB Setting the spin speed By pressing the SPIN SPEED button to set the spin speed for the selected wash cycle. The maximum spin speeds available for each wash cycle are as follows: Wash cycles Maximum spin speed Cottons 1000 rpm Synthetics 800 rpm Wool 800 rpm Silk drain only The spin speed may be lowered, or the spin cycle can be excluded altogether by selecting the symbol. The washing machine will automatically prevent you from selecting a spin speed which is higher than the maximum speed set for each wash cycle. Functions The various wash functions available with this washing machine will help to achieve the desired results, every time. To activate the functions: 1. Press the button corresponding to the desired function; 2. the function is enabled when the corresponding indicator light is illuminated. Note: If the indicator light flashes rapidly, this signals that this particular function may not be selected in conjunction with the selected wash cycle. Delay timer To set a delayed start for the selected wash cycle, press the button repeatedly until the desired delay time is displayed (this may be between 1 hour and 24 hours). To disable the function press the button until the text is displayed. N.B. Once you have pressed the START/PAUSE button, the delay time may only be decreased if you wish to modify it.! This option is enabled with all programmes. Super Wash Because a greater quantity of water is used in the initial phase of the cycle, and because of the increased cycle duration, this function offers a high-performance wash.! This function may not be used in conjunction with wash cycles 1, 6, 7, 8, 12, 13,,. Extra rinse By selecting this function, the efficiency of the rinse is increased and optimal detergent removal is guaranteed. It is particularly useful for sensitive skin.! This function may not be used in conjunction with wash cycles 6, 7,,. Easy iron By selecting this function, the wash and spin cycles will be modified in order to reduce the formation of creases. At the end of the cycle the washing machine will perform slow rotations of the drum. For the 12 wash cycle, the machine will end the cycle while the laundry is soaking, the EASY IRON and START/PAUSE indicator lights will flash (orange) and the RINSE phase will remain lit in a fixed manner. To drain the water so that the laundry may be removed, press the START/PAUSE button or the EASY IRON button.! This function may not be used in conjunction with wash cycles 6, 7, 8, 9, 10, 13,,,. 9

10 Detergents and laundry GB Detergent dispenser drawer Good washing results also depend on the correct dose of detergent: adding too much detergent won t necessarily make for a more efficient wash, and may in fact cause build up on the interior of your appliance and even pollute the environment.! Use powder detergent for white cotton garments, for prewashing, and for washing at temperatures over 60 C.! Follow the instructions given on the detergent packaging. Open up the detergent dispenser and pour in the detergent and fabric softener, as follows. compartment 1: Detergent for pre-wash compartment 2: Detergent for the wash cycle (powder or liquid) It is recommended that you place liquid detergent directly into the compartment using the appropriate dosing cup. compartment 3: Additives (softener, etc.) When pouring the softener in compartment 3, avoid exceeding the max level indicated. The softener is added automatically into the machine during the last wash. At the end of the wash programme, some water will be left in compartment 3. This is used for the inlet of denser fabric softeners into the machine, i.e. to dilute the more concentrated softeners. Should more than a normal amount of water remain in compartment 3, this means the emptying device is blocked. For cleaning instructions, see Care and maintenance. compartment 4: Bleach Bleach cycle Bleaching may be performed in conjunction with wash cycle 8. Pour the bleach into compartment 4; pour the detergent and softener into the corresponding compartments, then select one of the abovementioned wash cycles. This option is recommended only for very soiled cotton garments. Preparing the laundry Divide the laundry according to: - the type of fabric/the symbol on the label - the colours: separate coloured garments from whites. Empty all garment pockets and check the buttons. Do not exceed the listed values, which refer to the weight of the laundry when dry: see Table of wash cycles. How much does your laundry weigh? 1 sheet g 1 pillow case g 1 tablecloth g 1 bathrobe g 1 towel g Garments requiring special care Shirts: use special wash cycle 11 to wash shirts in various fabrics and colours. It guarantees maximum care is taken of the garments and minimises the formation of creases. Silk: use special wash cycle 12 to wash all silk garments. We recommend the use of special detergent which has been designed to wash delicate clothes. Curtains: fold curtains and place them in a pillow case or mesh bag. Use wash cycle 12. Wool: The wool wash cycle on this Hotpoint-Ariston machine has been tested and approved by The Woolmark Company for washing wool garments labelled as hand washable provided that the garments are washed according to the instructions on the garment label and those issued by the manufacturer of this washing machine. Hotpoint-Ariston is the first washing machine brand to be approved by The Woolmark Company for Apparel Care- Platinum for its washing performance and consumption of energy and water. Load balancing system Before every spin cycle, to avoid excessive vibrations and to distribute the load in a uniform manner, the drum rotates continuously at a speed which is slightly greater than the washing rotation speed. If, after several attempts, the load is not balanced correctly, the machine spins at a reduced spin speed. If the load is excessively unbalanced, the washing machine performs the distribution process instead of spinning. To encourage improved load distribution and balance, we recommend small and large garments are mixed in the load. 10

11 Troubleshooting Your washing machine could fail to work. Before contacting the Technical Assistance Centre (see Assistance ), make sure that the problem cannot be solved easily using the following list. GB Problem: The washing machine does not switch on. The wash cycle does not start. The washing machine does not take in water (the indicator light for the first wash cycle stage flashes rapidly). The washing machine continuously takes in and drains water. The washing machine does not drain or spin. The washing machine vibrates a lot during the spin cycle. The washing machine leaks. The START/PAUSE indicator light (orange) and the function indicator lights flash rapidly. There is too much foam. Possible causes / Solutions: The appliance is not plugged into the socket fully, or is not making contact. There is no power in the house. The appliance Lid is not shut properly. The ON/OFF button has not been pressed. The START/PAUSE button has not been pressed. The water tap has not been opened. A delayed start has been set (see Personalisation ). The water inlet hose is not connected to the tap. The hose is bent. The water tap has not been opened. There is no water supply in the house. The pressure is too low. The START/PAUSE button has not been pressed. The drain hose is not fitted at a height between 65 and 100 cm from the floor (see Installation ). The free end of the hose is under water (see Installation ). The wall drainage system is not fitted with a breather pipe. If the problem persists even after these checks, turn off the water tap, switch the appliance off and contact the Assistance Service. If the dwelling is on one of the upper floors of a building, there may be problems relating to water drainage, causing the washing machine to fill with water and drain continuously. Special anti-draining valves are available in shops and help to avoid this inconvenience. The wash cycle does not include draining: some wash cycles require the drain phase to be started manually. The EASY IRON function has been activated: To complete the wash cycle, press the START/PAUSE button ( Personalisation ). The drain hose is bent (see Installation ). The drainage duct is clogged. The drum was not unlocked correctly during installation (see Installation ). The washing machine is not level (see Installation ). The washing machine is trapped between cabinets and walls (see Installation ). The water inlet hose is not screwed on properly (see Installation ). The detergent dispenser drawer is blocked (for cleaning instructions, see Care and maintenance ). The drain hose is not fixed properly (see Installation ). Switch off the machine and unplug it, wait for approximately 1 minute and then switch it back on again. If the problem persists, contact the Technical Assistance Service. The detergent is not suitable for machine washing (it should display the text for washing machines or hand and machine wash, or the like). Too much detergent was used. 11

12 Service GB Before calling for Assistance: Check whether you can solve the problem alone (see Troubleshooting ); Restart the programme to check whether the problem has been solved; If this is not the case, contact an authorised Technical Assistance Centre using the telephone number provided on the guarantee certificate.! Always request the assistance of authorised technicians. Have the following information to hand: the type of problem; the appliance model (Mod.); the serial number (S/N). This information can be found on the data plate situated on the rear of the washing machine. 12
; the serial number (S/N).")
13 ARTXF
14 !!!!! 14
15 cm! 15
16 16
17 !. 17
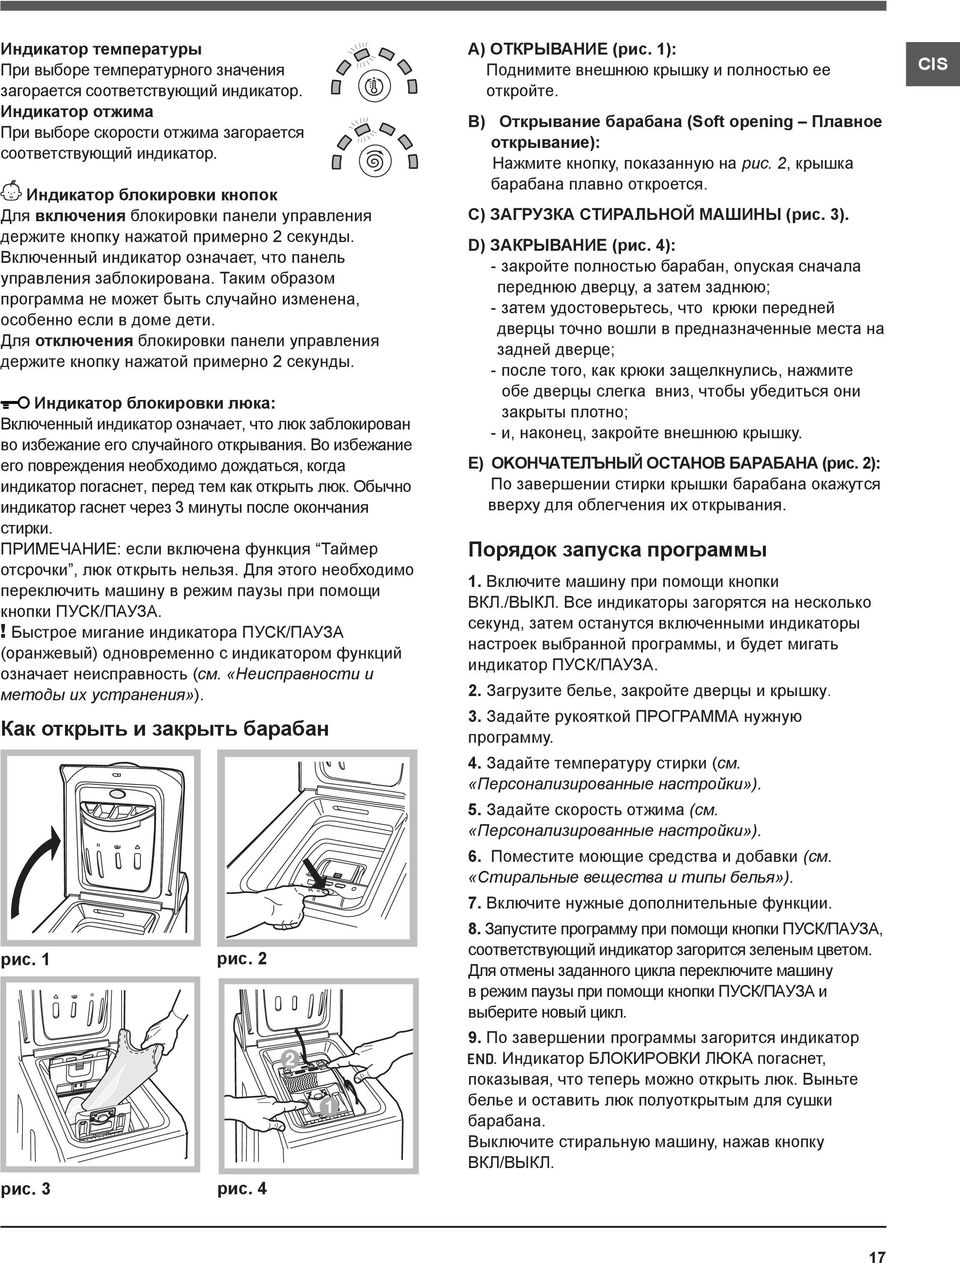
18 ÕËÎÏÎK (1): ñèëüíîçàãðÿçí ííîå áåëîå è ïðî íî îêðàøåííîå öâåòíîå áåëü ÕËÎÏÎK (2): î åíü ãðÿçíîå áåëîå è äåëèêàòíîå öâåòíîå áåëüå ÕËÎÏÎK: î åíü ãðÿçíîå áåëîå è äåëèêàòíîå öâåòíîå áåëüå , ÕËÎÏÎK (программа 4) белья стандартная программа идеально подходит для стирки х/б белья со средним загрязнением. Отличные результаты получаются также при стирке в холодной воде, сравнимые со стиркой при 40, обеспечиваются механическим действием с разной скоростью с повторяющимися частыми пиками. MИKС 30 (программа 6) предназначена для быстрой стирки слабозагрязненного белья цикл длится всего 30 минут, что позволяет сэкономить время и электроэнергию. По этой программе (6, 30 C) можно стирать вместе белье из разных тканей (за исключением шерсти и шелка) с максимальной загрузкой 3 кг. MИKС 15 (программа 7) предназначена для быстрой стирки слабозагрязненного белья цикл длится всего 15 минут, что позволяет сэкономить время и электроэнергию. По этой программе (7, 30 C) можно стирать вместе белье из разных тканей (за исключением шерсти и шелка) с максимальной загрузкой 1,5 кг. ЦИKЛ АНТИБАKТЕРИЯ (программа 8). Дезинфецирующая программа с высокой температурой, предусматривающая использование отбеливателя при температуре выше 60 C. Для отбеливания залейте отбеливатель, моющее средство и добавки в соответствующие ячейки (см параграф «Распределитель моющих средств»). НОЧНОЙ ЦИKЛ (программа 9). Это бесшумный цикл, который можно включить ночью, экономя электроэнергию. Данная программа расчитана на стирку синтетических и х/б вещей. По завершении цикла машина останавливается с водой в барабане; для слива и отжима нажмите кнопку START/PAUSE, в противном случае по прошествии 8 часов машина автоматически произведет слив воды и отжим. ДЕТСKОЕ БЕЛЬЕ (программа 10). Программа удаляет типичные загрязнения детской одежды, гарантируя удаление моющего средства из ткани во избежание аллергии чувствительной детской кожи. Данный цикл расчитан на сокращение количества бактерий благодаря использованию большего объема воды и оптимизируя воздействие специальных дезинфицирующих добавок старильного вещества. По завершении стирки машина продолжит медленно вращать барабан во избежание сминания белья. Для остановки цикла нажмите кнопку START/PAUSE 18
 белья стандартная программа идеально подходит для стирки х/б белья со средним загрязнением.")
19 !! 1, 6, 7, 8, 12, 13,,.! 6, 7,,. 2! 6, 7, 8, 9, 10, 13,,,. 19

20 8. Не превышайте значения, указанные в «Таблице программ», указывающие вес сухого белья Цикл стирки Шерсть» данной стиральной машины Hotpoint-Ariston прошел тестирование и был твержден Компанией Woolmark Company для стирки шерстяных изделий, классифицированных как «для ручной стирки» с тем, чтобы тирка выполнялась в соответствии с инсрукциями на этикетке вещи и инструкциями, прилагаемым изготовителем бытового электроприбора. Hotpoint-Ariston это первая марка стиральных машин, получившая от Woolmark Company сертификацию Woolmark Apparel Care - Platinum за качество стирки и за экономный расход воды и электроэнергии. 20

Instructions for use WASHING MACHINE. Contents WITE 87
 Instructions for use WASHING MACHINE GB English, 1 ES HU Magyar, 13 CZ Èeský, 25 Contents Installation, 2-3 Unpacking and levelling, 2 Electric and water connections, 2-3 The first wash cycle, 3 Technical
Instructions for use WASHING MACHINE. Contents ARSL 105
 Instructions for use WASHING MACHINE GB English,1 PL Polski,13 HU Magyar,25 Contents Installation, 2-3 Unpacking and levelling Connecting the electricity and water supplies The first wash cycle Technical
Instructions for use WASHING MACHINE. Contents XWSE 61253
 Instructions for use WASHING MACHINE Contents GB GB English,1 PL Polski,15 HU Magyar,29 Installation, 2-3 Unpacking and levelling Connecting the electricity and water supplies The first wash cycle Technical
KN-CP50. MANUAL (p. 2) Digital compass. ANLEITUNG (s. 4) Digitaler Kompass. GEBRUIKSAANWIJZING (p. 10) Digitaal kompas
 Digital compass. ANLEITUNG (s. 4) Digitaler Kompass. GEBRUIKSAANWIJZING (p. 10) Digitaal kompas") KN-CP50 MANUAL (p. ) Digital compass ANLEITUNG (s. 4) Digitaler Kompass MODE D EMPLOI (p. 7) Boussole numérique GEBRUIKSAANWIJZING (p. 0) Digitaal kompas MANUALE (p. ) Bussola digitale MANUAL DE USO (p.
KN-CP50 MANUAL (p. ) Digital compass ANLEITUNG (s. 4) Digitaler Kompass MODE D EMPLOI (p. 7) Boussole numérique GEBRUIKSAANWIJZING (p. 0) Digitaal kompas MANUALE (p. ) Bussola digitale MANUAL DE USO (p.
Instructions for use WASHING MACHINE. Contents XWSE 61253
 Instructions for use WASHING MACHINE Contents GB GB English,1 PL Polski,15 HU Magyar,29 Installation, 2-3 Unpacking and levelling Connecting the electricity and water supplies The first wash cycle Technical
Using the CW-Net in a user defined IP network
 Using the CW-Net in a user defined IP network Data transmission and device control through IP platform CW-Net Basically, CableWorld's CW-Net operates in the 10.123.13.xxx IP address range. User Defined
Instructions for use WASHER DRYER. Contents ARMXXD 1290
 Instructions for use WASHER DRYER! This symbol reminds you to read this instruction manual. GB GB HU PL English,1 Magyar,13 Polski,25 Contents I Italiano,37 Installation, 2-3 Unpacking and levelling Connecting
Instructions for use WASHER-DRYER. Contents WDD 9640
 Instructions for use WASHER-DRYER! This symbol reminds you to read this instruction manual. GB GB English,1 HU IT Italiano,37 HU Magyar,13 DE Deutsch,49 TR Türkçe,25 Contents Installation, 2-3 Unpacking
Instructions for use WASHER-DRYER. Contents WDD 9640
 Instructions for use WASHER-DRYER! This symbol reminds you to read this instruction manual. GB GB English,1 HU Magyar,13 TR Türkçe,25 Contents Installation, 2-3 Unpacking and levelling Connecting the electricity
Instrukcja obs³ugi AVTL 83 PRALKA. Spis treœci
 Instrukcja obs³ugi PRALKA PL Polski,1 HU Magyar, 13 Spis treœci Instalacja, 2-3 Rozpakowanie i wypoziomowanie, 2 Pod³¹czenie do sieci wodnej i elektrycznej, 2-3 Pierwszy cykl prania, 3 Dane techniczne,
Instructions for use WASHING MACHINE. Contents IWD 5145
 Instructions for use WASHING MACHINE English,1 IWD 5145 Magyar, 13 Contents Installation, 2-3 Unpacking and levelling Connecting the electricity and water supplies The first wash cycle Technical data Description
MINO V2 ÁLLVÁNY CSERÉJE V4-RE
 MINO V2 remote controlled MINO V2 ÁLLVÁNY CSERÉJE V4-RE Mino V3 circuit board replacement Mino V2-V4 csere készlet ezüst Art# 59348S, Mino V2-V4 csere készlet fehér Art# 59348W V4 áramköri lap Art# 75914
Instructions for use WASHER-DRYER. Contents WDD ! This symbol reminds you to read this instruction manual.
 Instructions for use WASHER-DRYER! This symbol reminds you to read this instruction manual. GB GB HU TR Contents English,1 HU IT Magyar,13 DE Türkçe,25 Installation, 2-3 Unpacking and levelling Connecting
Utasítások. Üzembe helyezés
 HASZNÁLATI ÚTMUTATÓ Üzembe helyezés Utasítások Windows XP / Vista / Windows 7 / Windows 8 rendszerben történő telepítéshez 1 Töltse le az AORUS makróalkalmazás telepítőjét az AORUS hivatalos webhelyéről.
EN United in diversity EN A8-0206/419. Amendment
 22.3.2019 A8-0206/419 419 Article 2 paragraph 4 point a point i (i) the identity of the road transport operator; (i) the identity of the road transport operator by means of its intra-community tax identification
MAKING MODERN LIVING POSSIBLE. Danfoss Heating Solutions
 MAKING MODERN LIVING POSSIBLE Danfoss Danfoss Link Link HC Hidronikus HC Hydronic szabályozó Controller Szerelési Installation útmutató Guide Danfoss Heating Solutions Szerelési útmutató Tartalomjegyzék
T Á J É K O Z T A T Ó. A 1108INT számú nyomtatvány a http://www.nav.gov.hu webcímen a Letöltések Nyomtatványkitöltő programok fülön érhető el.
 T Á J É K O Z T A T Ó A 1108INT számú nyomtatvány a http://www.nav.gov.hu webcímen a Letöltések Nyomtatványkitöltő programok fülön érhető el. A Nyomtatványkitöltő programok fület választva a megjelenő
Instructions for use WASHING MACHINE. Contents WITP 82 ES HU
 Instructions for use WASHING MACHINE GB English, 1 SK Slovenský, 37 ES ES HU Magyar, 13 RO Românã, 49 CZ Èeský, 25 ES PL Polski, 61 Contents Installation, 2-3 Unpacking and levelling, 2 Electric and water
Washing Machine User s Manual Mosógép Használati útmutató Pesumasin Kasutusjuhend
 WMB 71001 M+ Washing Machine User s Manual Mosógép Használati útmutató Pesumasin Kasutusjuhend Document Number 2820523922_EN / 11-03-14.(11:29) 1 Important instructions for safety and environment This
Cég név: Készítette: Telefon:
 Pozíció Darab Leírás 1 SCALA2 3-45 A Dátum: 218. 2. 9. Cikkszám: 98562862 Grundfos SCALA2 is a fully integrated, self-priming, compact waterworks for pressure boosting in domestic applications. SCALA2
Ültetési és öntözési javaslatok. Planting and watering instructions
 Ültetési és öntözési javaslatok Planting and watering instructions 1 Önöntöző-rendszer Sub-irrigation 2 Kedves növénykedvelő A LECHUZA önöntöző rendszerrel növényeink természetüknél fogva gyönyörű virágokat
Proxer 7 Manager szoftver felhasználói leírás
 Proxer 7 Manager szoftver felhasználói leírás A program az induláskor elkezdi keresni az eszközöket. Ha van olyan eszköz, amely virtuális billentyűzetként van beállítva, akkor azokat is kijelzi. Azokkal
Instructions for use WASHING MACHINE. Contents AVSF 88
 Instructions for use WASHING MACHINE GB English, 1 HU Magyar, 13 CZ Èeský, 25 Contents Installation, 2-3 Unpacking and levelling, 2 Electric and water connections, 2-3 The first wash cycle, 3 Technical
Contact us Toll free (800) fax (800)
 fax (800)") Table of Contents Thank you for purchasing our product, your business is greatly appreciated. If you have any questions, comments, or concerns with the product you received please contact the factory.
Table of Contents Thank you for purchasing our product, your business is greatly appreciated. If you have any questions, comments, or concerns with the product you received please contact the factory.
Washing Machine User s Manual Mosógép Használati útmutató
 Washing Machine User s Manual Mosógép Használati útmutató WMY 91443 LB1 Document Number 2820523926_EN / 30-09-14.(19:16) This product was manufactured using the latest technology in environmentally friendly
1.1. EGYETLEN KÉSZÜLÉK ÜZEMBE HELYEZÉSE... 124 1.2. KÉT KÉSZÜLÉK ÜZEMBE HELYEZÉSE... 124 2.1. BEKAPCSOLT/KÉSZENLÉTI ÁLLAPOT... 125
 TÁRGYMUTATÓ Fejezet 1: ÜZEMBE HELYEZÉS...124 1.1. EGYETLEN KÉSZÜLÉK ÜZEMBE HELYEZÉSE... 124 1.2. KÉT KÉSZÜLÉK ÜZEMBE HELYEZÉSE... 124 Fejezet 2: FUNKCIÓK...125 2.1. BEKAPCSOLT/KÉSZENLÉTI ÁLLAPOT... 125
WASHING MACHINE OWNER S MANUAL. www.lg.com
 OWNER S MANUAL WASHING MACHINE Before beginning installation, read these instructions carefully. This will simplify installation and ensure that the product is installed correctly and safely. Leave these
Lexington Public Schools 146 Maple Street Lexington, Massachusetts 02420
 146 Maple Street Lexington, Massachusetts 02420 Surplus Printing Equipment For Sale Key Dates/Times: Item Date Time Location Release of Bid 10/23/2014 11:00 a.m. http://lps.lexingtonma.org (under Quick
(Asking for permission) (-hatok/-hetek?; Szabad ni? Lehet ni?) Az engedélykérés kifejezésére a következő segédigéket használhatjuk: vagy vagy vagy
 (-hatok/-hetek?; Szabad ni? Lehet ni?) Az engedélykérés kifejezésére a következő segédigéket használhatjuk: vagy vagy vagy") (Asking for permission) (-hatok/-hetek?; Szabad ni? Lehet ni?) SEGÉDIGÉKKEL Az engedélykérés kifejezésére a következő segédigéket használhatjuk: vagy vagy vagy A fenti felsorolásban a magabiztosság/félénkség
(Asking for permission) (-hatok/-hetek?; Szabad ni? Lehet ni?) SEGÉDIGÉKKEL Az engedélykérés kifejezésére a következő segédigéket használhatjuk: vagy vagy vagy A fenti felsorolásban a magabiztosság/félénkség
4-42 ELECTRONICS WX210 - WX240
 4-42 ELECTRONICS WX210 - WX240 PCS 40000499-en Fig. 8 WX210 - WX240 ELECTRONICS 4-43 PCS COMPONENTS 40000471-en Load-limit regulator Legend Fig. 1 Fig. 2 1 Power supply 2 PWM1 output, proportional valve
Washing Machine User s Manual
 Washing Machine User s Manual WMY 81243 LMB2 EN HU Document Number= 2820523954_EN / 31-10-15.(9:43) This product was manufactured using the latest technology in environmentally friendly conditions. 1 Important
Cashback 2015 Deposit Promotion teljes szabályzat
 Cashback 2015 Deposit Promotion teljes szabályzat 1. Definitions 1. Definíciók: a) Account Client s trading account or any other accounts and/or registers maintained for Számla Az ügyfél kereskedési számlája
Dryer User manual Szárító Használati útmutató Džiovintuvo Naudotojo instrukcija DCU 7330 2960310372_KM/2808 14.1900
 Dryer User manual Szárító Használati útmutató Džiovintuvo Naudotojo instrukcija DCU 7330 2960310372_KM/2808 14.1900 Read this manual prior to initial operation of the product! Dear Customer, We hope that
WASHING MACHINE OWNER'S MANUAL
 OWNER'S MANUAL WASHING MACHINE Before beginning installation, read these instructions carefully. This will simplify installation and ensure that the product is installed correctly and safely. Leave these
Használati utasítás az OVC-WF1218 típusú vízszűréses porzsák nélküli háztartási porszívóhoz
 Használati utasítás az OVC-WF1218 típusú vízszűréses porzsák nélküli háztartási porszívóhoz Kérjük, figyelmesen olvassa el a használati utasítást. Biztonsági utasítások: A gépet csak 230V ~ 50Hz váltóáramra
INSTALLATION MANUAL For authorized service personnel only.
 Connection Method CHASSIS TYPE A AIR CONDITIONER OPTIONAL PARTS Communication box kit PART NO. 9317807005 INSTALLATION MANUAL For authorized service personnel only. 1. SAFETY PRES Contents 1. SAFETY PRES...
WASHING MACHINE OWNER'S MANUAL.
 OWNER'S MANUAL WASHING MACHINE Before beginning installation, read these instructions carefully. This will simplify installation and ensure that the product is installed correctly and safely. Leave these
Washing Machine User s Manual Mosógép Használati útmutató
 Washing Machine User s Manual Mosógép Használati útmutató WMY 71283 LMB3 Document Number 2820524357_EN/ 20-11-14.(19:02) This product was manufactured using the latest technology in environmentally friendly
NASODRILL ORRSPRAY: TARTÁLY- ÉS DOBOZFELIRAT, VALAMINT A BETEGTÁJÉKOZTATÓ SZÖVEGE. CSECSEMŐ GYERMEK FELNŐTT 100 ml-es üveg
 NASODRILL ORRSPRAY: TARTÁLY- ÉS DOBOZFELIRAT, VALAMINT A BETEGTÁJÉKOZTATÓ SZÖVEGE TARTÁLY - BOTTLE NASAL LAVAGE For chronic or recurring infection NASODRILL Formulated with thermal Luchon water naturally
Kezdőlap > Termékek > Szabályozó rendszerek > EASYLAB és TCU-LON-II szabályozó rendszer LABCONTROL > Érzékelő rendszerek > Típus DS-TRD-01
 Típus DS-TRD FOR EASYLAB FUME CUPBOARD CONTROLLERS Sash distance sensor for the variable, demand-based control of extract air flows in fume cupboards Sash distance measurement For fume cupboards with vertical
ANGOL NYELV KÖZÉPSZINT SZÓBELI VIZSGA I. VIZSGÁZTATÓI PÉLDÁNY
 ANGOL NYELV KÖZÉPSZINT SZÓBELI VIZSGA I. VIZSGÁZTATÓI PÉLDÁNY A feladatsor három részbol áll 1. A vizsgáztató társalgást kezdeményez a vizsgázóval. 2. A vizsgázó egy szituációs feladatban vesz részt a
későbbi használat esetére Őrizzük meg az útmutatót.
 4H01 típus későbbi használat esetére Őrizzük meg az útmutatót. A készüléket 8 év alatti gyermekek, valamint testi, mentális, érzékszervi fogyatékkal élő személyek, továbbá a kellő tapasztalattal, tudással
BKI13ATEX0030/1 EK-Típus Vizsgálati Tanúsítvány/ EC-Type Examination Certificate 1. kiegészítés / Amendment 1 MSZ EN 60079-31:2014
 (1) EK-TípusVizsgálati Tanúsítvány (2) A potenciálisan robbanásveszélyes környezetben történő alkalmazásra szánt berendezések, védelmi rendszerek 94/9/EK Direktíva / Equipment or Protective Systems Intended
Széchenyi István Egyetem www.sze.hu/~herno
 Oldal: 1/6 A feladat során megismerkedünk a C# és a LabVIEW összekapcsolásának egy lehetőségével, pontosabban nagyon egyszerű C#- ban írt kódból fordítunk DLL-t, amit meghívunk LabVIEW-ból. Az eljárás
Rezgésdiagnosztika. Diagnosztika 02 --- 1
 Rezgésdiagnosztika Diagnosztika 02 --- 1 Diagnosztika 02 --- 2 A rezgéskép elemzésével kimutatható gépészeti problémák Minden gép, mely tartalmaz forgó részt (pl. motor, generátor, szivattyú, ventilátor,
Zephyr használati utasítás
 Zephyr használati utasítás fontos óvintézkedések Ez a termék háztartási használatra készült. Elektromos termékek használatánál, különösen gyermekek jelenlétében, mindig be kell tartani a következő alapvető
3. MINTAFELADATSOR KÖZÉPSZINT. Az írásbeli vizsga időtartama: 30 perc. III. Hallott szöveg értése
 Oktatáskutató és Fejlesztő Intézet TÁMOP-3.1.1-11/1-2012-0001 XXI. századi közoktatás (fejlesztés, koordináció) II. szakasz ANGOL NYELV 3. MINTAFELADATSOR KÖZÉPSZINT Az írásbeli vizsga időtartama: 30 perc
USER MANUAL Guest user
 USER MANUAL Guest user 1 Welcome in Kutatótér (Researchroom) Top menu 1. Click on it and the left side menu will pop up 2. With the slider you can make left side menu visible 3. Font side: enlarging font
1. MINTAFELADATSOR KÖZÉPSZINT. Az írásbeli vizsga időtartama: 30 perc. III. Hallott szöveg értése
 Oktatáskutató és Fejlesztő Intézet TÁMOP-3.1.1-11/1-2012-0001 XXI. századi közoktatás (fejlesztés, koordináció) II. szakasz ANGOL NYELV 1. MINTAFELADATSOR KÖZÉPSZINT Az írásbeli vizsga időtartama: 30 perc
Csatlakozás a BME eduroam hálózatához Setting up the BUTE eduroam network
 Csatlakozás a BME eduroam hálózatához Setting up the BUTE eduroam network Table of Contents Windows 7... 2 Windows 8... 6 Windows Phone... 11 Android... 12 iphone... 14 Linux (Debian)... 20 Sebők Márton
English PATROL 24VDC SOROMPÓ HASZNÁLATI UTASÍTÁS
 English PATROL 24VDC SOROMPÓ HASZNÁLATI UTASÍTÁS English 3.3 Hand configuration changing As standard the system is supplied in right-hand configuration. To fit the barrier in the left-hand position, follow
Angol Középfokú Nyelvvizsgázók Bibliája: Nyelvtani összefoglalás, 30 kidolgozott szóbeli tétel, esszé és minta levelek + rendhagyó igék jelentéssel
 Angol Középfokú Nyelvvizsgázók Bibliája: Nyelvtani összefoglalás, 30 kidolgozott szóbeli tétel, esszé és minta levelek + rendhagyó igék jelentéssel Timea Farkas Click here if your download doesn"t start
Instructions for use WASHING MACHINE. Contents WITP 82 ES HU
 Instructions for use WASHING MACHINE GB English, 1 SK Slovenský, 37 ES ES HU Magyar, 13 RO Românã, 49 CZ Èeský, 25 ES PL Polski, 61 Contents Installation, 2-3 Unpacking and levelling, 2 Electric and water
Minta ANGOL NYELV KÖZÉPSZINT SZÓBELI VIZSGA II. Minta VIZSGÁZTATÓI PÉLDÁNY
 ANGOL NYELV KÖZÉPSZINT SZÓBELI VIZSGA II. A feladatsor három részből áll VIZSGÁZTATÓI PÉLDÁNY 1. A vizsgáztató társalgást kezdeményez a vizsgázóval. 2. A vizsgázó egy szituációs feladatban vesz részt a
You're reading an excerpt. Click here to read official SAMSUNG WF8700NDW user guide http://yourpdfguides.com/dref/4262032
 You can read the recommendations in the user guide, the technical guide or the installation guide for SAMSUNG WF8700NDW. You'll find the answers to all your questions on the SAMSUNG WF8700NDW in the user
MANUAL,OWNER S DRUM-EXPORT 1/1
 MFL69040451 RELEASING THIS DRAWING WITHOUT PERMISSION LG Electronics SHOULD BE ACCUSED ACCORDING TO THE LAWS AND COMPANY RULES. 이도면은 LG전자의자산으로불법유출시관계법과회사규정에의해처벌됨. WORK SEC. 가 BRAND 나 MODEL 다 P/NO. PRINTING
Construction of a cube given with its centre and a sideline
 Transformation of a plane of projection Construction of a cube given with its centre and a sideline Exercise. Given the center O and a sideline e of a cube, where e is a vertical line. Construct the projections
EL-ES03HQ. English Deutsch Français Nederlands Italiano Español Magyar Suomi Svenska Česky Română Ελληνικά. MANUAL (p. 2) TV SMART POWER SAVER
 TV SMART POWER SAVER") MANUAL (p. 2) TV SMART POWER SAVER MODE D EMPLOI (p. 8) Economiseur d énergie intelligent pour TV MANUALE (p. 14) RISPARMIATORE DI ENERGIA PER TV HASZNÁLATI ÚTMUTATÓ (o. 20.) INTELLIGENS TV ENERGIAMEGTAKARÍTÓ
MANUAL (p. 2) TV SMART POWER SAVER MODE D EMPLOI (p. 8) Economiseur d énergie intelligent pour TV MANUALE (p. 14) RISPARMIATORE DI ENERGIA PER TV HASZNÁLATI ÚTMUTATÓ (o. 20.) INTELLIGENS TV ENERGIAMEGTAKARÍTÓ
(NGB_TA024_1) MÉRÉSI JEGYZŐKÖNYV
 MÉRÉSI JEGYZŐKÖNYV") Kommunikációs rendszerek programozása (NGB_TA024_1) MÉRÉSI JEGYZŐKÖNYV (5. mérés) SIP telefonközpont készítése Trixbox-szal 1 Mérés helye: Széchenyi István Egyetem, L-1/7 laboratórium, 9026 Győr, Egyetem
Kommunikációs rendszerek programozása (NGB_TA024_1) MÉRÉSI JEGYZŐKÖNYV (5. mérés) SIP telefonközpont készítése Trixbox-szal 1 Mérés helye: Széchenyi István Egyetem, L-1/7 laboratórium, 9026 Győr, Egyetem
1. Gyakorlat: Telepítés: Windows Server 2008 R2 Enterprise, Core, Windows 7
 1. Gyakorlat: Telepítés: Windows Server 2008 R2 Enterprise, Core, Windows 7 1.1. Új virtuális gép és Windows Server 2008 R2 Enterprise alap lemez létrehozása 1.2. A differenciális lemezek és a két új virtuális
REMOTE RADAR DETECTOR (connectable to GPS DETECTOR device.) BEÉPÍTHETŐ RADARDETEKTOR (GPS DETECTOR készülékhez) USER MANUAL / HASZNÁLATI ÚTMUTATÓ
 BEÉPÍTHETŐ RADARDETEKTOR (GPS DETECTOR készülékhez) USER MANUAL / HASZNÁLATI ÚTMUTATÓ") REMOTE RADAR DETECTOR (connectable to GPS DETECTOR device.) BEÉPÍTHETŐ RADARDETEKTOR (GPS DETECTOR készülékhez) USER MANUAL / HASZNÁLATI ÚTMUTATÓ 1 REMOTE RADAR DETECTOR (connectable to GPS DETECTOR device.)
REMOTE RADAR DETECTOR (connectable to GPS DETECTOR device.) BEÉPÍTHETŐ RADARDETEKTOR (GPS DETECTOR készülékhez) USER MANUAL / HASZNÁLATI ÚTMUTATÓ 1 REMOTE RADAR DETECTOR (connectable to GPS DETECTOR device.)
Használati útmutató HANDELSINFORMATIONEN FÜR DEN KUNDEN COMMERCIËLE INFORMATIES VOOR DE KLANT SLT955 SLT955. ökocímke
 INFORMAZIONI COMMERCIALI PER I CONSUMATORI COMMERCIAL INFORMATION FOR THE CONSUMER INFORMATIONS COMMERCIALES POUR LE CLIENT INFORMACIONES COMERCIALES PARA EL CLIENTE Használati útmutató HANDELSINFORMATIONEN
MP3-FMTRANS50. MANUAL (p. 2) CAR MP3 FM+BLUETOOTH TRANSMITTER INCL. REMOTE CONTROL. ANLEITUNG (s. 4) AUTO MP3 FM+BT TRANSMITTER INKL.
 CAR MP3 FM+BLUETOOTH TRANSMITTER INCL. REMOTE CONTROL. ANLEITUNG (s. 4) AUTO MP3 FM+BT TRANSMITTER INKL.") MP3-FMTRANS50 MANUAL (p. 2) CAR MP3 FM+BLUETOOTH TRANSMITTER INCL. REMOTE CONTROL ANLEITUNG (s. 4) AUTO MP3 FM+BT TRANSMITTER INKL. FB MODE D EMPLOI (p. 6) Transmetteur MP3, FM + Bluetooth avec télécommande
MP3-FMTRANS50 MANUAL (p. 2) CAR MP3 FM+BLUETOOTH TRANSMITTER INCL. REMOTE CONTROL ANLEITUNG (s. 4) AUTO MP3 FM+BT TRANSMITTER INKL. FB MODE D EMPLOI (p. 6) Transmetteur MP3, FM + Bluetooth avec télécommande
ANGOL NYELVI SZINTFELMÉRŐ 2013 A CSOPORT. on of for from in by with up to at
 ANGOL NYELVI SZINTFELMÉRŐ 2013 A CSOPORT A feladatok megoldására 45 perc áll rendelkezésedre, melyből körülbelül 10-15 percet érdemes a levélírási feladatra szánnod. Sok sikert! 1. Válaszd ki a helyes
2. Local communities involved in landscape architecture in Óbuda
 Év Tájépítésze pályázat - Wallner Krisztina 2. Közösségi tervezés Óbudán Óbuda jelmondata: Közösséget építünk, ennek megfelelően a formálódó helyi közösségeket bevonva fejlesztik a közterületeket. Békásmegyer-Ófaluban
FAMILY STRUCTURES THROUGH THE LIFE CYCLE
 FAMILY STRUCTURES THROUGH THE LIFE CYCLE István Harcsa Judit Monostori A magyar társadalom 2012-ben: trendek és perspektívák EU összehasonlításban Budapest, 2012 november 22-23 Introduction Factors which
STUDENT LOGBOOK. 1 week general practice course for the 6 th year medical students SEMMELWEIS EGYETEM. Name of the student:
 STUDENT LOGBOOK 1 week general practice course for the 6 th year medical students Name of the student: Dates of the practice course: Name of the tutor: Address of the family practice: Tel: Please read
Miskolci Egyetem Gazdaságtudományi Kar Üzleti Információgazdálkodási és Módszertani Intézet. Hypothesis Testing. Petra Petrovics.
 Hypothesis Testing Petra Petrovics PhD Student Inference from the Sample to the Population Estimation Hypothesis Testing Estimation: how can we determine the value of an unknown parameter of a population
ANGOL NYELV KÖZÉPSZINT SZÓBELI VIZSGA I. VIZSGÁZTATÓI PÉLDÁNY
 ANGOL NYELV KÖZÉPSZINT SZÓBELI VIZSGA I. VIZSGÁZTATÓI PÉLDÁNY A feladatsor három részből áll 1. A vizsgáztató társalgást kezdeményez a vizsgázóval. 2. A vizsgázó egy szituációs feladatban vesz részt a
INSTRUCTION OF USE HASZNÁLATI UTASÍTÁS MANUALE D'USO
 INSTRUCTION OF USE HASZNÁLATI UTASÍTÁS MANUALE D'USO 105095101 105095104 105095101 105095104 Tisztelt Vásárló! Köszönjük, hogy az indukciós főzőlapunkat választotta. Annak érdekében, hogy a lehető legjobban
Hogyan használja az OROS online pótalkatrész jegyzéket?
 Hogyan használja az OROS online pótalkatrész jegyzéket? Program indítása/program starts up Válassza ki a weblap nyelvét/choose the language of the webpage Látogasson el az oros.hu weboldalra, majd klikkeljen
WATER PRESSURE minimum 5 N/cm² (0,5 kg/cm 2 ) maximum 80 N/cm² (8 kg/cm 2 )
 maximum 80 N/cm² (8 kg/cm 2 )") INSTRUCTION BOOK - HASZNÁLATI KÉZIKÖNYV - NÁVODOVÁ PØÍRUÈKA WASHING MACHINE MOSÓGÉP PRAÈKA TL 522 C TECHNICAL INFORMATION DIMENSIONS Height with panel 895 mm Height without panel 850 mm width 397 mm depth
INSTRUCTION BOOK - HASZNÁLATI KÉZIKÖNYV - NÁVODOVÁ PØÍRUÈKA WASHING MACHINE MOSÓGÉP PRAÈKA TL 522 C TECHNICAL INFORMATION DIMENSIONS Height with panel 895 mm Height without panel 850 mm width 397 mm depth
ENROLLMENT FORM / BEIRATKOZÁSI ADATLAP
 ENROLLMENT FORM / BEIRATKOZÁSI ADATLAP CHILD S DATA / GYERMEK ADATAI PLEASE FILL IN THIS INFORMATION WITH DATA BASED ON OFFICIAL DOCUMENTS / KÉRJÜK, TÖLTSE KI A HIVATALOS DOKUMENTUMOKBAN SZEREPLŐ ADATOK
A katalógusban szereplő adatok változásának jogát fenntartjuk. 2015. 02-es kiadás
 RUGÓKATALÓGUS A Biotek Kft. több mint 20 év tudásával és tapasztalatával valamint kiváló minőségű rögzítéstechnikai és gépépítő elemek nagy választékával kínál megoldásokat termékek tervezéséhez és gyártásához.
LIBRETTO ISTRUZIONI. Használati útmutató INSTRUCTIONS BOOKLET BEDIENUNGSSANLEITUNG LIVRET D INSTRUCTIONS INSTRUKCJE OBSŁUGI
 Cod. 110030291 (CIELO / AURA) LIBRETTO ISTRUZIONI Használati útmutató INSTRUCTIONS BOOKLET BEDIENUNGSSANLEITUNG LIVRET D INSTRUCTIONS INSTRUKCJE OBSŁUGI Ed. 2014 Italiano English Deutsch Français Español
bladeless AR5T90RE ToWER FAn instruction MAnuAl AR5T90RE 220-240V / 50Hz / 45W 220-240v~50Hz 45W
 bladeless AR5T90RE ToWER FAn lapátkerék nélküli instruction MAnuAl torony ventilátor AR5T90RE 220-240V / 50Hz / 45W 220-240v~50Hz 45W PAge 1/7 A jelölt készülék összeszerelését, beüzemelését, használatát
7 th Iron Smelting Symposium 2010, Holland
 7 th Iron Smelting Symposium 2010, Holland Október 13-17 között került megrendezésre a Hollandiai Alphen aan den Rijn városában található Archeon Skanzenben a 7. Vasolvasztó Szimpózium. Az öt napos rendezvényen
LIBRETTO ISTRUZIONI. Használati útmutató
 Italiano English Deutsch Français Español Português LIBRETTO ISTRUZIONI на русском языке Cod. 110030252 (CAPPE AD ISOLA) Használati útmutató INSTRUCTIONS BOOKLET BEDIENUNGSSANLEITUNG Sziget páraelszívókhoz
Supporting Information
 Supporting Information Cell-free GFP simulations Cell-free simulations of degfp production were consistent with experimental measurements (Fig. S1). Dual emmission GFP was produced under a P70a promoter
HU) FIGYELMEZTETÉS! EN) WARNING!
 FIGYELMEZTETÉS! EN) WARNING!") OJ u C nice HU) FIGYELMEZTETÉS! Gondosan olvassa el és pontosan kövesse ezeket az utasításokat, és tartsa meg, hogy a jövőben is használhassa. A telepítést "szakember" módjára, szigorúan a telepítési utasításokat
OJ u C nice HU) FIGYELMEZTETÉS! Gondosan olvassa el és pontosan kövesse ezeket az utasításokat, és tartsa meg, hogy a jövőben is használhassa. A telepítést "szakember" módjára, szigorúan a telepítési utasításokat
Madách Trade Center Bt. 1075 Budapest, Madách I. út 13-14. T (+36 1) 268 1900, (+36 1) 268 1901 F (+36 1) 269 6684 www.madachtrade.
 268 1900, (+36 1) 268 1901 F (+36 1) 269 6684 www.madachtrade.") Madách Trade Center Bt. 1075 Budapest, Madách I. út 13-14. T (+36 1) 268 1900, (+36 1) 268 1901 F (+36 1) 269 6684 www.madachtrade.hu info@madachtrade.hu bemutatkozás Bemutatkozás A Madách Trade Center
Madách Trade Center Bt. 1075 Budapest, Madách I. út 13-14. T (+36 1) 268 1900, (+36 1) 268 1901 F (+36 1) 269 6684 www.madachtrade.hu info@madachtrade.hu bemutatkozás Bemutatkozás A Madách Trade Center
Szundikáló macska Sleeping kitty
 Model: Peter Budai 999. Diagrams: Peter Budai 999.. Oda-visszahajtás átlósan. Fold and unfold diagonally. 2. Behajtunk középre. Fold to the center. 3. Oda-visszahajtások derékszögben. Fold and unfold at
EN United in diversity EN A8-0206/482. Amendment
 21.3.2019 A8-0206/482 482 Recital 13 g (new) (13g) In recognition of the need for specific treatment for the transport sector, in which movement is the very essence of the work undertaken by drivers, the
Modell típus: ISA60VFR. termékkód: 43056
 Modell típus: ISA60VFR termékkód: 43056 Általános jegyzet Technikai Dokumentáció irányelvei ----------------------------------------------------------------------------------------------------------------------------------
HAMBURG Használati útmutató Vezérlőmodul UKSM 24VDC Cikkszám: 260.033
 HABURG Használati útmutató Vezérlőmodul UKS 24VDC Cikkszám: 260.033 Brandschutz-Technik und Rauchabzug GmbH Schnackenburgallee 41d D-22525 Hamburg Germany +49 40 89 71 20-0 Fax: +49 40 89 71 20-20 Internet:
TRENDnetVIEW Pro szoftvert. ŸGyors telepítési útmutató (1)
") TRENDnetVIEW Pro szoftvert ŸGyors telepítési útmutató (1) TRENDnetVIEW Pro/05.29.2014 Tartalomjegyzék TRENDnetVIEW Pro Management Software követelmények... 13 TRENDnetVIEW Pro Telepítése... 14 Videokamerák
TRENDnetVIEW Pro szoftvert ŸGyors telepítési útmutató (1) TRENDnetVIEW Pro/05.29.2014 Tartalomjegyzék TRENDnetVIEW Pro Management Software követelmények... 13 TRENDnetVIEW Pro Telepítése... 14 Videokamerák
OLYMPICS! SUMMER CAMP
 OLYMPICS! SUMMER CAMP YOUNG BUSINESS CAMP 3D DESIGN CAMP OLYMPICS SUMMER CAMP 20 24 JUNE AND 27 JUNE 1 JULY AGE: 6-14 Our ESB native-speaking teachers will provide a strong English learning content throughout
EN DISHWASHER HU MOSOGATÓGÉP ESF6535LOX ESF6535LOW USER MANUAL HASZNÁLATI ÚTMUTATÓ
 ESF6535LOX ESF6535LOW EN DISHWASHER HU MOSOGATÓGÉP USER MANUAL HASZNÁLATI ÚTMUTATÓ 2 19 2 CONTENTS 1. SAFETY INFORMATION... 3 2. SAFETY INSTRUCTIONS...4 3. PRODUCT DESCRIPTION... 5 4. CONTROL PANEL...
www.mosogepszerviz.info
 SQG_WM_500_GB Motor driving triac short-circuited FAULT 01 Check for water leaks that may affect connector J9. Check the motor terminal board (possible problems due to chemical residues, like grease, which
Tavaszi Sporttábor / Spring Sports Camp. 2016. május 27 29. (péntek vasárnap) 27 29 May 2016 (Friday Sunday)
 27 29 May 2016 (Friday Sunday)") Tavaszi Sporttábor / Spring Sports Camp 2016. május 27 29. (péntek vasárnap) 27 29 May 2016 (Friday Sunday) SZÁLLÁS / ACCOMODDATION on a Hotel Gellért*** szálloda 2 ágyas szobáiban, vagy 2x2 ágyas hostel
Tavaszi Sporttábor / Spring Sports Camp 2016. május 27 29. (péntek vasárnap) 27 29 May 2016 (Friday Sunday) SZÁLLÁS / ACCOMODDATION on a Hotel Gellért*** szálloda 2 ágyas szobáiban, vagy 2x2 ágyas hostel
Felhívás. érted is amit olvasol? (Apostolok Cselekedetei 8:30)
") Felhívás Valamennyi Tiszáninneni református általános iskola és a miskolci egyházi iskolák 7-8. osztályosai részére meghirdetett Biblia-értő angol nyelvi versenyen való részvételre. érted is amit olvasol?
Felhívás Valamennyi Tiszáninneni református általános iskola és a miskolci egyházi iskolák 7-8. osztályosai részére meghirdetett Biblia-értő angol nyelvi versenyen való részvételre. érted is amit olvasol?
Travel Getting Around
 - Location I am lost. Not knowing where you are Can you show me where it is on the map? Asking for a specific location on a map Where can I find? Asking for a specific Eltévedtem. Meg tudná nekem mutatni
A vitorlázás versenyszabályai a 2013-2016. évekre angol-magyar nyelvű kiadásának változási és hibajegyzéke
 A vitorlázás versenyszabályai a 2013-2016. évekre angol-magyar nyelvű kiadásának változási és hibajegyzéke A dokumentum A vitorlázás versenyszabályai a 2013-2016. évekre angol-magyar nyelvű kiadásában
First experiences with Gd fuel assemblies in. Tamás Parkó, Botond Beliczai AER Symposium 2009.09.21 25.
 First experiences with Gd fuel assemblies in the Paks NPP Tams Parkó, Botond Beliczai AER Symposium 2009.09.21 25. Introduction From 2006 we increased the heat power of our units by 8% For reaching this
Emelt szint SZÓBELI VIZSGA VIZSGÁZTATÓI PÉLDÁNY VIZSGÁZTATÓI. (A részfeladat tanulmányozására a vizsgázónak fél perc áll a rendelkezésére.
 Emelt szint SZÓBELI VIZSGA VIZSGÁZTATÓI PÉLDÁNY VIZSGÁZTATÓI PÉLDÁNY A feladatsor három részből áll 1. A vizsgáztató társalgást kezdeményez a vizsgázóval. 2. A vizsgázó egy vita feladatban vesz részt a
INTELLIGENT ENERGY EUROPE PROGRAMME BUILD UP SKILLS TRAINBUD. Quality label system
 INTELLIGENT ENERGY EUROPE PROGRAMME BUILD UP SKILLS TRAINBUD WP4: Deliverable 4.5 Development of voluntary qualification system Quality label system 1 INTELLIGENT ENERGY EUROPE PROGRAMME BUILD UP SKILLS
EN United in diversity EN A8-0206/445. Amendment
 21.3.2019 A8-0206/445 445 Title Proposal for a DIRECTIVE OF THE EUROPEAN PARLIAMENT AND OF THE COUNCIL amending Directive 2006/22/EC as regards enforcement requirements and laying down specific rules with
Személyes adatváltoztatási formanyomtatvány- Magyarország / Personal Data Change Form - Hungary
 Személyes adatváltoztatási formanyomtatvány- Magyarország / Personal Data Change Form - Hungary KITÖLTÉSI ÚTMUTATÓ: A formanyomtatványon a munkavállaló a személyes adatainak módosítását kezdeményezheti.
82. FELADATLAP 3 feladat 3 szinten
 82. FELADATLAP 3 feladat 3 szinten BEGINNER Egy kis nyelvtan mindenkinek kell! Sok tanuló azért akad el, akár már az elején, mert az angol nyelvtan összeakad a magyar nyelvtannal. Na nem feltétlen a különbségeket
A KÉSZÜLÉK HASZNÁLATA ELŐTT 2 KÖRNYEZETVÉDELEM 2 ÁLTALÁNOS TANÁCSOK ÉS ÓVINTÉZKEDÉSEK 3 A HŰTŐTÉR HASZNÁLATA 4 A FAGYASZTÓTÉR HASZNÁLATA 5
 HASZNÁLATI ÚTMUTATÓ A KÉSZÜLÉK HASZNÁLATA ELŐTT 2 KÖRNYEZETVÉDELEM 2 ÁLTALÁNOS TANÁCSOK ÉS ÓVINTÉZKEDÉSEK 3 A HŰTŐTÉR HASZNÁLATA 4 A FAGYASZTÓTÉR HASZNÁLATA 5 A FAGYASZTÓTÉR LEOLVASZTÁSA 7 A HŰTŐTÉR TISZTÍTÁSA